Badsprout
Active Member
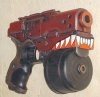
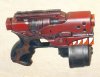
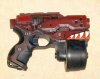
View attachment 296712View attachment 296713View attachment 296714View attachment 296715
My first steampunk Nerf Gun. It's a Hammerstrike with loads of bits glued on. I made it in the same class as the three guys above me.
Nice work, all three of you. I can't imagine any college in the UK allowing their students to make anything like this! Is that a Maverick slide I see there?