- NOW WITH CORRECTED PHOTOS! -
Hello.
Thanks for checking this out.
I'd like to start off by saying thanks again to Ed Maggiani (ed-209) and Steve Dimszo for constructing this saber initially.
The first time I saw the Yoda Saber (YS), I felt that it was right at home amongst the OT sabers, probably because it was "cobbled together" in the same manner and same spirit as those first SW sabers and so the YS became a saber I needed to have. ed-209 has also been very helpful in furnishing photos, measurements, and insight into the making of the original YS and I am grateful for his willingness and involvement.
I'd also like to thank scottjua, sjanish, and spoudastis for most of these pieces that I am using/destroying to bring this saber to completion.
Finally, I'd can never forget to thank my rotary tool.

I love you, rotary tool.
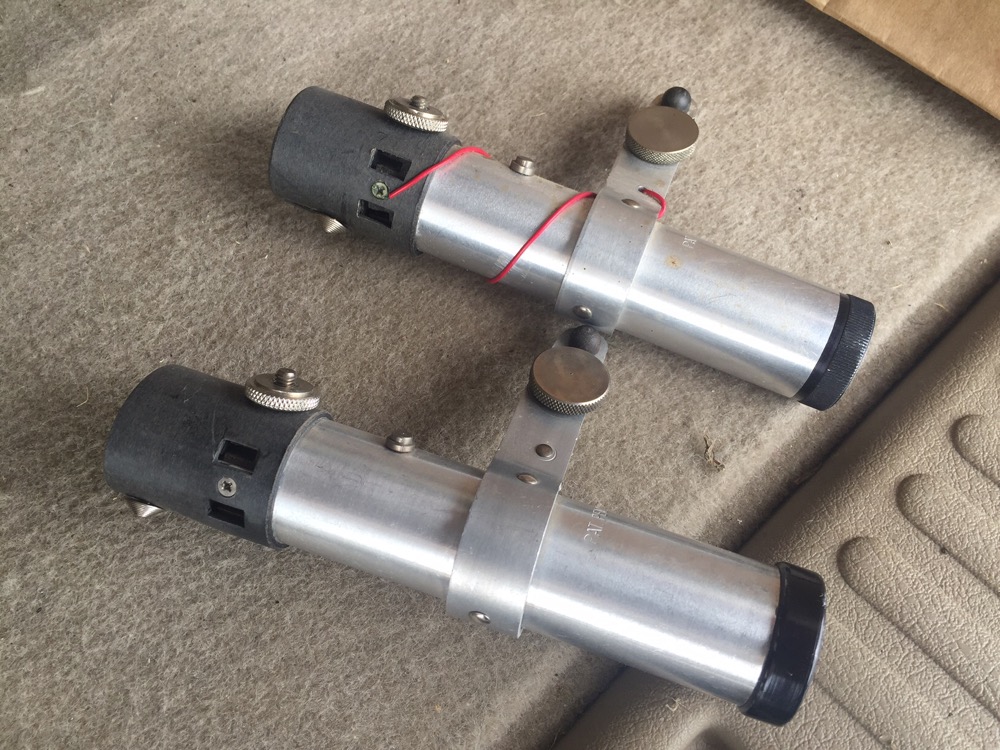
To begin, I have two full flahsguns: an incorrect Praco and a Bolsey 2.
These two flashes are very similar with only a few minor yet unacceptable differences:
1. The Bolsey has a small side nut (sounds dangerous) which the Praco does not have
2. The Bolsey has a sliding thumb knob in its black sheath (that becomes the center band on the YS)
Noticeable issues and features of the native Praco I am using are:
1. Although having a correctly knurled end cap, it is black whereas the YS has a raw silver metal coloring.
2. The black sheath that becomes the center band has more holes in it which are located in the correct areas than those already in the Bolsey.
3. The Praco also appears to be made of a higher quality material (the tube part...I think it may be stainless steel), or at the very least, the machining done to the tube or the forming of the tube makes the finish of the Praco appear more smooth and soft (if that makes any sense at all) than the finish of the Bolsey 2, so I am using the Praco tube as the base for the entire YS.
In any case, neither of these two flashes are perfectly accurate for recreating the YS, so I am having to make a Praco/Bolsey mashup with them.
The first thing is to remove the black sheath from the Praco that becomes the midband for the YS.
As I am using a slightly incorrect variant of the Praco, it has two holes that need to be filled (as well as a small square section on its edge that must also be cut out and removed later). I begin by filling these two small holes with my trusty Elmer's woodfiller (I will explain my choice of using woodfiller in a minute):

I use just the tiniest bit to fill the two small screw holes in the midband that originally held a clunky head piece on the Praco flash:

To do this, I wrap the midband in masking tape to cover the holes from the outside. I then squirt the woodfiller into the holes from inside the midband. After 24 hours, I remove the masking tape and then sand the inside and the outside of the midband to remove any excess woodfiller. Being that these two holes are so small, it is difficult to ensure the holes are well-filled with woodfiller without having air bubbles trapped in it that could essentially occupy the entire cavity. In fact, during my first attempt, a small air pocket was in fact visible in one of the filled holes. To overcome this, I dabbed woodfiller into the hole from the outside:

Once the woodfiller had dried, I sanded the outside of the midband again. You may notice that I filled the hole at the bottom as well... disregard this as this hole will be gone once I cut out the square section from the midband.
In prepping this piece for adding the oil pan and for priming/painting, I noticed that some of the edges where holes were cut (from the factory by the manufacturer) have stray bits of fibrous material hanging off as you can see in the square hole here:

To remove these edge fibers, I used one of my very small files. It is this fibrous makeup of the midband, which may not have been apparent in most of these earlier photos but now made evident by these edge imperfections which led me to choose woodfiller as opposed to epoxy or something else:

Next, I need to remove the inner black assembly that the emitter shroud is attached to:

You can see in this photo the assembly has a piece of folded metal attached to its center by a domed brass flat head screw. This is where the Lamborghini model wheel goes so this metal piece needs to be removed:

To remove the entire black interior assembly (and the emitter shroud that is attached to it) the tiny screw at the bottom of the previous photo must be removed.
Also notice the black assembly sits fairly flush with the tube’s rim/edge on my Praco. When comparing this characteristic to this photo of the real YS, the black assembly on the real YS actually sticks out a bit beyond the rim/edge of the flash tube:

(image courtesy of ed-209)
To correct this on my YS, it is important to understand how that inner black assembly is comprised. It is actually made of three parts:
1. The lower section which looks like it would accept a typical 2-pronged US electrical plug
2. A flat black disc that sits on top of Part 1
3. A brass threaded tube the goes from below part 1 and up through it. This piece is what the domed flathead screw (that secured the Lambo wheel) threads into.
The black assemblies of both the Praco I'm using and the Bolsey 2 are put together in exactly the same way. My solution for getting the black assembly on my YS to be extended just past the lip of the flashtube is to take the black discs (Part 2 mentioned above) from both my Praco and my Bolsey 2 and stack them on top of each other and then set them together on top of Part 1 from the Praco:

Luckily, the domed screw has a long threaded section for being such a small screw overall.
This solution presents a new issue: the long vertical cutout sections of Part 1 is now capped by the Part 2 disc that is twice as thick as normal.
To remedy this, I glued the Bolsey 2 disc to the top of Part 1 of the Praco. Once dried, I cut notches out of the Bolsey Part 2 disc where the vertical cutouts of Part 1 are located. This gives the appearance that the extended upper portion of these Part 1 holes are actually just the original holes of the Part 1 once the Praco Part 2 disc is laid on top of it all. Here are some photos of the process:

Here is the gluing and the clamping to make it all seem like one Praco Part 1 and Bolsey Part 2 are all the same piece once the glue cures.

Here are the parts glued together with the notches cut out. At this time, I cut a tiny section from the hole on the left to match a small cut/rut in the original YS (as it is currently).

Here is the entire assembly with the Praco Part 2 disc sitting back on top, and with the brass domed screw going through it. At the bottom of this image, you can also see the bottom of Part 3 of the assembly.
Once the glue cured I sanded the entire outer circumference of the assembly and gave it a test fitting back in the Praco flashtube:

FULL DISCLOSURE: I inserted the wrong photo here. This photo is from the test fitting before any gluing or cutting had taken place as it appears the correct photo has been lost. You should still be able to get the same general idea of how the elevation caused by the second top disc matches the extended black assembly of the real YS however.
While that whole last step was going on (waiting for the glue to dry), I took sjanish's oilpan and cut the pour spout off of it, sanded the underside by wrapping a very fine grit sandpaper around the black midband and then I slid the oil pan side to side on the sandpaper. This was a surprisingly issueless exercise and left a very smooth finish while removing any flashing from the oilpan's edges.
I decided that the best approach to complete the oilpan portion of the midband is to attach the oilpan before priming/painting.
In order to decide exactly where on the midband the oilpan is supposed to go I consulted this photo of the real YS:

(photo courtesy of ed-209)
I glue the oilpan onto my midband:

There. I think it is pretty close.
Finally, I decide to cut up that Bolsey 2 in order to get the weird metal side nut "button" off it in order to place it on my Praco. I need that nut/button in place on the Praco to be able to understand where to cut the square out of the midband:

Having removed a couple of beer tab rivets from Graflexes before, I thought the best way to remove this "button" would be from the inside.
Of course, both the Praco and the Bolsey 2 are small flashguns thus my rotary tool will not fit all the way up inside the tube of the Bolsey 2. To release the metal nut/button, I improvise access:

And I now have the button ready to go onto the Praco.
Next step is cutting the grips, and then priming and painting.
EDIT: The next piece mentioned (I call it the Mikuni Main Air Jet) is actually a part that is included on a correct Praco flash, and even on some incorrect Praco variants. I believe I even heard of someone having a Bolsey once that had this correct part. The part I mention (the Mikuni) is a piece similar in shape, size, and color to the correct native Praco part.
I believe I have located the correctly sized and shaped Mikuni Jets. I had previously purchased a set of 6 Mikuni 135 Main Jets. These turned out to be incorrect as the circumference of the Mikuni Jet is way too large compared to photos supplied by ed-209. Also, the thickness of the head of the Mikuni Jets I found are twice as deep (or more) as the correct piece found on the real YS. I searched and searched for a smaller circumferenced Mikuni Main Jet with a head of the right thickness but to no avail. I could find smaller circumferences, but all of the Main Jets still had the wrong head thickness. Finally, I stumbled upon an exploded view diagram of a carburetor, and believe it or not, there are different kinds of Mikuni Jets: Pilot Jets, Main Jets, and Main Air Jets.
The one we need is called a Main Air Jet. I believe the size needed is 130 (as I believe perhaps Sym-Cha had mentioned in the main YS thread).
Before you go looking one up on eBay, there is also another difference. All of the ones that I could find for sale in the US had a bevelled edge around the surface of the head. The piece on the real YS does not have a bevelled edge.
I was able to locate a supplier in Italy that has non-bevelled 130 size Mikuni Main Air Jets.
Anyway, back on topic... I will hopefully begin cutting the grips this weekend and maybe even get to priming/painting. If you see any glaring issues, please tell me before I go any further. Thanks for checking this out.
Hello.
Thanks for checking this out.
I'd like to start off by saying thanks again to Ed Maggiani (ed-209) and Steve Dimszo for constructing this saber initially.
The first time I saw the Yoda Saber (YS), I felt that it was right at home amongst the OT sabers, probably because it was "cobbled together" in the same manner and same spirit as those first SW sabers and so the YS became a saber I needed to have. ed-209 has also been very helpful in furnishing photos, measurements, and insight into the making of the original YS and I am grateful for his willingness and involvement.
I'd also like to thank scottjua, sjanish, and spoudastis for most of these pieces that I am using/destroying to bring this saber to completion.
Finally, I'd can never forget to thank my rotary tool.
I love you, rotary tool.
To begin, I have two full flahsguns: an incorrect Praco and a Bolsey 2.
These two flashes are very similar with only a few minor yet unacceptable differences:
1. The Bolsey has a small side nut (sounds dangerous) which the Praco does not have
2. The Bolsey has a sliding thumb knob in its black sheath (that becomes the center band on the YS)
Noticeable issues and features of the native Praco I am using are:
1. Although having a correctly knurled end cap, it is black whereas the YS has a raw silver metal coloring.
2. The black sheath that becomes the center band has more holes in it which are located in the correct areas than those already in the Bolsey.
3. The Praco also appears to be made of a higher quality material (the tube part...I think it may be stainless steel), or at the very least, the machining done to the tube or the forming of the tube makes the finish of the Praco appear more smooth and soft (if that makes any sense at all) than the finish of the Bolsey 2, so I am using the Praco tube as the base for the entire YS.
In any case, neither of these two flashes are perfectly accurate for recreating the YS, so I am having to make a Praco/Bolsey mashup with them.
The first thing is to remove the black sheath from the Praco that becomes the midband for the YS.
As I am using a slightly incorrect variant of the Praco, it has two holes that need to be filled (as well as a small square section on its edge that must also be cut out and removed later). I begin by filling these two small holes with my trusty Elmer's woodfiller (I will explain my choice of using woodfiller in a minute):
I use just the tiniest bit to fill the two small screw holes in the midband that originally held a clunky head piece on the Praco flash:
To do this, I wrap the midband in masking tape to cover the holes from the outside. I then squirt the woodfiller into the holes from inside the midband. After 24 hours, I remove the masking tape and then sand the inside and the outside of the midband to remove any excess woodfiller. Being that these two holes are so small, it is difficult to ensure the holes are well-filled with woodfiller without having air bubbles trapped in it that could essentially occupy the entire cavity. In fact, during my first attempt, a small air pocket was in fact visible in one of the filled holes. To overcome this, I dabbed woodfiller into the hole from the outside:
Once the woodfiller had dried, I sanded the outside of the midband again. You may notice that I filled the hole at the bottom as well... disregard this as this hole will be gone once I cut out the square section from the midband.
In prepping this piece for adding the oil pan and for priming/painting, I noticed that some of the edges where holes were cut (from the factory by the manufacturer) have stray bits of fibrous material hanging off as you can see in the square hole here:
To remove these edge fibers, I used one of my very small files. It is this fibrous makeup of the midband, which may not have been apparent in most of these earlier photos but now made evident by these edge imperfections which led me to choose woodfiller as opposed to epoxy or something else:
Next, I need to remove the inner black assembly that the emitter shroud is attached to:
You can see in this photo the assembly has a piece of folded metal attached to its center by a domed brass flat head screw. This is where the Lamborghini model wheel goes so this metal piece needs to be removed:
To remove the entire black interior assembly (and the emitter shroud that is attached to it) the tiny screw at the bottom of the previous photo must be removed.
Also notice the black assembly sits fairly flush with the tube’s rim/edge on my Praco. When comparing this characteristic to this photo of the real YS, the black assembly on the real YS actually sticks out a bit beyond the rim/edge of the flash tube:
(image courtesy of ed-209)
To correct this on my YS, it is important to understand how that inner black assembly is comprised. It is actually made of three parts:
1. The lower section which looks like it would accept a typical 2-pronged US electrical plug
2. A flat black disc that sits on top of Part 1
3. A brass threaded tube the goes from below part 1 and up through it. This piece is what the domed flathead screw (that secured the Lambo wheel) threads into.
The black assemblies of both the Praco I'm using and the Bolsey 2 are put together in exactly the same way. My solution for getting the black assembly on my YS to be extended just past the lip of the flashtube is to take the black discs (Part 2 mentioned above) from both my Praco and my Bolsey 2 and stack them on top of each other and then set them together on top of Part 1 from the Praco:
Luckily, the domed screw has a long threaded section for being such a small screw overall.
This solution presents a new issue: the long vertical cutout sections of Part 1 is now capped by the Part 2 disc that is twice as thick as normal.
To remedy this, I glued the Bolsey 2 disc to the top of Part 1 of the Praco. Once dried, I cut notches out of the Bolsey Part 2 disc where the vertical cutouts of Part 1 are located. This gives the appearance that the extended upper portion of these Part 1 holes are actually just the original holes of the Part 1 once the Praco Part 2 disc is laid on top of it all. Here are some photos of the process:
Here is the gluing and the clamping to make it all seem like one Praco Part 1 and Bolsey Part 2 are all the same piece once the glue cures.
Here are the parts glued together with the notches cut out. At this time, I cut a tiny section from the hole on the left to match a small cut/rut in the original YS (as it is currently).
Here is the entire assembly with the Praco Part 2 disc sitting back on top, and with the brass domed screw going through it. At the bottom of this image, you can also see the bottom of Part 3 of the assembly.
Once the glue cured I sanded the entire outer circumference of the assembly and gave it a test fitting back in the Praco flashtube:
FULL DISCLOSURE: I inserted the wrong photo here. This photo is from the test fitting before any gluing or cutting had taken place as it appears the correct photo has been lost. You should still be able to get the same general idea of how the elevation caused by the second top disc matches the extended black assembly of the real YS however.
While that whole last step was going on (waiting for the glue to dry), I took sjanish's oilpan and cut the pour spout off of it, sanded the underside by wrapping a very fine grit sandpaper around the black midband and then I slid the oil pan side to side on the sandpaper. This was a surprisingly issueless exercise and left a very smooth finish while removing any flashing from the oilpan's edges.
I decided that the best approach to complete the oilpan portion of the midband is to attach the oilpan before priming/painting.
In order to decide exactly where on the midband the oilpan is supposed to go I consulted this photo of the real YS:
(photo courtesy of ed-209)
I glue the oilpan onto my midband:
There. I think it is pretty close.
Finally, I decide to cut up that Bolsey 2 in order to get the weird metal side nut "button" off it in order to place it on my Praco. I need that nut/button in place on the Praco to be able to understand where to cut the square out of the midband:
Having removed a couple of beer tab rivets from Graflexes before, I thought the best way to remove this "button" would be from the inside.
Of course, both the Praco and the Bolsey 2 are small flashguns thus my rotary tool will not fit all the way up inside the tube of the Bolsey 2. To release the metal nut/button, I improvise access:
And I now have the button ready to go onto the Praco.
Next step is cutting the grips, and then priming and painting.
EDIT: The next piece mentioned (I call it the Mikuni Main Air Jet) is actually a part that is included on a correct Praco flash, and even on some incorrect Praco variants. I believe I even heard of someone having a Bolsey once that had this correct part. The part I mention (the Mikuni) is a piece similar in shape, size, and color to the correct native Praco part.
I believe I have located the correctly sized and shaped Mikuni Jets. I had previously purchased a set of 6 Mikuni 135 Main Jets. These turned out to be incorrect as the circumference of the Mikuni Jet is way too large compared to photos supplied by ed-209. Also, the thickness of the head of the Mikuni Jets I found are twice as deep (or more) as the correct piece found on the real YS. I searched and searched for a smaller circumferenced Mikuni Main Jet with a head of the right thickness but to no avail. I could find smaller circumferences, but all of the Main Jets still had the wrong head thickness. Finally, I stumbled upon an exploded view diagram of a carburetor, and believe it or not, there are different kinds of Mikuni Jets: Pilot Jets, Main Jets, and Main Air Jets.
The one we need is called a Main Air Jet. I believe the size needed is 130 (as I believe perhaps Sym-Cha had mentioned in the main YS thread).
Before you go looking one up on eBay, there is also another difference. All of the ones that I could find for sale in the US had a bevelled edge around the surface of the head. The piece on the real YS does not have a bevelled edge.
I was able to locate a supplier in Italy that has non-bevelled 130 size Mikuni Main Air Jets.
Anyway, back on topic... I will hopefully begin cutting the grips this weekend and maybe even get to priming/painting. If you see any glaring issues, please tell me before I go any further. Thanks for checking this out.
Last edited: