Rogue One: Cassian's Blaster

Faroth

Active Member
I saw Rogue one and generally liked it a lot. One of the things I liked was the return to using real world guns as bases for blasters. I caught that Cassian's blaster pistol used an AR15 as it's base and I really liked the design of the blaster so I want to make my own replica prop.

I believe this will be done in a few different stages.
First I want to make just the blaster pistol.
RPF_CB_01.jpg

This will hopefully be a simple build. It looks like I just need to strip down an AR15 arisoft rifle, add a barrel, and some parts to the side.
Once I have that done, I believe I will move on to attempt to make the entire rifle.
RPF_CB_02.jpg
The Rifle is designed to be broken down into 3 parts. The blaster connects into the front part, and a stock slides onto the back.
Now I just need to try and find the right type of arisoft rifle.
 
The first AR15 Airsoft Rifle that I picked up was the Crossman Elite Stinger R37. At first glance, I thought this would be a great gun to use for the prop. It breaks down well. Not a lot of extra stuff to remove besides cutting the front barrel off. It also has the slide on Stock that I was not able to find anywhere else.
RPF_03.jpgRPF_04.jpg
Unfortunately there are some issues with the details. The grip, although removable, is not the correct grip. The actual blaster has a little finger nub and this one is smooth under the trigger. The top handle is molded in, so i had to cut that off. once sanded down, it would leave a smooth top, but I do no think it would be identical to the movie version.
Finally the right side of the gun is not correct.
RPF_05.jpg

The gun has a thumb tab instead of a circular tab and it is missing a small bulge that the movie prop has.
Over All, this is a great find for the stock, but not accurate for other things. I might save this for making the version of the full rifle that clips together and change/ add the correct detail. I believe the actual prop is made form an airsoft gun that had both the correct detail and the slide on stock.

I would not recommend this for making the blaster pistol.
 
The next Airsoft I got was the M83 A2. At first I thought this was not going to work out at all. Even after removing the stock and the barrel cover, there were parts that got in the way of the blaster barrel and the removable stock.
RPF_06.jpg

But I took it apart some more and after removing most of the internals and cutting the stock and barrel ends off it started to look a lot better.
Note to anyone wanting to use this airsoft. Once i removed the internal gearing mechanism, the select switch components on the inside were loose and it didn't move correctly anymore.
RPF_08.jpg
I don't think they ever move the fire select switch in the movie, so you could glue it in place and let it be. I ended up carefully super gluing a piece of plastic across the upper right hand corner so the mechanism could still move when the switch was moved.

Once I had these extra parts cut out, it started to look a lot better. It has a handle that can be removed from the top rail. It has the correct grip. And it has the correct detail on the right side.
RPF_07.jpgRPF_09.jpgRPF_10.jpg

The main problem is it does not have the clip piece on the back for the stock. I could probably replicate one but I imagine it snapping off.

If anyone knows of an airsoft rifle that has the correct side detail, handle, and the slide on stock, let me know.

In the mean time this looks like an excellent gun to use for a blaster base where you are not looking to add the stock to it.
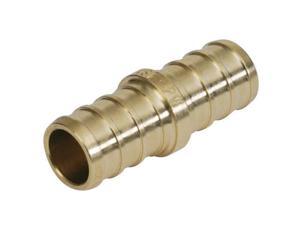
I'm searching for some of the side parts at hardware stores. They look to be the type of fittings that are used to fit into thin clear tubing.
I'll make a clip for the back and glue it on. It won't be solid enough to be functional but it will look right.
And of course I need to make the barrel. I'm not sure yet if I am going to try and make it using PVC piping or if I will 3D print it. Maybe I will do a combination of both.
Also it needs the Vietnam era short clips. I have some on order, but looking at the clips on line compared to the prop, I think even the short ones will need to be cut down to a smaller size. We'll see when they get here.
 
I 3D printed a barrel and back clip piece for the Blaster. These were just first test print versions as I wanted to make sure i had the scale correct. I think they turned out pretty good over all. The barrel needs the vents at the tip yet. Looks like the clip on the back could have a little bit thicker base. Over all not bad. Now that I know that will work, my plan is to glue the gun itself together and putty over the engraved words, screw holes, seams, and the top rail to make it smooth.
CB_WIP_03.jpgCB_WIP_02.jpgCB_WIP_01.jpg
 
Blaster Update.
I filled in the screw holes and the top rail using apoxy sculpt. I used that for a filler because it is very tacky and sticks in place. It doesn't shrink as it dries, and it dries rock hard so good for a prop that will be handled. I filled the recessed words in with Squadron Green as it works better for fine line filling. I also added in a few screw caps to match the gun they used in the film (I have not found the exact airsoft yet. The one I am using here is close but not exact.) And I glued on the first part of my 3D printed barrel since i figure that is going to stay the same no matter what else I do to fine tune the rest of the barrel. I put on a first coat of flat black primer to see how it all looks. It needs a little more sanding here and there but over all I think it is looking decent. Next I need to take the pluming parts I found and get those cut / glued to the side.

CB_WIP_04A.jpgCB_WIP_04B.jpgCB_WIP_04C.jpgCB_WIP_04D.jpgCB_WIP_04E.jpgCB_WIP_04F.jpg
 
Next step is to add on the bits on the side. I found these 1/4" adapters in the hose section at Menards. They are designed to push a plastic tube onto one end. They normally come in Brass but i picked up these nylon ones because I thought they would be easier to cut in half. I'm not 100% sure they need to be cut in half. It is hard to tell exactly how they fit onto the side of the pistol. Its possible they were ground down a bit then glued onto the side. It looks like the ones I got might be a bit too big, but they certainly are the right type of bit.

RPF_11A.jpgRPF_11B.jpgRPF_11C.jpg
 
Sometimes you don't have the skill or tool that you need to make something so you need to improvise. For my 3D printing, I mostly use Google Sketchup. It is pretty easy to use and versatile for most mechanical things. Its a bit clunky for organic objects like animals or curvy sculpture. I have not figured out a good way to put a negative hole through a cylinder. I know it can be done but I am guessing it is a lot of work. I also know there are other programs out there like Blender or 123D but I am just starting to work with those. SO I run into a problem with making the tip of the blaster. I can make the cylindrical part easy enough but I can't put the ovals on the side in 3D.

3D printed objects are not solid, so cutting them in after would be a lot of trouble too. So I figured out a compromise. I built the 3D model using a Decagon (10 sided shape) so that the surfaces were flat. That I can easily put other shapes on and indent them.
RPF_12A.jpg

Then I use my engineering skills to run a bolt through it, secure it, and hook it up to my drill so I can sand it down into a cylindrical shape.

RPF_12B.jpg

I know, somewhere out there is a 3D programming master that is flipping out because "All you had to do was this thing and it is soooo simple." But hey, I ran into a problem and found a mechanical solution that worked for me.

RPF_12C.jpg

I thought that shape was going to be the hardest part of this build so the rest seems like it will be comparably easy.
Just need to finish some sanding. Wait for my swivel harness studs to arrive, and the short clips. Add in the little details on the side. Prime and paint.
 
I know, somewhere out there is a 3D programming master that is flipping out because "All you had to do was this thing and it is soooo simple."
Ha ha, kinda true... :p
But hey, I ran into a problem and found a mechanical solution that worked for me.
But it's great that you worked it out with the skills you have! Btw, if you run into a similar problem again, just PM me, and I could fix it for you. (if you like)
 
The current prop I am working on will work well as a display hand blaster. Although I printed a back clip part for it, I don't consider it structurally sound enough to actually clip a stock onto it. I am still looking for a good airsoft to use for the full, modular Blaster rifle. I found and ordered the following and was excited to share with others this morning.

http://www.sharpimport.com/m4a1-carbine-aeg-full-and-simi-auto-electric-airsoft-assault-rifle.aspx

Unfortunately, After I purchased two, they are now out of stock and judging by the "low stock sale price" I am guessing they are not planning on restocking. But just in case, I'll run through the details for this one as well.

First off, the site Sharp Import. The price was great at $23. One drawback is they required a $50 minimum purchase before they would ship anything. I'm not fond of that business model but oh well. I picked up two of these and a cheap fun airsoft shotgun for some later project. Shipping was by Fedex and fairly quick.

The gun itself is 1 to 1. It has the correct grip, and without the extra safety switch under the trigger so no hole to fill there. The top handle is removable once you undo the two big screws. The internal workings are easily removable. It has the slide on stock, and unlike the other airsoft rifle that I found with a slide on stock, this one has the correct detail on the right hand side. It comes in a camo green painted on color but I'm going to be painting it anyway so that didn't matter to me.

Sharp_03.jpgSharp_02.jpgSharp_01.jpgSharp_04.jpg

Once I had the gun apart it was easy to cut the front off of the two shell pieces with a razor saw.

Sharp_05.jpgSharp_06.jpgSharp_07.jpgSharp_08.jpg

Over all this is still not exactly the airsoft gun they used for their props. (I notice some small differences in theirs have a hex head bolt or two more and a slightly different shape to the back clip) But I think this is like 95% close to the real prop and has all the correct details and a slide on stock. This will make a great base for a hand blaster or modular blaster rifle. I hope this one can be found at some other site so more people can use it for their props.
 
Looks like I got the side detail wrong.

CB_Side_Pieces_Compare.jpg

Fortunately I have not glued anything to the blaster yet.

Off to the hardware store for more searching.
 
Side detail. Each one is about 60mm long. I'm pretty sure that they just screwed together a couple of air hose fittings, but I haven't found the right ones yet.
Might have to scratch build these from tubes and nuts and such, or 3D Print. I really don't like having to do that when there are viable parts out there somewhere.
The search continues.

CB_Side_Detail.jpg
 
The "knurling" on it looks like PEX:

A4DX_1_20140320482500699.jpg


Gotta be some kind of ball fitting.

Side detail. Each one is about 60mm long. I'm pretty sure that they just screwed together a couple of air hose fittings, but I haven't found the right ones yet.
Might have to scratch build these from tubes and nuts and such, or 3D Print. I really don't like having to do that when there are viable parts out there somewhere.
The search continues.

View attachment 696379
 
Has anyone found the real world item that his pistol barrel is ? Or was it created by their prior guys/3D printed ?

My guess is that the barrel and blaster tip were milled in a machine shop. I haven't found out if it was a found part or not yet for sure. I'm not sure what it would be even.
 
This is by far the best 3D print of the muzzle end that I have seen all over the internet. I wish the folks on Etsy could get it that right. Good Work!
 
This is by far the best 3D print of the muzzle end that I have seen all over the internet. I wish the folks on Etsy could get it that right. Good Work!

Wow, yeah. The ones i looked up I would say are done "in the style of" or maybe were done before the movie release when there were fewer pics.

If anyone wants my 3D files or wants me to 3D print for them, one of the items I have made just message me. I'm sure we can work something out. 3D printing is fairly cheap, and I certainly don't mind helping others.
 
Almost done with the first blaster pistol. I had purchased a short straight clip but it was still too long. One of the indentations on the side didn't go all the way to the end of the clip. There was extra detail on the end of the clip where the plate crimped over the sides. The more I looked at the movie prop photos, the more I started to see just the slightest curve at the end of the clip.

CB_Clip_Curve.jpg

I'm pretty sure now that they just took the long curved clip that it came with and cut it down to size and put a plastic plate on the end.
So that is what I did.

CB_WIP_05A.jpg

Note: These clips are filled with a long spring and a metal weight so make sure to take them apart before band sawing into them or something.

I also added the swivel stud on the back. It is only used / needed for the full rifle, but it is a detail that is on the pistol as well.

CB_WIP_05B.jpg

The only thing left to do is figure out those hose parts on the side and paint it.
 
Well, I spent a few hours looking at hose adapter parts online and in hardware stores and I still can't find the exact parts used for the Blaster. So until i do find them some day, I made 3D prints of the side bits.

DSC_0303.JPG

They turned out ok. They are cut almost in half to assist with gluing them to the gun. (I'm guessing the original parts were sanded down a bit and then glued to the blaster.)
They are a bit rough yet and needed some coats of putty and primer. This may be a part that I send off to Shapeways to print as their printers can create much finer detail on small parts.

Over all I like how things turned out. All the main parts are together on the blaster pistol now.
CB_WIP_06B.jpgCB_WIP_06C.jpg

Just needs a little more putty work, then primer, paint, and seal.
 
This thread is more than 7 years old.

Your message may be considered spam for the following reasons:

  1. This thread hasn't been active in some time. A new post in this thread might not contribute constructively to this discussion after so long.
If you wish to reply despite these issues, check the box below before replying.
Be aware that malicious compliance may result in more severe penalties.
Back
Top