You are using an out of date browser. It may not display this or other websites correctly.
You should upgrade or use an alternative browser.
You should upgrade or use an alternative browser.
Y oh Y oh Y & its over!
- Thread starter Guy Cowen
- Start date
- Status
- Not open for further replies.
LVskywalker
New Member
Re: Y oh Y oh Y
Wow, that's a great paintjob you did there!
It looks old, oily and beaten up. Great work. :thumbsup
Wow, that's a great paintjob you did there!
It looks old, oily and beaten up. Great work. :thumbsup
imaginager
Sr Member
Re: Y oh Y oh Y
Very nice paintwork, Guy. Beaten, dirty and peeling....as a Y should be!
Very nice paintwork, Guy. Beaten, dirty and peeling....as a Y should be!
Kuhn Global
Sr Member
Re: Y oh Y oh Y
Guy... you never cease to amaze me my friend. Your work is fantastic!
Guy... you never cease to amaze me my friend. Your work is fantastic!
Re: Y oh Y oh Y
Thanks everyone, It really helps to put good work in when you get such a great response.
Worked on the engine thrusters last night & started to color the piping, its dry fitted so dont worry about alignment it was a color test more than anything.
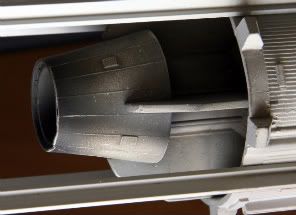
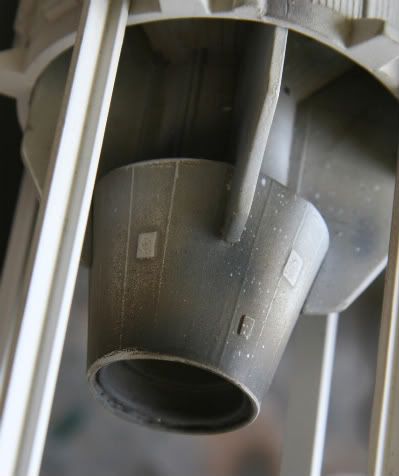
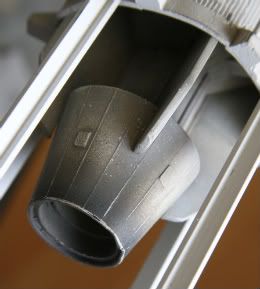
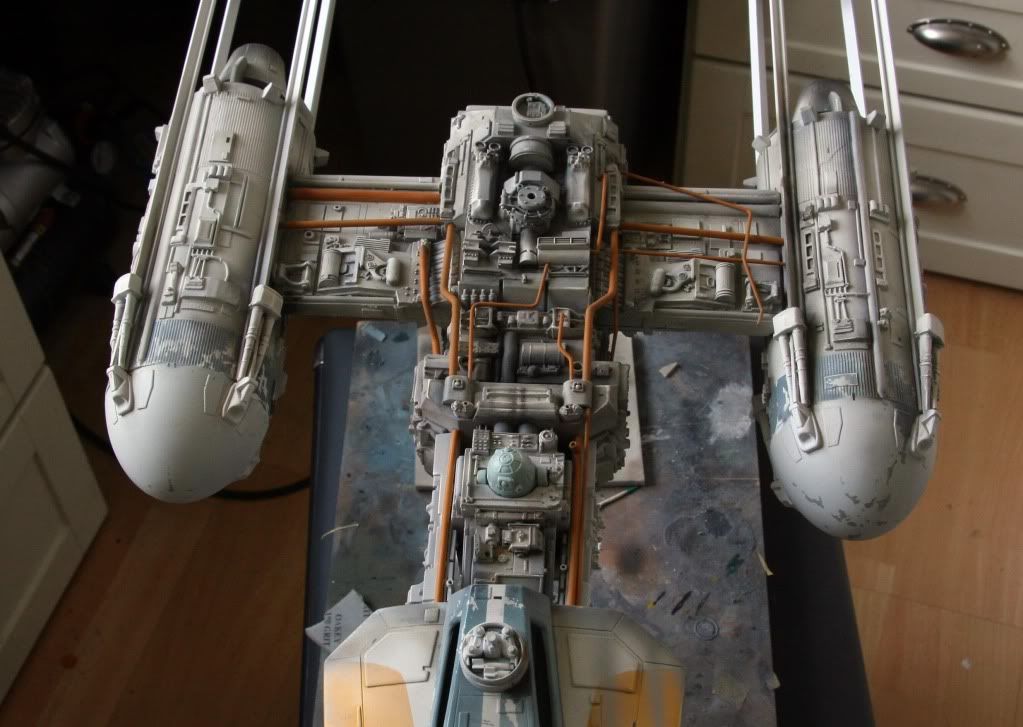
This is what I did to paint the thrusters.
Rattle can base coat (off white)
Then used Tamiya medium grey as a shader on all parts Kida like a sunburst guitar
Then went over the thruster tip with a pre mix that I mentioned before (all tamiya) Black, German Grey, brown, Dec Tan.
Then used german grey on its own with each layer getting slowly narrower
then finally mixed some Black into the German grey for the closest part to the tip.
With this mix I did some spurts all over to get the grainy spot look.
Next was a heavy mist of pure Tamiya White with no thinner, it seems very wrong to do this but most of it will be sanded away. When you do this it gives the piece a fury coat of white dust (very textured)
Then using an oakley 180 grit between coat pad I lightly sanded in various parts & feathered the pad over the hole thruster.
Next I added a very wet coat of black oil mixed with turps (not much oil, so it dry's tanslucent) then even before this had dried, using a big soft brush I brushed grey pastel into wet oil & then did some more sanding.
Finally I added some thinned rust color blotches here & there & then gave it a few bursts with the Tamiya white again to give the specs. The hole thing was done in 20-30 mins, so no drying time between mediums. I am pretty chuffed with the results as its blended to the rest of the thruster really well & Looks quite old to the eye.
Tamiya paint sands very differently depending on how dry it is, the newer the paint the more that comes away when sanding, this really helps when you want to control the weathering. For the torpedo holes on the base of the cockpit I sanded straight away after painting & then again the next day so you get 2 types of texture to the sanding.
Thanks everyone, It really helps to put good work in when you get such a great response.
Worked on the engine thrusters last night & started to color the piping, its dry fitted so dont worry about alignment it was a color test more than anything.
This is what I did to paint the thrusters.
Rattle can base coat (off white)
Then used Tamiya medium grey as a shader on all parts Kida like a sunburst guitar
Then went over the thruster tip with a pre mix that I mentioned before (all tamiya) Black, German Grey, brown, Dec Tan.
Then used german grey on its own with each layer getting slowly narrower
then finally mixed some Black into the German grey for the closest part to the tip.
With this mix I did some spurts all over to get the grainy spot look.
Next was a heavy mist of pure Tamiya White with no thinner, it seems very wrong to do this but most of it will be sanded away. When you do this it gives the piece a fury coat of white dust (very textured)
Then using an oakley 180 grit between coat pad I lightly sanded in various parts & feathered the pad over the hole thruster.
Next I added a very wet coat of black oil mixed with turps (not much oil, so it dry's tanslucent) then even before this had dried, using a big soft brush I brushed grey pastel into wet oil & then did some more sanding.
Finally I added some thinned rust color blotches here & there & then gave it a few bursts with the Tamiya white again to give the specs. The hole thing was done in 20-30 mins, so no drying time between mediums. I am pretty chuffed with the results as its blended to the rest of the thruster really well & Looks quite old to the eye.
Tamiya paint sands very differently depending on how dry it is, the newer the paint the more that comes away when sanding, this really helps when you want to control the weathering. For the torpedo holes on the base of the cockpit I sanded straight away after painting & then again the next day so you get 2 types of texture to the sanding.
Last edited:
3d-builder
Sr Member
Re: Y oh Y oh Y
Well Guy thats just damn sexy!!! thumbsup Thanks for the paint tutorial!!
Well Guy thats just damn sexy!!!
thumbsup Thanks for the paint tutorial!!3d-builder
Sr Member
Re: Y oh Y oh Y
Hey guy I was looking at page six with your strip scratch-build looks great!!
Try one of these guys a great tool for cutting strip makes you look like $100 bucks!!thumbsup I use it all the time...well now that I have it I do!
Try micromark.com thats where I got mine!
Hey guy I was looking at page six with your strip scratch-build looks great!!
Try one of these guys a great tool for cutting strip makes you look like $100 bucks!!
thumbsup I use it all the time...well now that I have it I do!Try micromark.com thats where I got mine!
3d-builder
Sr Member
Re: Y oh Y oh Y
Shoot if you and Lee were not across the pond you would be!! Love the weathering on the model fantastic work! I love the missile launch tube weathering...nice:thumbsup
Thanks mate, I just wish its was half as neat as your building, it would be a pleasure to paint something of yours. Just incredible talent.
Shoot if you and Lee were not across the pond you would be!! Love the weathering on the model fantastic work! I love the missile launch tube weathering...nice:thumbsup
Re: Y oh Y oh Y
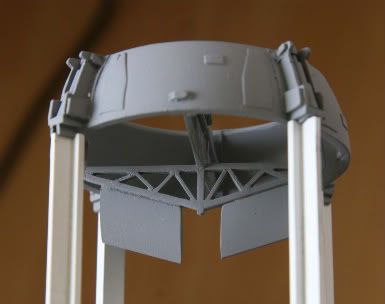
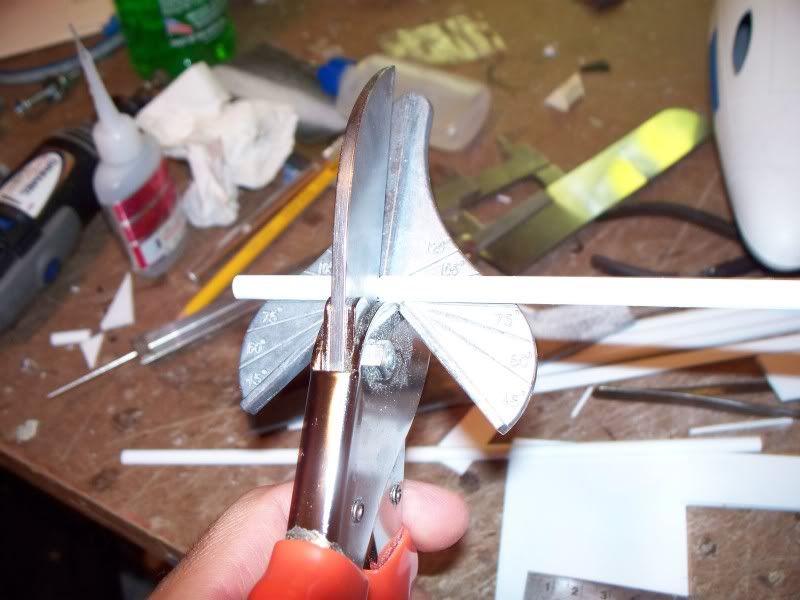
Thanks Michael, what a great tool & great site. I wish I'd had one a few weeks ago:lol, you may be able to help me? I need to find or make the circle that goes in the thrust vecters at the end of the model, I've tried styrene rod/bar but cant get it to hold shape, any suggestions for making a ring. I've tried cutting up bottles & all kinds but just cant nail it?????:cry

Hey guy I was looking at page six with your strip scratch-build looks great!!
Try one of these guys a great tool for cutting strip makes you look like $100 bucks!!
Try micromark.com thats where I got mine!
Thanks Michael, what a great tool & great site. I wish I'd had one a few weeks ago:lol, you may be able to help me? I need to find or make the circle that goes in the thrust vecters at the end of the model, I've tried styrene rod/bar but cant get it to hold shape, any suggestions for making a ring. I've tried cutting up bottles & all kinds but just cant nail it?????:cry
3d-builder
Sr Member
Re: Y oh Y oh Y
Tell me the thickness of the ring in MM's and the diameter it needs to be in MM's as well!thumbsup
Tell me the thickness of the ring in MM's and the diameter it needs to be in MM's as well!
thumbsup3d-builder
Sr Member
Re: Y oh Y oh Y
I had to make rings for the A-wings vector ring's. of course these are MUCH bigger but same principal. I did not want them just cut from PVC stock to heavy, so I took the PVC cut it to the correct thickness then filled it with a 2 part clay called Apoxie Sculpt. Whaaala A buck in born, then I just formed it....not so fast Guy! Encapsulation is an issue here so I had to build a punch press as I call it to get the ring out.Worked great and a perfect ring strong, unbroken and light!


I had to make rings for the A-wings vector ring's. of course these are MUCH bigger but same principal. I did not want them just cut from PVC stock to heavy, so I took the PVC cut it to the correct thickness then filled it with a 2 part clay called Apoxie Sculpt. Whaaala A buck in born, then I just formed it....not so fast Guy! Encapsulation is an issue here so I had to build a punch press as I call it to get the ring out.Worked great and a perfect ring strong, unbroken and light!
3d-builder
Sr Member
Re: Y oh Y oh Y
You can see the buck loaded into the press, it has the ring around it before the buck is knocked out.This ring could not be removed from the buck by hand thats how tight it was formed!
A simple solution would have been to just slice the ring and remove it
from the buck, but this compromises the strength as it would have had
to be glued back together.Plus it had to sit between the two stabilizers
so strength was an issue to me.
Last edited:
3d-builder
Sr Member
Re: Y oh Y oh Y
If you find the correct diameter in PVC pipe your golden!! Slice it to the correct thickness and your done!! The PVC "WILL NOT CHANGE SHAPE ON YOU"!thumbsup
At your scale here it will be light in PVC unlike the rings on the A-wing
because they are so much thicker, so need for vacuum forming!
Regards,
Michael
If you find the correct diameter in PVC pipe your golden!! Slice it to the correct thickness and your done!! The PVC "WILL NOT CHANGE SHAPE ON YOU"!
thumbsupAt your scale here it will be light in PVC unlike the rings on the A-wing
because they are so much thicker, so need for vacuum forming!
Regards,
Michael
Last edited:
darth_daniel
Sr Member
Re: Y oh Y oh Y
Guy, the easiest way for making the rings would be cutting them from sheet styrene with a circle cutting tool.
Guy, the easiest way for making the rings would be cutting them from sheet styrene with a circle cutting tool.
3d-builder
Sr Member
Re: Y oh Y oh Y
No worries!:lol I would just find the right diameter in PVC pipe and slice it
to the correct thickness.
The idea about the styrene is good also, but a bit more work
as you would have to cut the center out also.The good thing about
cutting it out of styrene is you don't have to worry about finding the
correct diameter in PVC.
you completely lost me there mate....sorry. I cant even work out what you filed with the epoxy sculpt! Doh!!!
I'm away again today but will continue with this next week if thats cool?
No worries!:lol I would just find the right diameter in PVC pipe and slice it
to the correct thickness.
The idea about the styrene is good also, but a bit more work
as you would have to cut the center out also.The good thing about
cutting it out of styrene is you don't have to worry about finding the
correct diameter in PVC.
3d-builder
Sr Member
Re: Y oh Y oh Y
Do you know the thickness and the diameter of the rings?
Saw your Y-squad very nice builds.:thumbsup
Guy, the easiest way for making the rings would be cutting them from sheet styrene with a circle cutting tool.
Do you know the thickness and the diameter of the rings?
Saw your Y-squad very nice builds.:thumbsup
darth_daniel
Sr Member
Re: Y oh Y oh Y
Umm...what Y-squad? Do you mean my FM Ys? Haven´t shown any pics of my Neisen Y as far as I remember.
Just measured my Neisen Y. It´s actually two rings, the second one is a thin "lip" sitting on the bigger ring with the thinner ring facing backwards. The big ring has a thickness of 2mm, outer diameter of 33mm and inner diameter of 31mm. The thinner ring adds another 1.5 - 2mm to the thickness and should have an outer diameter of about 32.3mm and inner diameter of 31.7mm (estimate). The thinner ring is so thin that it will be impossible to cut it from styrene...:unsure
Do you know the thickness and the diameter of the rings?
Saw your Y-squad very nice builds.:thumbsup
Umm...what Y-squad? Do you mean my FM Ys? Haven´t shown any pics of my Neisen Y as far as I remember.
Just measured my Neisen Y. It´s actually two rings, the second one is a thin "lip" sitting on the bigger ring with the thinner ring facing backwards. The big ring has a thickness of 2mm, outer diameter of 33mm and inner diameter of 31mm. The thinner ring adds another 1.5 - 2mm to the thickness and should have an outer diameter of about 32.3mm and inner diameter of 31.7mm (estimate). The thinner ring is so thin that it will be impossible to cut it from styrene...:unsure
3d-builder
Sr Member
Re: Y oh Y oh Y
Ya the FM squad!:thumbsup
Thanks for the dims!
Umm...what Y-squad? Do you mean my FM Ys? Haven´t shown any pics of my Neisen Y as far as I remember.
Just measured my Neisen Y. It´s actually two rings, the second one is a thin "lip" sitting on the bigger ring with the thinner ring facing backwards. The big ring has a thickness of 2mm, outer diameter of 33mm and inner diameter of 31mm. The thinner ring adds another 1.5 - 2mm to the thickness and should have an outer diameter of about 32.3mm and inner diameter of 31.7mm (estimate). The thinner ring is so thin that it will be impossible to cut it from styrene...:unsure
Ya the FM squad!:thumbsup
Thanks for the dims!
- Status
- Not open for further replies.
Similar threads
- Replies
- 5
- Views
- 1,598
- Replies
- 1
- Views
- 1,289