ViskerStudios
New Member
Someone asked me about building Xena's Chakram a while which I've been working on for a while now, but I thought this would be a good time to do my first build thread. I started by gathering reference images and whatever information I could find. Luckily the website http://xenaproptreasures.blogspot.com/2014/01/comparisons-original-chakram-i-of-iv.html had already done a lot of the leg work as far as dimensions go.
.jpg")
I also found a few other screen shots to be able to make the designs. I then started designing it in CAD. Knowing I was going to 3D print it, I cut it into 4 pieces that would be 3D printable.

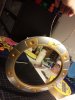
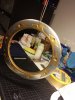
Before I was able to make the final prints I had to find shell to match on outside so I could size my model to them. The website above mentioned paui shell, which I found to be fairly expensive to buy as an inlay. I was able to find some 10 mm abalone shell beads which looked like a perfect match


I printed everything in ABS, which meant I was able to use an ABS/Acetone mixture as a paste between them.


The next steps which I forgot to take pictures of, was filling the small gaps with spot putty and sanding until smooth, upto 600 grit. I'll be posting more progress pics within the next few days
I also found a few other screen shots to be able to make the designs. I then started designing it in CAD. Knowing I was going to 3D print it, I cut it into 4 pieces that would be 3D printable.
Before I was able to make the final prints I had to find shell to match on outside so I could size my model to them. The website above mentioned paui shell, which I found to be fairly expensive to buy as an inlay. I was able to find some 10 mm abalone shell beads which looked like a perfect match
I printed everything in ABS, which meant I was able to use an ABS/Acetone mixture as a paste between them.
The next steps which I forgot to take pictures of, was filling the small gaps with spot putty and sanding until smooth, upto 600 grit. I'll be posting more progress pics within the next few days
Last edited:
") Cheers
Cheers


.jpg")


