X-WING 1:1 SCALE

Hi greeble-gremlin, no, the canopy is 3D printed and then wrapped in CF...I wish I had the facility to CNC it.

To be honest, I'm really not sure what the differences are between the Red V in ANH and ESB...cockpit or otherwise. I kinda thought it was supposed to be the same ship. Any pics, highlighting the differences, would be extremely helpful
I will post a few pictures but also send you a PM with more information including the source for some bits on the Targeting computer
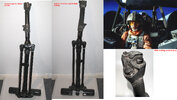
there are actually two different version of the main console..I am partial to the one using the 2 slide viewers /as scopes/screen displays
The same slide viewers used to make the Security Holo-cams in the detention center
 
Hi greeble-gremlin, no, the canopy is 3D printed and then wrapped in CF...I wish I had the facility to CNC it.

To be honest, I'm really not sure what the differences are between the Red V in ANH and ESB...cockpit or otherwise. I kinda thought it was supposed to be the same ship. Any pics, highlighting the differences, would be extremely helpful
when designing the 3d printed portion of the canopy..do you accommodate for the added thickness of the layers of Carbon fiber??
defintely need more pics and details..I love a good build blog
 
Thanks, yes I already have the 2 Trident slide viewers for the dashboard and I plan to have lit displays in them. Not sure about the camera used on the TC, I just went for something vintage looking. I'm trying to get an MP4 player to run the trench graphic
I didn't factor in the thickness of the CF on the canopy...it goes on really thin and needs just a skim of filler. I embedded 2 steel tubes in the frame to allow for the hinge mech, which I still have to figure out. I've dry fitted it to the bodyshell and it seems to line up pretty nice. 5mm perspex for the glass so hopefully not too heavy. I'll post some pics once I have more progress
 
Is there a list somewhere for all the found bits?
There's a thread in the SW group for the grip and some details inside the cockpit;)
 

Attachments

  • ESB grip 1 (1).JPG
    ESB grip 1 (1).JPG
    4 MB · Views: 92
Bit more progress...got the bottom front fuselage all filled, sanded and primed...not the final colour but nice to get it white, and cut in the panel lines. Also fitted the nosecone, which needs finishing, but will be detachable, for transportation.
Next job is to cut out the flaps for the landing gear, front leg;

20250124_131042.jpg
20250124_131127.jpg


Also got the Targeting Computer done...not that accurate but quite fun;


A little more phenomenal every time. I am so jealous of your work. I've got a list of lifesize Star Wars vehicles I've always wanted to do... sadly, it's seeming unlikely at this point. I've done a lot of cool things, but I just don't have the space for something big (like a vehicle). I thought when I got my house, I'd build a snowspeeder, but what would I do with it? leave it out in the elements in the backyard forever?

Your work is awesome! And inspiring!! Can't wait to see more!
 
Call for help...I'm looking for images of the 2 display screens on the dashboard console, if anyone has any, thx
 
Awesome undertaking!
On a personal note, I aways found scaling the models up to 1:1 kind of makes the ships look and feel more 'toy-like' (bulky and lacking detail)
That said, all the miniatures contain kit parts that have been softened when scaled down, maybe instead of basing the detail off the kit part, use the original part the kit was based on.
 
Yep, I totally agree...with scale comes the need for more detail, so I will be aiming for real size parts reproduction, rather than scaling up the digital kit parts. There are some places where there is not much ref, like the inside of the landing gear flaps, where fun can be had with real engine parts.
So the bottom is done, painted and weathered and she is flipped ready to start on the top side.

20250131_102036.jpg
20250131_102128.jpg
20250131_102148.jpg
20250131_102059.jpg
20250131_103113.jpg
 
Last edited:
I just went back and looked and realized you're covering in carbon-fiber! That alone must have cost a new mortgage. I use carbon-fiber sheets in aviation composite repairs all the time and a single role can be thousands of dollars.
 
I just went back and looked and realized you're covering in carbon-fiber! That alone must have cost a new mortgage. I use carbon-fiber sheets in aviation composite repairs all the time and a single role can be thousands of dollars.
Yep, Carbon-Fiber, not cheap...but necessary I think
Nice work!
What reason do you use Carbon Fibre as opposed to just chop strand?

Cheers,
Josh
and yes, I chose CF because of it's lightness/strength ratio...the front section of the fuselage is 6m long, I didn't want it sagging in the middle and because it will have to be manually lifted off the island, where I work, it needs to be as light as I can make it. Chop strand, even at the same fabric weight as CF holds a lot more resin and takes a lot more filler to get smooth. And most importantly, you can say u have a Carbon-Fiber X-Wing!

So the top front half is wrapped/filled/sanded and primed;

20250205_065701.jpg
20250207_122641.jpg
 
Back
Top