wayouteast
Sr Member
I've just completed a satisfying quick 'in-between' project, an almost out-of-the-box build of the X-Plus 'Maschinenmensch' otherwise variously known as 'Futura', the 'false Maria', or simply 'the robot' from the 1927 silent movie masterpiece 'Metropolis'. I'd just recently watched the new(ish) cut of the film with the long-thought-lost extra 40 minutes of footage reintegrated and - seeing the film again after many years - I was struck by just what a brilliant piece of movie-making it is, and how incredibly far ahead of its time. This one film is responsible for so much of the visual iconography of the science fiction films that came after it, not to mention many of the themes and tropes as well, particularly in the dystopian sub-genre.

I've always wanted a model of the iconic robot that's become such an enduring image - recognisable even to people who may never have seen the film or know where this beautiful but disturbing humanoid comes from. The X-Plus model is 1:8 scale and fitted the bill nicely.
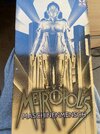
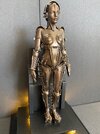
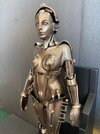
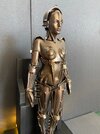
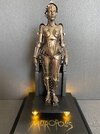
The kit has some minor flaws, but builds into a very nicely accurate model. It's moulded in gold, dark grey and clear plastic, and the first and biggest flaw is apparent in the way the parts have been injection moulded. The parts attach to the sprues in such a way that most attachment points are on two 'planes' of the part, which makes snipping them off and cleaning the attachment point up a bit of a chore. It's quite doable, though, and the contact points are (mostly) well-chosen so as not to interfere with any important detail. Some careful work with needle files and/or sanding sticks cleans the parts up nicely. The plastic is slightly softer than some other plastic kits I've built, and the chair she sits in had a strange 'textural' flaw that showed through the primer and paint despite my best efforts at prepping the piece. It's only visible on very close inspection, though, so not a huge issue.
The construction of the kit is well thought out; the external 'plating' all snaps onto/through an internal figure (like a body-suit) that is only visible at the neck, elbows, hips and knees. You can build almost the entire kit as a 'snap-together'. I elected to glue the internal figure together so I could fix and hide the seams at the points where they would be visible.
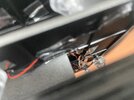
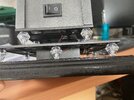
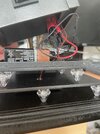
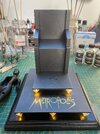
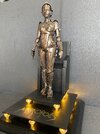
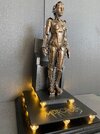
I wanted to illuminate the 14 clear 'lights' that are sandwiched between the layers of the base, as they are in the movie. I did this with warm white SMDs inside each 2-part light, running the wires along the underside of the base sections and up into the interior of the chair where they were powered by a 9v battery. I added a switch to the back of the chair. The chair, handily, push-fits onto the base so can be left unglued for battery changes.
All the parts were primed with Tamiya grey fine surface primer. The base and chair, and the internal figure were then airbrushed matt black, and the metallic parts were airbrushed with Alclad II 'black base' to give them a smooth, glossy finish. The base and chair were then given a light dusting of AK Interactive X-treme metal 'gunmetal' to give them a slight metallic sheen while keeping them very dark. The 'Metropolis' logo was picked out with a gold acrylic paint pen, and the writing on the back of the chair was picked out with an aluminum weathering pencil.
Many people think that the Futura robot is gold in colour; indeed the box art shows her in a gold finish as do many of the posters and other artworks depicting her. In fact, according to contemporary accounts, the suit - which was made of moulded sheets of 'plastic wood', a new material at the time - was finished with gloss varnish mixed with 'silver-bronze' powder. For this reason, I opted for a final colour that was predominantly a very warm silver that verges on gold. I pondered which way round to do this, a silver basecoat with a gold misting or vice versa. In the end, I went for a basecoat of Alclad II metallic lacquers - 3 parts 'polished brass' to 1 part 'copper'. This gave the metal plates a nice warm golden colour. I painted all the metal parts separately at this stage, with the smaller parts like connectors and straps still on their sprues.
When all the parts had fully cured, I assembled the kit. For the most part, I simply snapped the exterior pieces in place. The engineering of the kit is excellent, and most of the parts are held securely in place when correctly 'snapped'. There were a couple of parts that were a little loose, and those I secured with a dab of superglue. The smaller connectors, details and straps were also attached at this point with canopy glue.
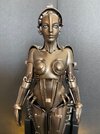
Once assembled, the entire figure was given a light misting of Alclad II 'stainless steel', building up very thin applications until I was happy with the colour. The final result is a look that varies from warm silver through to white gold depending on the light and the angle of viewing - a happy compromise between the assumed look of the original suit and the popular image.
The eyes were originally painted pale-grey or white with black or dark-grey 'eyeliner' to make them stand out. I replicated this with Vallejo acrylics. The figure was glued to the base and the project was done. I think the final result is a very nice model of such an important science-fiction icon, and I'm really happy to finally have 'Maria' as part of my display.
I've always wanted a model of the iconic robot that's become such an enduring image - recognisable even to people who may never have seen the film or know where this beautiful but disturbing humanoid comes from. The X-Plus model is 1:8 scale and fitted the bill nicely.


The kit has some minor flaws, but builds into a very nicely accurate model. It's moulded in gold, dark grey and clear plastic, and the first and biggest flaw is apparent in the way the parts have been injection moulded. The parts attach to the sprues in such a way that most attachment points are on two 'planes' of the part, which makes snipping them off and cleaning the attachment point up a bit of a chore. It's quite doable, though, and the contact points are (mostly) well-chosen so as not to interfere with any important detail. Some careful work with needle files and/or sanding sticks cleans the parts up nicely. The plastic is slightly softer than some other plastic kits I've built, and the chair she sits in had a strange 'textural' flaw that showed through the primer and paint despite my best efforts at prepping the piece. It's only visible on very close inspection, though, so not a huge issue.
The construction of the kit is well thought out; the external 'plating' all snaps onto/through an internal figure (like a body-suit) that is only visible at the neck, elbows, hips and knees. You can build almost the entire kit as a 'snap-together'. I elected to glue the internal figure together so I could fix and hide the seams at the points where they would be visible.
I wanted to illuminate the 14 clear 'lights' that are sandwiched between the layers of the base, as they are in the movie. I did this with warm white SMDs inside each 2-part light, running the wires along the underside of the base sections and up into the interior of the chair where they were powered by a 9v battery. I added a switch to the back of the chair. The chair, handily, push-fits onto the base so can be left unglued for battery changes.
All the parts were primed with Tamiya grey fine surface primer. The base and chair, and the internal figure were then airbrushed matt black, and the metallic parts were airbrushed with Alclad II 'black base' to give them a smooth, glossy finish. The base and chair were then given a light dusting of AK Interactive X-treme metal 'gunmetal' to give them a slight metallic sheen while keeping them very dark. The 'Metropolis' logo was picked out with a gold acrylic paint pen, and the writing on the back of the chair was picked out with an aluminum weathering pencil.
Many people think that the Futura robot is gold in colour; indeed the box art shows her in a gold finish as do many of the posters and other artworks depicting her. In fact, according to contemporary accounts, the suit - which was made of moulded sheets of 'plastic wood', a new material at the time - was finished with gloss varnish mixed with 'silver-bronze' powder. For this reason, I opted for a final colour that was predominantly a very warm silver that verges on gold. I pondered which way round to do this, a silver basecoat with a gold misting or vice versa. In the end, I went for a basecoat of Alclad II metallic lacquers - 3 parts 'polished brass' to 1 part 'copper'. This gave the metal plates a nice warm golden colour. I painted all the metal parts separately at this stage, with the smaller parts like connectors and straps still on their sprues.
When all the parts had fully cured, I assembled the kit. For the most part, I simply snapped the exterior pieces in place. The engineering of the kit is excellent, and most of the parts are held securely in place when correctly 'snapped'. There were a couple of parts that were a little loose, and those I secured with a dab of superglue. The smaller connectors, details and straps were also attached at this point with canopy glue.
Once assembled, the entire figure was given a light misting of Alclad II 'stainless steel', building up very thin applications until I was happy with the colour. The final result is a look that varies from warm silver through to white gold depending on the light and the angle of viewing - a happy compromise between the assumed look of the original suit and the popular image.
The eyes were originally painted pale-grey or white with black or dark-grey 'eyeliner' to make them stand out. I replicated this with Vallejo acrylics. The figure was glued to the base and the project was done. I think the final result is a very nice model of such an important science-fiction icon, and I'm really happy to finally have 'Maria' as part of my display.
Last edited:

