WIP: Foam Hulkbuster for my 7yr old - Lots of Con Pics!

Re: WIP: Foam Hulkbuster for my 7yr old - Chest/Back Progress

Thanks,IFG...I wasn't sure whether it would be appropriate,but here goes:

http://www.therpf.com/showthread.php?t=212583&highlight=classic+hulkbuster

It's the version by SmookCMb.

That's a great version of the comic book Hulkbuster. For those looking for the recent movie version I'd check out Shadeling's files. Hopefully these two links helps out folks hunting for full-size models! :D


@indefilmgeek hows the build going hope its going well

Sent from my SM-G900F using Tapatalk

Rough week, but I've managed to get some more work done! Here's a look at what I've been working on...
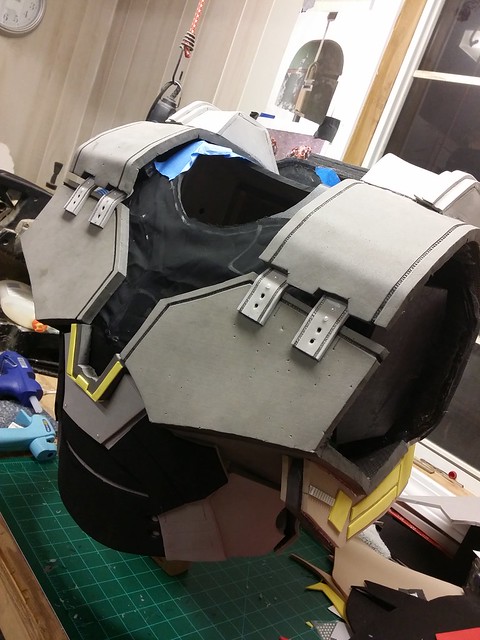
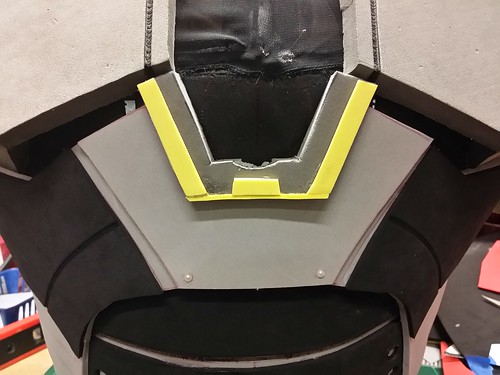
CHEST:
After checking the fit of the chest unit, I mocked this up to show how the Chest/Arms will be larger then the legs... It will be a little odd, but hopefully look ok.
21662609888_1f27a55049_n.jpg


The test fitting also led me to open up more holes for my kid to look out of. More in the front...

21869581996_4b9fb73323_z.jpg


And a few in the side too...
21895697785_0fd67d684e_z.jpg


To mask these, I used a very thin fabric I've used in lots of other builds. To test it out I put it on my head... which was a very tight fit! :lol
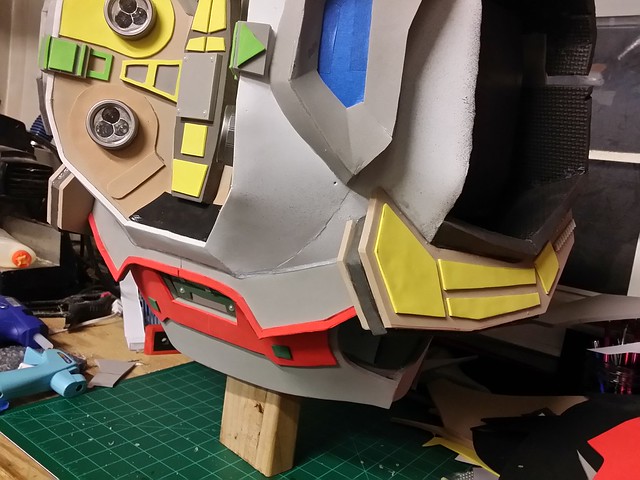
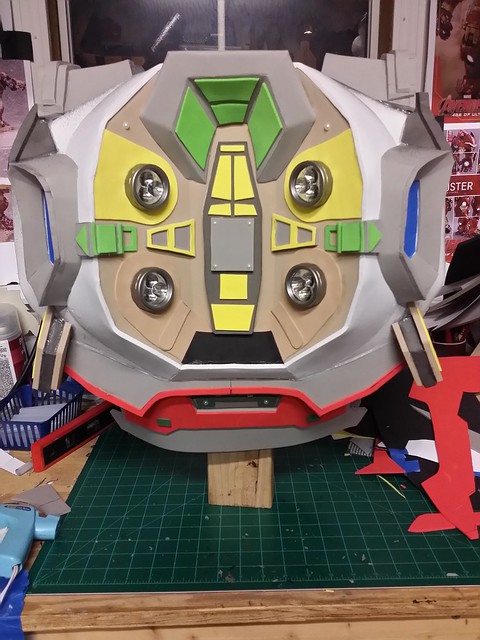
21709332148_d3ca6df948.jpg


HELMET:

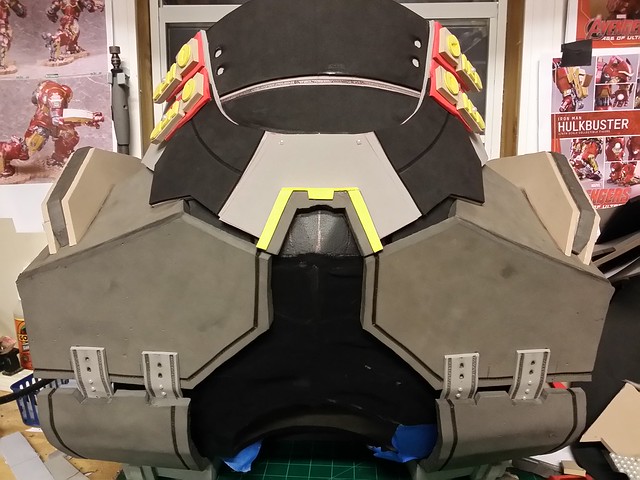
I also have done a lot of work on the helmet. I started with the papercraft model and began creating a foam copy of it - piece by piece.
21272982474_72e1880bd6_z.jpg


The faceplate was tricky, but I finally got it looking ok...
21274615683_7fa7c2bef6_z.jpg


And here is the back...
21707657220_869c35dd36_z.jpg


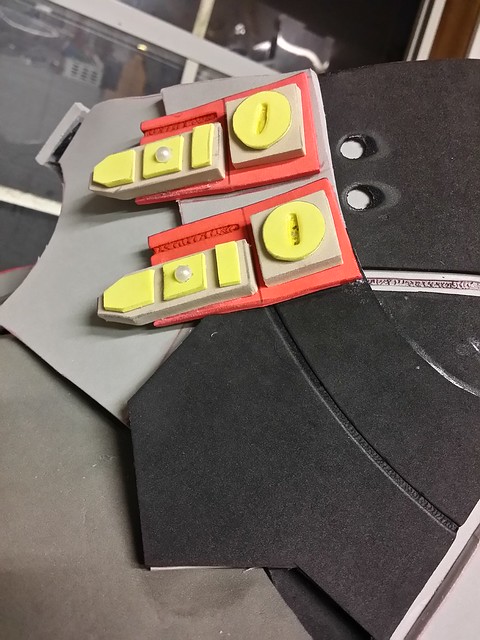
After this, I did some of the detail pieces....
21272987434_b039f42cce_z.jpg


Finally, I started working on the eye-lights... Now, I'll preface this by saying it's best to do this work AFTER you paint the piece... but dove into this without thinking about it and then had to do some fancy masking prior to painting. :behave

I took a string of battery-operated Christmas lights (10 LED string), and used 5 LED's per eye. I basically did the same thing I did for my other Iron Man kids costume (HERE), but simplified since no one will be looking out of these spaces.

Steps:
1. Glue a matte-finish clear piece of plastic (binder cover material) over the eye holes.
2. Glue the 5 LED's just below (or above) this so they shine into the space.
3. Glue a bright white piece of plastic on top of the LED's (also covering the eye space.

This results in the LED light reflecting onto the white plastic 'backing' and out through the matte-finish clear lense. It is a VERY smooth light, with NO hotspots.

Here is a look at the sloppy inside...
21274606043_11e7bf6db1_z.jpg


And here is what it looks like on the outside...
21274623553_2776cfaec5_z.jpg


I also built another sloppy-fast batter holder for these lights so I can change batteries easily...
21272953904_36b716a2a1_z.jpg


And here's how it looks on the chest framework...
21906862951_1cd0e8e252_z.jpg


Finally, I hit it with a coat of Plasti-dip (prior to priming it and painting it... For scale I put my hand near it. It's SO small! :)
21885218572_8ec5a2e043_z.jpg


That's it for now... Hopefully more updates later tonight!
 
Last edited:
Re: WIP: Foam Hulkbuster for my 7yr old - 10/2 Helmet Progress

I bit more progress before heading to bed...

Finally got up the courage to glue down the shoulders. :rolleyes

Also got the detail piece on the top of the shoulders done (had to free-hand those)... I set the head on here just so you can see how it will look with the helmet in place.
21281510683_5852a9e65d_z.jpg


Also got the first coat of the base colors on the helmet...
21281108053_a64268fe84_z.jpg


Nite All! :sleep
 
Re: WIP: Foam Hulkbuster for my 7yr old - 10/2 Helmet Progress

AND NOW, THE "FATHER OF THE YEAR" GOES TO ... :) dramatic pause . . THIS GUY :thumbsup
 
Re: WIP: Foam Hulkbuster for my 7yr old - 10/2 Helmet Progress

I second that :thumbsup plus: great looking progress on the suit !
Makes me look back for a moment and wish I had known about crafting when I was a kid,but you know...Europe :D we're a little behind
 
Re: WIP: Foam Hulkbuster for my 7yr old - 10/2 Helmet Progress

Thanks, although there's a LOT of us on RPF building kids costumes this time of year - I love seeing what everyone else is doing too! :popcorn

After fretting about it for a long time, I finally put hot glue to foam this afternoon and attached the chest panels. Can't explain it, but this chest/torso piece has really messed me up. Most of the time I have a really good idea of how things will come together... not so much with this section of the suit.

That said, these parts are now attached...
21307811953_0388e1b900_z.jpg


I've got one more complicated section to do (the one right below the chest). It's not only got strange attachment points to this piece, but it also has to have arm-holes and space for small human to fit inside. ;)

I've got some full-size paper reference pieces that I'm sorta using as a starting point, but I'm definitely waiting until I've slept and will be fresh before tackling this part.
21938675461_ca0398cce0_z.jpg
 
Re: WIP: Foam Hulkbuster for my 7yr old - 10/4 Chest Progress

Sunday progress...

Got the first coat of plasti-dip on the waist piece. But ran out of plasti-dip after that, so I'll need to pick this part up tomorrow after a run to the hardware store.

Note: Not quite screen accurate to have the flared sections on the sides, but that should work WONDERS for covering up the connection between the top of the thigh pieces and this section. :cool
21958475101_0d79962427_z.jpg


The only pic I have of the back right now is this one...
21325959494_0449b79e29.jpg


Also, finished up the helmet paint job with a bit of weathering and a clear coat...

21768174618_d5775c3712_z.jpg


I'm starting a pretty good collection of Iron Man parts in the workshop...
21929930496_0da65df923_z.jpg
 
Re: WIP: Foam Hulkbuster for my 7yr old - 10/4 Chest Progress

Sunday progress...

Got the first coat of plasti-dip on the waist piece. But ran out of plasti-dip after that, so I'll need to pick this part up tomorrow after a run to the hardware store.

Note: Not quite screen accurate to have the flared sections on the sides, but that should work WONDERS for covering up the connection between the top of the thigh pieces and this section. :cool
https://c2.staticflickr.com/6/5706/21958475101_0d79962427_z.jpg

The only pic I have of the back right now is this one...
https://c2.staticflickr.com/6/5733/21325959494_0449b79e29.jpg

Also, finished up the helmet paint job with a bit of weathering and a clear coat...

https://c1.staticflickr.com/1/742/21768174618_d5775c3712_z.jpg


I'm starting a pretty good collection of Iron Man parts in the workshop...
https://c2.staticflickr.com/6/5810/21929930496_0da65df923_z.jpg
Just keeps getting better the finish is a credit to you amazing [emoji2]

Sent from my SM-G900F using Tapatalk
 
Re: WIP: Foam Hulkbuster for my 7yr old - 10/4 Chest Progress

Nice build, im looking forward to the complete suit up pics. I also really hope that you come across a mini hulk for some photos....
 
Re: WIP: Foam Hulkbuster for my 7yr old - 10/4 Chest Progress

Looking great! Since you have most of the lower half done, does he have any trouble walking in it?
 
Re: WIP: Foam Hulkbuster for my 7yr old - 10/4 Chest Progress

Looking great! Since you have most of the lower half done, does he have any trouble walking in it?

He's done some walking tests. The boots are a bit clunky to walk in, but they are a heck of a lot easier than stilts would have been? :)

- - - Updated - - -

Nice build, im looking forward to the complete suit up pics. I also really hope that you come across a mini hulk for some photos....

That would be AWESOME!

- - - Updated - - -

Just keeps getting better the finish is a credit to you amazing

Thanks! I certainly lean on my finishing to cover lots of my mistakes! :)
 
Re: WIP: Foam Hulkbuster for my 7yr old - 10/4 Chest Progress

Small amount of work tonight. Working on the lower section of the chest/back piece. This is the back (upside down).

21993893131_de941a1f47_z.jpg


The last piece that will need to go on this is the 'skirt trim. Here it is in paper...
21795950620_2c06f340a7_z.jpg


I also started cutting out the front pieces, but have decided to call it an early night and get some sleep. :)

21993891621_3d544f0239.jpg


Nite folks!
 
Re: WIP: Foam Hulkbuster for my 7yr old - 10/6 Chest Progress

Seriously cool build, seeing this progress and looking at the builds I have going on makes me really want to step up my foam game. Keep it up!
 
Re: WIP: Foam Hulkbuster for my 7yr old - 10/6 Chest Progress

Had a kiddo who won't fall asleep for me tonight, which really messed up my build plans. That said, I still got a little bit more done...

I cut out the foam pieces for the front of the upper torso (the part directly below the arc reactor). I don't have them glued down yet, but here's what they look like in raw foam...
21823593229_7a77d95a19_z.jpg


This process has also solved the 'harness' issue I was worried about. As you can see below, I've cut arm-holes out for my son to reach out. As discussed before, his arms will pop out of the suit from around the armpits of the Hulkbuster suit, and he will use his black-clothed arms to 'puppet' the massive 'fake' Hulkbuster arms.

To get this on him, I will need to leave the space below the arm holes open, and construct velcro closures for each side. Once he slides this over this upper body, we'll velcro the piece in place under each of his arms. But by having this foam chest piece now go all the way down under his arms (and fasten like a vest), I'm very certain this will add all the support for the top-heavy chest we'll need! :love
21387730594_d6f3d98f9b_z.jpg


I'm holding the front and back pieces together in this picture right where the velcro closures will be. You can see that the metal shoulder braces as you look down into the arm hole.

...and that's it. Hopefully, we have a better build evening tomorrow!
 
Re: WIP: Foam Hulkbuster for my 7yr old - 10/7 Torso Progress

Starting from the previous night's work, I got the two closures done. I always not only glue both sides of the velco down, but also go back over the edges of the velcro with a thick layer of glue to make sure it doesn't pull off of the foam.

21844109169_86e9c959a2_z.jpg


I also attached the last of the front chest panels and made room for the arc reactor!
You've been seeing this thing upside down for quite a while now, so I figured I'd give you a couple picture of it right-side-up! :)
21408231064_d81cbc5ca6_z.jpg

Front.... and the back...
21409875443_da6c065a72_z.jpg


...and finally, I created the two detail pieces that attach just below the arms on the chest... I made these out of three layers of foam (1/2" floor mat for the middle & 6mm EVA for the outsides.
22018696342_544865b65d_z.jpg


I glued on some detailing and here's what it looks like prior to attaching it...
21842851800_5a7b51b735_z.jpg
 
Re: WIP: Foam Hulkbuster for my 7yr old - 10/7 Torso Progress

That is looking great! I love the detail about the velcro, I've been having a hard time with mine peeling up so I'll have to try that. Thanks!
 
Re: WIP: Foam Hulkbuster for my 7yr old - 10/7 Torso Progress

That is looking great! I love the detail about the velcro, I've been having a hard time with mine peeling up so I'll have to try that. Thanks!

Yeah, I had the same issue, but this really seems to help! ;)


*********

Last night I did finished up the chest armor detailing...

I finished adding foam details around where the arc reactor will be:
21859260678_4de690206d_z.jpg
22047126455_ab2526994c.jpg


I also finished the trim piece for the bottom of the back:
22057075731_9f341e47eb_z.jpg


21426001233_aa0a491c14_z.jpg


And then I created the 'fastener' details on the side of the torso:
22047298105_743370ebd6_z.jpg


It is now ready for masking and the first coats of Plasti-dip!!!!
22047122045_872dd64bc8_z.jpg


More updates after the painting has started! :)
 
Back
Top