Doesn't Elmer's Glue yellow over time? I used Testor's canopy glue, which dried crystal clear. I'm thinking of hitting the inside with some flat clear to see if that helps diffuse it any more at all.
SB
SB
Someone did mention that when I suggested Elmers. As the windows should be yellow anyway and the holes are so small, I don't think it would be noticeable.Doesn't Elmer's Glue yellow over time? I used Testor's canopy glue, which dried crystal clear. I'm thinking of hitting the inside with some flat clear to see if that helps diffuse it any more at all.
SB
Those "hot spots" are what had me worried about not running fibers. I had seen quite a few videos that pan along it, and those hotspots really detract from the effect making it look literally like a hollow model with some LEDs inside
Elmer's glue might be the ticket rescuing me from running all those fibers
I'm sorry. if am not mistaken - there is in mind school glue for arts and crafts from paper?While working on cutting masks for airbrushing hull plating - decided to try Omnius' idea of putting glue that dries clear into the holes from the rear of the superstructure, bridge tower and trench pieces and filling them with paint marker red to create lighting effects without the use of fiber.
Did some trial and error by using some craft glue that I have been using to secure the fiber on the Zvezda. Dries crystal clear and worked well in terms of filling the windows and accepting translucent red pigment to create 'red windows' when backlit. The glue dried super clear and on windows without red pigment - you get hot spots of the LED twinkling through as your eye moves across the model.
So then I was looking for a glue that might dry off-white and act as a semi-diffuser of sorts and cut down on the hot spots and also still accept red pigment to shine through some of the holes. Did a few trial and errors with several glues and finally settled on: "ELMER'S WHITE GLUE". Yup. Plain old Elmer's white school glue. Overfill the holes and turn the piece over so the glue can seep down into the holes from behind and the glue dries into a cloudy clear off-white that when shining an LED through - gives great light BUT eliminates hots spots altogether. However, I think I will have to go with an enamel red paint to fill the holes rather than a permanent red paint marker to get the red to shine through sufficiently.
Perhaps some pics later.
I'm sorry. if am not mistaken - there is in mind school glue for arts and crafts from paper?
here in Russia it's called PVA - about this consistency, am I right? View attachment 1062234
 www.instructables.com
thanks, fun. but seriously - I imagined it, but wasn't sure. we have easier - PVA for paper, PVA glue carpenter, PVA super... no Elmer or other names. only PVA and "liquid nails" - probably also PVA?According to this, it should be fine:
Yours for the making - Instructables
Instructables is a community for people who like to make things. Come explore, share, and make your next project with us!
I just received this kit and I have been struggling with how to finish it, and I have not even started it. I really like what you are doing her, thanks!!!PRE-SHADING
Because the details are so fine and the scale is small, I am worried about too much softening of them with a coat of primer followed by a base coat, followed by panel highlights and wash enhancements. So I have decided to make my primer, my base coat and apply only a thin coat at that. I'll be adding a few drops of machine grey to the white Stynylrez to create a more off-white ILM filming model appearance than a deeper grey on-film appearance, and a few drops of Future/Pledge floor care to achieve a matte finish direct from the airbrush.
So that plan necessitated that I pre-shade the kit, rather than paint and then go in with a wash to bring out the fine details in the hopes that the subtlety will be enough to sell the details without overpowering and create the illusion that the studio lighting achieved without washes on the ILM filming model.
So because I was pre-shading on bare plastic with a water-based wash - I decided to use black shoe polish with some added water to create the wash because I knew that the shoe polish also had dye properties that would discolor the plastic slightly without too much beading that you couldn't get with a simple acrylic wash. And WOW! That brought out the details that are frankly STUNNING. Again - DEAD-BALLS ACCURATE to the ILM filming model at scale:
View attachment 1059664View attachment 1059662View attachment 1059661View attachment 1059658View attachment 1059657View attachment 1059656View attachment 1059663View attachment 1059665View attachment 1059660View attachment 1059659
I have no idea how to ameliorate this problem and am not exactly sure what is contributing to it, except that possibly the segmented trench walls C-11, C-19 and C-12 , C-20 are somehow responsible with adding stress to the bottom and top hull pieces and bowing the hull upwards from the front bow section.


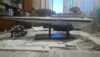
I collected and disassembled my kit for a long time. I did not understand why it is bent during Assembly. at the same time - to the junction of the top and bottom of the case flat. the bottom of the hull with glued sides is also flat. the first impression - the upper hand a bit in short than an effort, but - I bit off all connecting splints, except Central - would still bend there is.Well, I got the kit put together:
View attachment 1065109View attachment 1065110View attachment 1065111View attachment 1065112
But I am not happy. Major frustrations have occurred that I have not had to deal with in a Bandai kit before.
The battery pack and LEDs - seems like they dumped this in from another model kit. The wires are too long and getting them wrapped, notched and configured to fit inside the hull was irritatingly tedious and silly. Then, once the diffusers were snapped into place - neither the engine block or the upper hull will snap snug into place. The hull stresses cause it to bow up and out in several locations instead of fitting secure - as if the diffusers are prohibiting a good fit. I took the kit apart and reassembled it 9 times. I fiddled with the wires inside with tweezers trying figure out what the problem is, tucking in extra wire and making sure none are getting cinched between joins. No avail. I am afraid gluing the top hull onto the bottom is going to make the curve worse because of the stress I see on the plastic trying to force the snap fit.
Not only this - but the light leaks are horrible. Especially along the hull. I cannot get in there to put a line of Tulip black like I did along the bottom hull trenches to seal the light. I did what I could to seal up the conning tower neck edges, but the way the kit is designed, I cannot get in there to seal it from behind. Same with the light leak across the top of the bridge where the face plate is snapped onto the top and sides. If I had to do it over, I think you have to assemble the bridge and neck first, then putty and seal the edges and the top from the outside and push it into the crevice and lightly sand it smooth before painting it to light seal both the top bridge and the sides of the neck front. I do not see any other way you could seal it - because of the way it is engineered and assembled.
But by far, for now - the light leak across the upper trench where the top hull is supposed to sit snug to the bottom is the worst because I cannot get the top hull to secure tightly to the bottom without bowing out from stress. I think I will have to glue and clamp the hulls together - but in dry fitting that with my fingers, it warps the side hulls and causes more hull curvature. So - not sure what I am going to do next to finish this kit. I really wanted to just build it out of the box with minimal fuss so I could return to the Zvezda - and now that is not the case. I am going to have to fuss with this quite a bit to deal with all the issues I now have with it.
Interesting to hear about the struggles this kit has. Can you post any photos of the light leaks that you're talking about? I just got the upper bridge section put together, and now I'm worried that I didn't do enough to seal in the tiny gaps.


I tried to collect without diffusers. the result is the same. I'm afraid the problem with this model is scale. I think it was designed for a larger scale, and then just reduced. I see no other explanation for such a mass marriage.Interesting. Do you think that the diffusers have anything to do with the warping? I wonder if anybody has lit one of these up without using them?
SB
if you have not started the Assembly-try to connect the top and bottom of the body without all - just the top and bottom.Yikes, those leaks are uuuuuuuuu...gly. That's really astonishing and disappointing from Bandai. Welp, at least that's a good guide on where to try and head things off at the pass before assembling...I guess. As far as the bow peg, I wonder if shaving the peg down or widening the hole would help alignment, and pull the hull into a straighter shape.