This coat pattern is huge. Which means the only space I have that is big enough is my floor. I have discovered that the Earth negatively repulses me. The closer I get to the ground the more it hurts.

I am following the nondestructive pattern process. Using the spurred wheel tool, I have laid the pattern on brown craft paper and am rolling the wheel around the pattern to impress it into the brown, stiff craft paper. I am using canned food as weights to hold everything flat and steady. Never slide anything across the pattern or it will tear. Set the weights down directly onto the paper. When done, I am drawing over the dotted impression with a pencil then cutting out with my garbage backup roller blade. The next step will be to lay the craft paper patterns on the fabric and weigh it down as well so I can cut the entire project using a newer rolling blade.

This process does two things: it saves the pattern to be used for the other sizes it contains and it allows me to avoid pinning and scissor cutting. I despise pinning and scissor cutting. It will often stop me from continuing a project. I have high hopes for this process. I am taking a break to post this. I will post results when done.
Well, I like to cover when I am wrong and today that is my thinking that my substandard rolling blade could cut more than one foot of stiff craft paper. I am cutting my craft paper now with scissors and will roller cut my fabric. This still saves me from the hell that is pinning and scissor cutting fabric where what you really get is a lot of torn pattern and miscut fabric unless you started this whole process with the world's nicest cutting table (that was free from clutter). And I still didn't ruin my patterns by cutting them to a single size.
 
Yep; I hear your pain; some fabrics are PITA to pin & cut (and even iron :()! I usually did all the cutting /pinning/ ironing on a looonnng table or mannequin...but that's another story...I would like to know if there's a trick to do so with problem fabrics as fabric tape doesn't work either!
Taking a breather is a good idea; it clears the mind...or breaking something with a baseball bat does the trick also:p
 
So I finished cutting my patterns and took a break today. I have not started cutting coat material and since Halloween is tomorrow, I am stopping now instead of attempting to rush for the day. I want it to be a well finished coat and will likely take a good week to two in order to complete it. I am in no way a seasoned tailor. I learn each skill as I come up against another new item. I have just learned to poke at it until it looks like the screen item and to never rush.

Here is a pic of everything except the coat:

20221030_175821.jpg


and the screen used to compare...

OrlandoBloom Will Turner Pirates costume.jpg


and of course I just noticed I need to dust up my boots.... ;)
 
Oh and just to share, I have not only used the 4923 Simplicity pattern for the main pieces but have also highly utilized the following maker for breeches, shirt and coat:


Scroll nearly to the end of her videos or search for Jack Sparrow in her list. She even adds the collar to the coat, not in the original pattern. Remember her alterations are for Jack, not Will, so button counts, position and other changes will need to be ignored.
 
After micro watching the reunion scene, I believe he finally is using a scabbard. He never had one in previous movies. The scabbard for the 1860 naval cutlass is shaped like the cutlass itself except for the tip. This is another place where modern replicas of the 1860 fall short as they have, not only, a sharply pointed scabbard but usually include brass ornamentation that was not on the original. The majority of originals had a blunt folded leather end riveted with a very large centered rivet that showed on the front. Let me know what you think if you have a nifty 4k or better large screen and want to stare closely at pixels for me.
 
This is a shot of an original 1860 back and then front of scabbard. I think this silhouette matches what I am seeing in the reunion scene in potc5.

Screenshot_20221105-194848_Samsung Internet.jpg
Screenshot_20221105-194903_Samsung Internet.jpg
 

Attachments

  • Screenshot_20221105-194848_Samsung Internet.jpg
    Screenshot_20221105-194848_Samsung Internet.jpg
    175.4 KB · Views: 56
Had some serious issues with thicker and stickier fabrics. I fixed it. My walking foot was not dropping on its own and was destroying my fabric. Looked online to find it is a common issue with the singer foot. I glued a bobby pin to it to make a lower return arm like the higher cost premium feet have. Works great.

20221106_193925.jpg
 
Last edited:
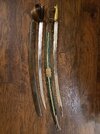
So, with adding the scabbard, I decided to do another comparison shot. The first picture is the two swords that I bought as a matching set at second hand/thrift for 17 each. The top is how it came, the bottom is my cosplay modified version. The last picture is an original 1860 to compare.

20221106_202622.jpg


20221106_203436.jpg
Screenshot_20221104-113956_Samsung Internet.jpg
 

Attachments

  • 20221106_202548.jpg
    20221106_202548.jpg
    2 MB · Views: 53
Help needed: I cannot find any good pics of Will's potc4 and 5 coat that show the bottom from the sides or back. I am trying to solve one question: Does it or does it not have slits and/or filler ( an enlarging fold connecting the two sides of the slit). My pattern has 3, two side slits and one back slit and all three have this filler flap. It makes it bulky and flouncy, more like jacks coat. I just don't see any bulk to Will's coat, like it is a simple one layer bottom. Anyone have any pics or maybe has seen this coat on display? I feel like it is far more like a long dress coat and not a full captain's style coat.
Pirates_of_the_Caribbean_s_Will_Turner_Fathead_Disney_Wall_Graphic.jpg
 

Attachments

  • Screenshot_20221120-180627_Samsung Internet.jpg
    Screenshot_20221120-180627_Samsung Internet.jpg
    517.2 KB · Views: 78
Looks like it...even the poster doesn't show any slit(s) or material joining any...more like on long coat.
The pic is a bit blurry, but it does seem whole at the rear.

1669212296782.png
 
While watching the reunion scene the coat flips up for just a second and shows a slit. No webbing. I believe it represents as solid because it is the type of slit where one tail lays over the other by an inch to 2. So I have removed all webbing sections from my pattern but am now looking for the exact orientation of the lower sections. I can only guess it is possibly 3 sections because that would explain it not showing a central slit in the back. And again, nothing found so far to show this coat from the back. I even checked the scenes from Kingdom Hearts III. They seem to show one solid coat no slits. Here is the one moment I saw a slit... honestly it could be the whole coat whipping to one side... it hurts us... I even emailed Disney (cross all your fingers because it is a long shot). The only thing I cannot do is find contact info for Penny Rose, the designer, so if you have a contact, I promise to be super courteous and not weird. I even offered my buddy 15 bucks to watch this again on his 4k jumbo. The scene where the Dutchman comes to rescue the team from Beckett, if it were viewed in box rather than wide (a version I don't have) it might show the bottom of the coat the same as that same scene in Kingdom Hearts 3. Yes, I am hinting strongly to anyone who is willing to look. Oh and I asked my buddy in Japan to double check in KH3 for a possible 360 character display.

Will_Turner_curseless.jpg
 
While watching the reunion scene the coat flips up for just a second and shows a slit. No webbing. I believe it represents as solid because it is the type of slit where one tail lays over the other by an inch to 2. So I have removed all webbing sections from my pattern but am now looking for the exact orientation of the lower sections. I can only guess it is possibly 3 sections because that would explain it not showing a central slit in the back. And again, nothing found so far to show this coat from the back. I even checked the scenes from Kingdom Hearts III. They seem to show one solid coat no slits. Here is the one moment I saw a slit... honestly it could be the whole coat whipping to one side... it hurts us... I even emailed Disney (cross all your fingers because it is a long shot). The only thing I cannot do is find contact info for Penny Rose, the designer, so if you have a contact, I promise to be super courteous and not weird. I even offered my buddy 15 bucks to watch this again on his 4k jumbo. The scene where the Dutchman comes to rescue the team from Beckett, if it were viewed in box rather than wide (a version I don't have) it might show the bottom of the coat the same as that same scene in Kingdom Hearts 3. Yes, I am hinting strongly to anyone who is willing to look. Oh and I asked my buddy in Japan to double check in KH3 for a possible 360 character display.

View attachment 1641333
I swear I have a headache from squinting at this scene. So, I finally found it. The incredibly unlikely shot of Will's coat from Jack's spyglass. After doing some serious zooming.... it is one central back slit and the left side flap lays over the right side flap making it look solid most of the time.

Screenshot_20221124-023516_Samsung Internet.jpg

Screenshot_20221124-023207_Samsung Internet.jpg
Screenshot_20221124-023644_Gallery.jpg


and the one with flap closed

Screenshot_20221124-024910_Gallery.jpg


and now I am going to bed, tomorrow is Thanksgiving and I will remember to list all of you for your help on everything. Still have quite a haul to go but very thankful for all the tips and corrections.
 
Well, I'll be damnedo_O Great research; did you try LinkedIn for Penny Rose? I'll cross my fingers to see if Disney will respond to your inquiry;)
Well, I couldn't wait to post this, so here I am on Thanksgiving.... :) My buddy did the Kingdom Hearts 3 research and they show the coat with NO SLIT!!! So even the game designers didn't put in a slit nor a gather even though it is there. I will also link the youtube short vid showing the flap blowing. And this confirms for me that none of the replica coats are correct either, at least the ones I found for sale.

20221124_091353.jpg


In the following video clip, set the play speed to .25 and turn dpi up to highest resolution. It shows at the very last partial second before Jack puts down his telescope:

between 21 and 23 seconds on the timer.

Update: I recommend watching this clip at youtube. Viewing it within the RPF thread seems to nearly hide the moment the flap pops up.
 
Last edited:
Very subtle for sure; seems that the flap is covering a lot of real-estate on each side, covering more the fabric of the other flaps located on each side of the coat. Not your typical design for sure. I'm wondering also at the cut of that major middle flap in terms of sewing and cutting the coat.
So, it seems that some additional fabric was added to the right and left hand side flaps as to make sure that the middle flap covers it all?:unsure:
So far as I can put together from the different instances of it actually showing, it does seem that the sides (when they do flip up) seem insubstantial like they are smaller or lighter than the back. Like when he crests the hill and you see sky next to his right leg. Then when the back flips up , in the kissing by telescope scene, it does expose a LOT making it seem to be either a very large 3rd flap directly in the center back..... or it is a central slit that has a large amount of overlap. I would love to see the original so as to put this one to rest.
 

Your message may be considered spam for the following reasons:

If you wish to reply despite these issues, check the box below before replying.
Be aware that malicious compliance may result in more severe penalties.
Back
Top