Quick note on the sash that Will Turner wears under his waist belt in these last few movies: onscreen version is extremely custom. I have not found the source material nor the loom pattern. I did however get really lazy and came up with a new method for adding the loose ends at the very end of the sash. I placed a long strip of packing tape (clear) on my worktable and then overlapped half of that with another strip to pin the first to the desk. I kept this horizontal to the work edge and a distance from the edge nearly one inch longer than my estimated need for tassle ends (9 inches). Using my chosen colors, in thick cross-stitch/embroidery thread, I zigzagged from my work edge onto the sticky tape and back to the edge, while moving across the distance of my sash width. I overlapped my colors. This skipped the need for cutting each to length or sewing them in singles. When done I cut the tape in half, cutting away the part with no threads, to free up my creation, still attached to the remaining tape. I then placed them inside the open end of my sash material (mine was not knit but rather printed, doubled, material) far enough to completely hide the tape, and sewed this in place with two passes through the sewing machine. I will continue to look for a closer match on materials but am very happy with this tassle method. After sewing, I cut the loop ends to create the single strand tassles....
20221014_144933.jpg
20221013_220740.jpg


Screen original:
20221014_153001.jpg


Mine is 15 inches wide and 7 feet long for the material and an extra 16 inches for two 8 inch tassle ends. I would guess the screen version is more like 9 feet just for the main sash. If it is double wrapped, like Jack Sparrow, it can be 11ft to 16ft depending on waist size.
 

Attachments

  • Screenshot_20221014-105220_Messages.jpg
    Screenshot_20221014-105220_Messages.jpg
    763.2 KB · Views: 54
Last edited:
I have started on the final belt and have experimented with several impression stamping methods. My first idea was to use a soldering iron add-on but it was too weak and made 3 trials before breaking. I now have a large unbreakable tool but am having issues heating it. Too hot destroys the vinyl and too cool does not impress.....

20221014_230248.jpg


Initial sculpture.

20221015_093632.jpg


First working model that quickly broke.

20221015_175206.jpg


Larger stamp with handle. I heat this one with a torch and press it into the back of the vinyl into a bed of sand in a cupcake tin.

20221015_225511.jpg


The ultimate of course would be a timer press with clamp but I haven't given up yet on manual stamping.
 
Last edited:
Finally took the plunge and stamped the entire length. No paint yet, but am very happy with the heat imprinting...
20221016_205643.jpg


In the wise words of KungFu Panda "WITH AUTHENTIC BATTLE DAMAGE!!!" I decided that any burn holes are "weathering".

20221016_211639.jpg
 
Last edited:
Yep; hand stamping leather is not easy...your idea to do so on a sand bed is not bad. Have you tried other medium like wet wood?
As for the buckle; a little green patina would add a "je ne sais quoi" to it, as well as getting more wear and tear on the 2 pointy parts & the edges. So more gold can be seen;) Eager to see your next update
 
I could have sworn I posted this already but the sword belt and final paint on that buckle is here:

20221017_124324.jpg


and no matter how many times I say done... now I want to put another wash of powder black/ brown over the shine. Note the deeper copper brown on the buckle. In the sun it shows the green spots I added as well. Will upload better buckle pic later today. And keep the tips coming, they are guiding me in the right direction.

20221017_125149.jpg
 
Last edited:
So, finally back around to give sizing for the Baldric (sword belt). First a finished pic showing overall shape. (Please review the older post about cutting, patterning and sewing, above. September 26th 2022)

20221017_194243.jpg


Note the acute angle. This is achieved in the frog portion (large v) by having one leg longer than the other. The other two sections are straight belts. (10-18-22 Update: I noticed it is very hard to see the true frog shape and it is not an equal sided v. Looking at it from the front, the left leg is 90 degrees, perfect corner, to the buckle end belt. The right hand leg is the one at an angle and goes straight into that angle you see attached to the long end of the belt. Think of it like the love child of an h and a v. Actually, because it was originally designed using two straight template scrap pieces that were hinged with a bolt, you can imagine locking down the left one at 90 degrees and then swinging the second one out to the right to the angle in the picture. On the angled leg, at the point it folds back on itself, the angle is mirrored and it goes back toward the left. This bent my brain until I did it on scrap paper. The only way to get it to be aligned with the lower belt's straight line is to get that cut at the backward angle as after it folds, it hides the back flap behind the front flap. Practice first, cut last.)

20221018_080810.jpg

20221017_193200.jpg


This long section is originally 39 inches by 2 and 7/8 inches wide, before sewing front sheet to back sheet. There will be a 3/8 inch fold over onto the back, on all edges, allowing a 1/4 inch sewn overlap on the back. The back sheet is 38 and 1/4 inches long and 2 and 1/8 inches wide. One end is round and the other end is oblong but sharper. Like the shape of one half of an American football. Spray glue or otherwise adhere front to the back with the back centered on the other, back to back ( nice sides facing out ) and remember it is center lengthwise as well (meaning it will be 3/8 in from the end of the front's end and centered side to side). Then fold over the front onto the back for a 1/4 inch flap for sewing. If you choose to do 1/2 inch seem allowance, add that to total width of only the front sheet and trim down to 1/4 after sewing. Finished width, after sewing is 2 and 1/4 maximum. There is one hole on the round end, 3/4 inch from the end (after sewing is complete) and centered side to side. Hole is the size of the fastener you choose ( mine was 3/16 bolt in my custom rivet). The holes on the other end start at 4 and 1/4 inch from the end (already sewn) with 1 and 1/4 inch between holes for a total of five holes.

20221017_193151.jpg
20221017_193147.jpg


Note weathering locations (visible aging/fading).

The shorter length of straight belt is the buckle end. It is front face 26 and 1/2 inches long by 2 and 7/8 wide before sewing. The back is 25 and 3/4 inches long and 2 and 1/8 inches wide. Both ends, on the front sheet and back sheet are round. Follow same instructions as long section for adhering and sewing. The holes and slot on the buckle end are as follows: First hole is 3/4 from the end (after already folded and sewn) and centered side to side. Second hole is 1 and 1/4 inch from end. The slot begins at 1 and 7/8 inch and ends at 2 7/8. To find the next two hole locations, fold the belt from the end in so that the slot cut is folding in half, end to end. Mark the two holes by marking through the first two holes.

20221017_193052.jpg


The holes on the other end must be done while lining it up with its location inside the folded legs of the frog portion of the baldric. There must be two, one for each leg of the frog or your sword will squash it out of shape. It is very important at this point to test these as follows and make sure you are only marking the hole locations while having it put together in its final formation. I advise using food bag clamps or other non destructive spring clamp (no sharp edges). Pictures below show view from the front and back and apart. Get very familiar with this before poking any permanent holes in your hard work. These holes, when done correctly, cannot be seen from the front.

20221017_210847.jpg
20221017_210533.jpg
20221017_210629.jpg


In that last picture, see how the buckle belt section is facing front up and the frog is backside up when you mark the holes. The idea is that the bottom folding section of the frog wraps around the other belt section and then leaves an even larger gap before it bolts to itself. The loop it is forming is where the sword scabbard goes through. This leads us to the funny frog leg portion of the Baldric. Use the picture of the flattened frog as a pattern ( the much older post has the best flat image, near beginning of this thread). Size it on your print, using 11 x 17 paper so that the length from the longest edge, round point to leg's point is at 16 inches. At the point where the leg's width can be measured separately, they are both the same as the two straight sections with a finished sewn width of 2 and 1/4 each leg (again, the best sewing pictures are from an earlier portion of the thread on September 26, 2022). The hole on the round end is 1 and 1/4 inch in from the end and centered side to side. The holes in the folded leg sections need to be set to allow the buckle section to go straight across both legs, without warping. Pin the folded legs in practicing so they are far enough up the belt to allow for your decorative rivets to not be over the buckle belt section inside the folds. Take it slow, hold the rivets up to you work and make sure everything is flat and not warping. The potato chip bag clips come in very handy here.

20221017_210541.jpg
20221017_210533.jpg


Note wear and fading locations from movie version. More weathering and a powder matte black wash coat are still needed for this build.
 

Attachments

  • 20221017_193056.jpg
    20221017_193056.jpg
    1.4 MB · Views: 52
  • 20221017_210541.jpg
    20221017_210541.jpg
    1.9 MB · Views: 52
  • 20221017_210533.jpg
    20221017_210533.jpg
    1.9 MB · Views: 45
Last edited:
Getting there; do be careful to better finish the rounded parts of the belt. I know that practice makes perfect;)
What kind of sewing machine do you have to build your leather work? Sometimes, it's better to farm out some of the part to get a better result.
Eager to see your next update(y)
 
Getting there; do be careful to better finish the rounded parts of the belt. I know that practice makes perfect;)
What kind of sewing machine do you have to build your leather work? Sometimes, it's better to farm out some of the part to get a better result.
Eager to see your next update(y)
I skimped and used vinyl. It is far stiffer than the same thickness of leather and has been kicking my butt in the rounded, clipped sewing areas. Lesson learned, leather for sure and more practice as you mentioned.
 
After much sewing and nightmare, I am one buckle tongue away ftom completing this belt. Serious pointer on sewing vinyl and/or painted cloth. Use a "walking foot" or just don't try. I was without a piping presser foot, got bored, and attempted it without. About 2 hours later I gave up on piping with the cord present, finished without, hated the flat piping, spent 3 hours putting cordage in my piping manually. Serious as I can be, walking foot for anything sticky, slick or thick pile and get the piping foot for piping right with cord in while sewing. Get a walking foot with the u shaped front lever that can be pushed up and down by the needle screw adjustment. The straight arm one fails more than half the time because it is pushed up but springs down on its own... unless it doesn't and your material gets ruined. Some painting done but more to come.

20221021_235321.jpg
 
Yep, vinyl tends to flatten unless the threads are close to the edges. Eager to see your next update. (y)
This build, and the troubles with it, have finally convinced me that I need to adjust my judgement on time vs dollars vs possibilities. Likely, I won't say this right but I have, for decades, had a great eye and judgement for needful things. For a long time McGyvering something was nearly as good as the original part or item. I literally have a degree in manufacturing engineering. This carried over very well into costumes and I can normally recreate the rarer parts of the costume quickly by using normal found materials. On this build I have found the exception to this. Vinyl is only a replacement for leather when it already looks like the finished item, without needing paint or texture. It can't be expected to lay correctly, fold correctly or weather at all. In the very same build that I have been crazy happy with resin pour items that replaced metal ones, I have been convinced that the cost difference between leather and vinyl doesn't really exist. The extensive time, frustration and below par end result makes leather the only true source for replacing/replicating leather items. And not to knock the quick costumes that require it from sheer availability of local materials, vinyl is everywhere so get that quicky costume out and have fun at the event. But for screen match, leather for the win.
 
^^
I hear you and you're right; you have to make decisions in terms of accuracy % and $$ amount + time spent trying to find visual tricks/illusions to achieve your accuracy %. It's all about experiments in different techniques used by prop and costume designers to achieve something ;)
Do I want a hero prop/costume? A secondary type of quality I can live with? I know the feeling very well:D
Of course, the experimentation is also costing money. Take embossed vinyl: some have heated the vinyl (heat gun) before embossing it on a piece of soft wet wood (pine). Some have used other techniques that are kept secret by the pros or even the amateurs.
The main thing is to have fun and be happy with the results at the end. It's all a learning curve and to gather all of this info for future build.
True and living it right now. After the harshness of dealing with the vinyl, I finally got to sit and paint and weather my finished belts. This is the relaxing bit and I have really enjoyed each phase, base coat, weathering (special note, vinyl doesn't weather, I painted on the weathered look, additive not subtractive), top coat, color fades, stains/washes vs paints. This also started out as experimenting and I learned to just keep changing it til it feels/looks right. When I am satisfied, I can let it be for a day or two, check my inspiration scene pics and judge my work with a fresh glance and kick out another layer or even minus one with more wear/ weathering. Today I learned that the gloss of my acrylic based leather paints can be matted to a beautiful real leather finish with a very quick coat of rubbing alcohol 3%. Can't spend more time than applying quickly or it will begin to thin the existing paint but if you just mist it on or very lightly/quickly brush it on, that super fake plastic look shine just disappears. And it takes only minutes because it sets again as soon as the alcohol evaporates. I do not know the chemistry on that so I may regret it later if it is degrading the whole layer but it sure brings in that soft warn leather finish to what would have been high gloss. I had only intended to put a final black wash over the brown and got the black and the matte in one go. One part black, one part chocolate brown, 3 parts 3% rubbing alcohol and I got an antique wash coat. Super stoked now to put it all back together tomorrow for pics of the finished pieces.
20221023_211436.jpg
 
Last edited:
Oh and this happened today... Was looking for the prong material for this last buckle and got a hint from God that I was seriously taking too much time on this build. Found this cotter pin in my tool box. The second picture is moments after when I placed it on the belt. I had not done anything to it at all and it was the perfect bends and length. Last picture is the in-scene match pic.

20221023_165857.jpg
20221023_165940.jpg
Screenshot_20220922-225845_Gallery.jpg


and the final buckle...

20221023_213035.jpg
 
Yep, that 3% alcohol did the trick on that vinylo_O(y)(y) We're not just model/prop/costume makers; we're also alchemists :D
It's really looking good and that belt is A+
 
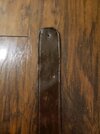
Because I seem to have mastered the art of not following a straight thought process, I have some catch up posting to do today. First, the construction of the animal print (tortoise/turtle most likely but has been suggested to be choice sections of croc/al without the spikes) belt. Previous post, from Oct 15, shows the creation of the embossed pattern face. Let's just agree now that there were things that should have been done differently and I hope this can save you some headache on yours. First mistake, I used vinyl instead of leather. Just don't. Leather would have been so much easier to emboss, color and weather/age. Second error, I made this belt in four separate strips when it needed only 2, a front and a back. I made the piping as a separate strip on both edges because I had it in my head to make piping like for furniture. This means I cannot provide the width you need to do the leather as it would just be the front folding onto the back (as my baldric did on post Sept 26) but with enough space in the fold for 3/16 inch piping cord.

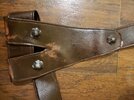
Mine was two side strips sewn face to face with the front pattern side at the edges (one per edge). Then unfolded and wrapped completely around the back to cover the edges of the back face while wrapping around my cordage edging. My vinyl had a cloth back. Keep this in mind when viewing the pictures, cloth means back in this belt process. This first pic shows two stages, before sewing and after the edges are turned out. The second picture shows stage three, sewing this 3 piece front onto the back layer.

sewing the pattern belt_1.jpg

sewing the pattern belt_2.jpg


In that picture the vinyl sides are facing out. No cloth faces are showing.

(Update 10/30/22 Heads Up: In the following sentence I describe some trimming that should not have been done at this point. You will see why, a few sentences later)

Because of doing this 4 piece method, there was a lot of excess width that was needed for the sewing machine and then trimmed off before wrapping the edges onto the back face. The piping edge strips started at 1 and 3/4 inch wide. The front pattern face was 2 and 3/4 inch. After sewing the piping edges to the pattern face at the edges, two strips on opposite edges, I trimmed 5/16 off both edges. This left the Patterned face at 2 and 1/8 wide with the seam just inside the cut edge (about 1/8 inch). Using fabric adhesive, I adhered the front (cloth backside) to the back (also the cloth backside). In sewing terms, this is wrongside to wrongside. The back face vinyl did not have a pattern, in order to match the movie. This back of the belt shows prominently in most scenes. The back face width was 2 and 1/4 inches so when aligning the two pieces, centered to each other, it will have a protruding edge on both edges. About 1/16.

This is the hard part. Folding the front edging flaps all the way around to the back (with piping inserted) turned out to be too difficult and I was forced to sew it first and then insert the cord.... not fun. Had I started with an edging width plus another half inch on each edge, I could have sewn the piping in during the last step. The sewing machine must have this extra width or it will attempt to eat the edge and jam the machine.

(you saw that right? I needed the extra distance I trimmed off moments before..... So ya, don't trim the two side strips (piping) until the entire belt is finished)

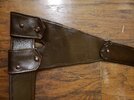
When the front flaps are folded back they reveal the seam. Using a method referred to as Stitch in the ditch, you will now sew the front to the back through this seam which will now contain 3 layers, front seam, back face and folded edge of the piping piece. See image above of rolled edge. If you make the same mistake I did or otherwise cannot put your cording inside the piping flaps during sewing, MAKE SURE TO LEAVE THE EXTRA FOR PUTTING IN THE CORD AFTER. It should leave a big loop on both edges to put in the cord.

20221026_101948.jpg


When done, you can trim the back of the belt in any areas that are not straight on the excess folded cloth past the seam.

20221026_104342.jpg


I finished the buckle end with the four holes and prong slot as was done on the belt from the baldric (Oct 17 post).

20221026_104713.jpg


Also, when painting, remember the back is solid dark brown heading to black, even the piping edge. Paint all fasteners to hide them, no shining chrome allowed.

And my defacto excuse, this is not replica quality as a single piece. My goal is to be near screen match on the portion the camera will see. This is not original match hardware in the fasteners.
 
Last edited:
Second catch up post of the day: The sword.

This pic is the potc5 reunion (credits) scene with Orlando:

20220614_182824.jpg


That sword was new to me, having never seen him carry this blade. Research showed it is an 1860 Navy Cutlass.

20221026_113750.jpg


This matches what little we see in the scene but I found reproductions available did not match and had fewer rivets, longer pommel, etc.

Screenshot_20220830-221013_eBay.jpg


and because this is about making the costume vs buying the right pieces... I made one.

20221026_111305.jpg

here is a closeup of the onscreen for comparison. I missed the little ridge that runs along the edge.

Screenshot_20220817-231323_Gallery.jpg


20221026_111343.jpg


The blade is from a thrift store find that was a decorative wall hanging, for 17 dollars. You could definitely make a very decent copy using a yard stick painted silver.

The handle is a broom handle with this decorative metal cap. The broom handle was drilled through to allow the tang of the blade to pass through to the pommel nut. I had been hoarding these shampoo lids, hoping to use one on a costume.

20221026_111417.jpg


The pommel end button I sculpted out of plastelina. Then cast in plaster and finally two part epoxy resin poured in Alumilite's 5 minute white resin. During the resin process I placed a nut and bolt into the resin. After it hardened, I removed the bolt. This allowed me to use this end button to refasten the new handle to the blade as it was already threaded.

The hand guard was excessively difficult. I used the cone from an atv headlight, cut in half, riveted to a formed metal band that I had plasma cut by hand from a shovel head. The rivets are from my wife's scrapbooking supplies. Much drilling ensued, followed by a lot of painting. When I placed the cone inside the metal band, I drilled through my existing holes to make matching holes in the cone. I placed the rivets and then I ran a full line of JB Weld two part epoxy to hold the cone to the metal band. The rivets are very weak and only for matching the size of the originals. I then finished painting it as one unit.

As for costuming, the originals are over 1000 each and the new replicas are not made of the same materials, so weathering would be near impossible and with construction differences (size and number of rivets), would never match.

Given that you could only see the differences if they were side by side, buying a new replica for 100 and painting/staining it, instead of weathering it, would be far more recommended than making one.
 
Last edited:

Your message may be considered spam for the following reasons:

If you wish to reply despite these issues, check the box below before replying.
Be aware that malicious compliance may result in more severe penalties.
Back
Top