H3LLJumper
New Member
Thank you for the info. now is that the Hight Bright wire or the Heavy Duty wire that you showed here?
High Bright! :lol
Thank you for the info. now is that the Hight Bright wire or the Heavy Duty wire that you showed here?
From what I've read about EL wire in general, the copper wire with the phosphorus coating (the part that lights up inside) is the same in both regular and heavy duty EL wire, it's just that the heavy duty EL wire has a thicker PVC outer layer (3.2 mm) than regular EL wire (2.3 mm). Therefore the brightness would be about the same.
Now with High Bright EL wire, the glow is actually brighter than regular EL wire (about 50 percent brighter according to Glowire's website), but apparently has a shorter lifespan. It's also slightly thicker (2.5 mm) than regular EL wire (2.3 mm).
Glowire has a basic explanation of their EL wire products here:
BASIC GLOWIRE INFORMATION
IMO, I think the High Bright EL wire would probably be the best choice for you, Annisse, since you want the most light to pass through the diffusion layers you'll have on your costume.
") and thank you both!
and thank you both! High Bright! :lol

Dude, don't go this way.
I have posted many times and noone said nothing. Ok, but now everyone is going my direction. Funny.
The amount of work and time you will need to do the suit will be completaly spoiled if you attach it to this armor.
Now, for once and for all my friends:
GO WITH SMOOTHSKIN NEOPRENE WETSUIT FOR THE RUBBER PARTS!!
BUT TWO SIZES BIGGER!!
Sorry I can't say it clearier.
I will post mine about January,
Regards my friends
(RE: kaiwalkerz's post) That's just one option on how to do the costume. It would be a flexible way to do a screen accurate costume.Was that "Don't do it" aimed at my info request? If it were, I don't see a single reason that it would be difficult at all as I am not mod'ing the armor or placing the plates on another suit. I am just putting a single, small led into (under) each of the plates with a hidden line of wire leading under the pads back to the power source on the lower back area. Soldering a dozen LEDs and running some wires is hardly 'a lot' of work.
Looks great and can't wait to see it in person tomorrow at ElecTRONica Macross!
The issue I have is my extreme lack/no experience with the power requirements of the LEDs. The power will come from a direct 4.8v (4xAA 2500mah recharge batteries) power source. The LEDs will be something in the 5mm size range with around 1.7v, 20-30mah max each reqs. I would assume to wiring them in series, 12-14 of them (depending on brightness). There is a concern what resistor to use (if only one from the source or one on each LED, I don't know which method is best) and finally the worry of eventually over-heating the LEDs (since padded plastic does not make a great sink) due to active use over a number of hours during the upcoming Tron screening party.
Any ideas, hints, good ol' wiring instructions?? Thanks and keep up the amazing work all.
As for wiring the LEDs, what color are they and what is the voltage range of them?? Each color & size is slightly different.
Here is an LED resistor calculator that I've found very useful: LED Resistor Calculator
gams001: have you looked into SMD LEDs yet? They are itty bitty and can be a bit computer ribbon cables and run them around the pads if you dont want to poke holes from behind them as well...
Why do I keep seeing the vision of someone screaming 'I looked at the trap!!'? :eek
Interesting items, but I worry about the lights actually blinding someone in a darkened club event, though I would think I am assuming more than they will produce.
Any idea of where I might find some details on wiring them and resistor requirements, etc?
This site was helpful for me:
Resistor calculator for leds from MetkuMods - Because you love your hardware!
Helpful, ty.
Seems, unless I misunderstand how this works:
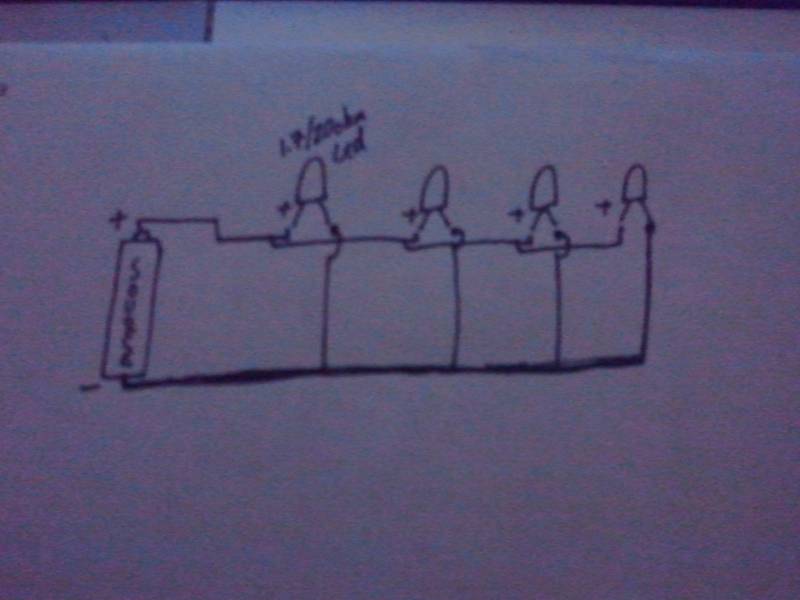
12 LEDs, at 1.7v, running at 20mah, in series..
Require a power source of: 20.4v?
So in order to do 4 LEDs on each arm and 4 in the chest plates, I would have to basically wire three different sets in groups of 4, each sourced on 9v battery.
Or am I wrong in thinking this way and should be wiring them in parallel?
Seems about right. I know my baton has 4 (5V leds @ 10Mah) running off a 9v battery and they are wired parallel, so if you wired your (which have a smaller voltage) leds in a series you could run them part series and part parallel and get away with fewer batteries. (be aware the drain on the battery would be faster that way) Also make sure you have the correct resistor for the series you want.
Check my thinking if you could.. a parallel build:
Looks good, just don't forget your resistor(s)
As I understand it, you can put one main resistor on the pos to 1st LED, so long as it is made to handle the entire line and is before the first split off for the parallel circuit. Is it 'better' or just 'wiser' to put a resistor before every LED, not just a bigger one before the first?
since resistors are so inexpensive I just put one before each of my LEDS. but I think either way will work (providing they are all the same color. From what I came to read, different LED colors have different volts, so to be on the safe put the correct resistor before the correct color...but since mine were all the same it didnt matter (however) I still had 1 resistor for each led. (guess I'm just redundant)