Tomenosuke 2049 Kit - Sharing some mods and my Blade Runner Blaster journey

Here's another couple of changes I made to the magazine housing.

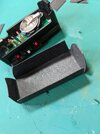
I found that the back side of the LEDs were visible through a thin gap between the barrel and mag housing on the right hand side of the blaster.
There'd be lots of ways to sort this but I just used what I had to hand at the time, which was a bit of black card.
I just cut a sort of lid out of the card that slots down around the circuit.

Tomenosuke Blade Runner Blaster - Magazine mod light blocking - Akwalek RPF


Okay, this next one, I'm open to admitting it might be a little overly fussy...

...I think the LEDs burn too bright. Maybe even twice as bright ;)

I love what Tomenosuke have done with the warm up of the lights when switched on but for me they never look super bright on screen.
To sort this out to my liking I tried a few different ratings of resistor between the battery and the + terminal. 2k seemed about right so I cut a 20mm disk of 2mm thick acrylic, put a strip of 5mm copper tape onto the bottom and wrapped around to the top. Then I cut a gap in the tape and soldered the resistor between them. The result is pictured below.

PXL_20220319_113200005.jpg
 

Attachments

  • PXL_20210514_125556344.jpg
    PXL_20210514_125556344.jpg
    1.5 MB · Views: 72
Last edited:
So the next mod was unfortunately needed to fix an issue that I created rather than a problem with the Tomenosuke.
I stripped the thread for the small 8/32 [EDIT - 4/40 not 8/32] screw that goes into the back of the grip frame to hold the inner and outer frames together. The one just above the large hole on the back strap of the frame.

My first thought was just to re-tap for a larger thread but it can't really accommodate a larger screw. So I ended up creating a sort of bracket on the inside of the grip frame, tapped to take the 4/40, that would pull the outer frame against the inner frame.

First step was to drill out the stripped thread. I went for a hole about 5mm diameter.

View attachment 1556787

Next I formed the bracket from 5mm square mild steel bar using my handheld rotary tool and a grinding disk. It was finished up with hand files, then drilled and tapped for the 4/40 screw. The second image shows a test fit of the piece.

View attachment 1556790View attachment 1556801

Below is the finished piece installed. I painted it black so it is not visible through the amber grips. It works great and is much less likely to fail than the threads that were in the relatively soft metal of the bulldog grip frame.

View attachment 1556802
this happened to mine as well, I couldn't think of a good way to solve this issue until I saw this. Thank you!
 
Another issue with the Tomenosuke Blaster's is a loose bolt handle.
I say issue but I know that the real prop has a loose bolt so potentially this is intentional. Anyway, it's not really a feature that I wanted to replicate.

I'm pretty sure that the changes I made are common mods but I'll detail them here anyway.
First up is to shave a little off the stepped bushing at the back end of the bolt assembly. It's circled in the image below.

View attachment 1557722

I filed a little off the inner face of this (circled in red below) which results in everything this end fitting a bit tighter. You've got to be careful though as too much off will have the opposite effect.

View attachment 1557723

It was still a little loose for me so to add bit of extra friction I cut little spacers out of an old black nitrile glove. This material is great for this sort of task as it's super thin so doesn't cause fit issues.

View attachment 1557727

A couple of these were then put between the back part of the Steyr receiver and the bolt end where the bushing screw comes through. You can just about make them out in the image below. This is the back end of the Steyr receiver assembly viewed from below.

View attachment 1557728

As well as this I made an alteration at the front end to the pin that protrudes through the front cap of the receiver assembly.
I saw someone else do this on this or another forum, so if that was you then thanks for sharing.
First up I mounted the pin by the threaded end into the chuck of my rotary tool. I then spun the pin whilst holding a file against it to cut a channel into its shaft. Next I made a rubber O ring from a piece of old bicycle inner tube and slid it down into the channel.
It just needs to be slightly wider than the pin so it has a bit of grip in the hole it rides through in the front cap.

View attachment 1557730

These mods combined result in a really smooth action for the bolt assembly and most importantly, everything stays put when the bolt handle is closed up!
I went for the approach I use when I do on set props and just put some strips of gaff tape in the bolt assembly until there was no more wiggle or rattle
 
For the last couple of months I've been meaning to take some nice pics of the completed blaster to share with you guys.
Well when I say completed, I mean I've not messed about with it for a sustained period of time!


So here you go....

Tomenosuke Blade Runner Blaster Custom Stand - Akwalek RPF

Tomenosuke Blade Runner Blaster Custom Stand - Akwalek RPF

Tomenosuke Blade Runner Blaster Custom Stand - Akwalek RPF

PXL_20220616_135512488.jpg
Tomenosuke Blade Runner Blaster - Akwalek RPF

Tomenosuke Blade Runner Blaster - Akwalek RPF

Tomenosuke Blade Runner Blaster - Akwalek RPF

PXL_20220616_134621282.jpg

This one really reminds me of a Rick Ross PKD promo shot.


Plus one for laughs, if just one person gets this it will have been worth it! ;)
Private.jpg
 
Congrats on the awesome result! your blaster looks amazing :)
Thanks so much eethan!
Amazing journey and results :cool: :cool: (y) (y)
Cheers joberg, It's only taken 27 odd years to finally realise that dream of holding a Blaster that feels just right!
Lovely blaster and I really like that stand too.
Thanks so much mrwax. I'm really please with how it came together.
With regards to the stand, I'm currently putting together a Project Run post to offer them for sale. I already have a few made, just working on the packaging.


Here's another pic of the Blaster displayed in my Cabinet of Awesome!
I really need to dust those doors.

Neon Nautilus' Blade Runner Blaster Display Stand
 
All that work really paid off. I like that you've gone with a darker blued metal look. I think that is a very good look on this gun.

It's interesting where Blade Runner had taken some of us creatively. I will never forget pausing the film on our VCR when they show the close up of the gun (when it's close to the wall, and rain is dripping down the wall) and my friend is got mad at me for pausing it. I asked him what he thought the gun was, your post made me think of this reply: "A beretta with a laser sight! Just play it already. Who cares?" I replied "That ain't no beretta." and we happily watched the rest of the film.
Thanks Noeland!
Great to hear my post sparked that memory. I guess the way the Beretta has the end of the barrel protruding from the front is a bit similar... but yeah, come on, it definitely ain't no Beretta!

I can so relate to pausing the VCR. Pretty sure I wore out the first copy I recorded off the TV freeze framing that shot.
Thinking about that scene, I'm still not 100% decided on whether or not to put the wires in under the sight rod. In my memories it's quite an important detail as they're quite prominent in that shot and it was one of the few ways to get a good look at the blaster back then.
I always thought the curved line of the wires was some sort of lever.

I went through the process of finding the perfect wire, brought 4 different kinds. Ended up with a computer ribbon cable being the best as it looks like they're all linked together in Karl Tate's pics. Weathered them up and installed them but they just didn't feel right on there.
 
For the last couple of months I've been meaning to take some nice pics of the completed blaster to share with you guys.
Well when I say completed, I mean I've not messed about with it for a sustained period of time!


So here you go....

View attachment 1588311
View attachment 1588312
View attachment 1588313
View attachment 1588314View attachment 1588315
View attachment 1588317View attachment 1588320
View attachment 1588330View attachment 1588394
View attachment 1588416
This one really reminds me of a Rick Ross PKD promo shot.


Plus one for laughs, if just one person gets this it will have been worth it! ;)
View attachment 1588367
stunning, I'm waiting on a metal cylinder to finish off my blaster and then its on to a stand/case. Im also considering doing something really crazy since I live in the southern U.S and buying an original charter arms revolver, de-milling it and putting it in my blaster to make it perfect.
 

Your message may be considered spam for the following reasons:

If you wish to reply despite these issues, check the box below before replying.
Be aware that malicious compliance may result in more severe penalties.
Back
Top