PartyPyrate
Active Member
Re: Money can not buy you the honor you have earned today.
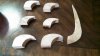
Time to start the helmet weave.
I am fender hitching a netting for the helmet. I believe this is the most accurate patterning based off the pictures I have studied. Here I will present a picture of the helmet and a picture of my tracing of the roping. To me and my past as a naval/pirate re-enactor I can only see this as a fender hitching pattern.


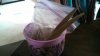
Progress:
So I have taped some line in place and started the hitching. I used glue gun sticks to keep the knots even until I had the first row done and then superglued the first row of knots to the brim of the helmet. Now I am in the slow process of weaving the netting for the helmet.


Time to start the helmet weave.
I am fender hitching a netting for the helmet. I believe this is the most accurate patterning based off the pictures I have studied. Here I will present a picture of the helmet and a picture of my tracing of the roping. To me and my past as a naval/pirate re-enactor I can only see this as a fender hitching pattern.
Progress:
So I have taped some line in place and started the hitching. I used glue gun sticks to keep the knots even until I had the first row done and then superglued the first row of knots to the brim of the helmet. Now I am in the slow process of weaving the netting for the helmet.


")

![IMG_20150301_105730_515[1].jpg](https://therpf-f28a.kxcdn.com/forums/data/attachments/191/191721-70a3f471f866499efc19b0114ff74b7d.jpg "IMG_20150301_105730_515[1].jpg")
![IMG_20150301_161157_361[1].jpg](https://therpf-f28a.kxcdn.com/forums/data/attachments/191/191722-a965945be46e7041717ff46bd3396ad6.jpg "IMG_20150301_161157_361[1].jpg")
![IMG_20150302_192803_552[1].jpg](https://therpf-f28a.kxcdn.com/forums/data/attachments/192/192779-41198c572eea653888c2d102b6bd9b96.jpg "IMG_20150302_192803_552[1].jpg")
![IMG_20150303_170802_201[1].jpg](https://therpf-f28a.kxcdn.com/forums/data/attachments/192/192790-13eb2e36532e48c51e9831e7912e9045.jpg "IMG_20150303_170802_201[1].jpg")
![IMG_20150304_060008_906[1].jpg](https://therpf-f28a.kxcdn.com/forums/data/attachments/192/192794-74952a828e4693b64204622cf6ba19a1.jpg "IMG_20150304_060008_906[1].jpg")
![IMG_20150304_170027_651[1].jpg](https://therpf-f28a.kxcdn.com/forums/data/attachments/192/192795-e20f68165a3eaec08130e50fb97e7064.jpg "IMG_20150304_170027_651[1].jpg")
![IMG_20150304_170808_229[1].jpg](https://therpf-f28a.kxcdn.com/forums/data/attachments/192/192796-33e61a6b09063c2e7e0da1709c5c819f.jpg "IMG_20150304_170808_229[1].jpg")


![IMG_20150323_195659_973[1].jpg](https://therpf-f28a.kxcdn.com/forums/data/attachments/199/199225-81ae78b9a723f862975910c90609845b.jpg "IMG_20150323_195659_973[1].jpg")

![IMG_20150324_165752_975[1].jpg](https://therpf-f28a.kxcdn.com/forums/data/attachments/199/199227-27e62666d470e7c04ba8ebb2f007047f.jpg "IMG_20150324_165752_975[1].jpg")
![IMG_20150324_165803_755[1].jpg](https://therpf-f28a.kxcdn.com/forums/data/attachments/199/199228-9e9dc1add914f592dcc6f626e7b18e41.jpg "IMG_20150324_165803_755[1].jpg")
![IMG_20150324_165816_346[1].jpg](https://therpf-f28a.kxcdn.com/forums/data/attachments/199/199230-e7accc4d8f817afcdbf665682e84a20e.jpg "IMG_20150324_165816_346[1].jpg")
![IMG_20150324_165833_744[1].jpg](https://therpf-f28a.kxcdn.com/forums/data/attachments/199/199232-0f44cacff63d7a3c88536fb21de6d26f.jpg "IMG_20150324_165833_744[1].jpg")
![IMG_20150327_163210_082[1].jpg](https://therpf-f28a.kxcdn.com/forums/data/attachments/200/200842-32a49f45e859deba0051ce41721c539b.jpg "IMG_20150327_163210_082[1].jpg")
![IMG_20150328_160349_726[1].jpg](https://therpf-f28a.kxcdn.com/forums/data/attachments/200/200843-3a93cf15feba88fcbf33bcb4fd76196b.jpg "IMG_20150328_160349_726[1].jpg")
![IMG_20150327_201649_807[1].jpg](https://therpf-f28a.kxcdn.com/forums/data/attachments/200/200844-a21162958da997eeb18ffcbbc2f7d04b.jpg "IMG_20150327_201649_807[1].jpg")
![IMG_20150327_202407_736[1].jpg](https://therpf-f28a.kxcdn.com/forums/data/attachments/200/200845-43a2c43db68c8f08ed97a3cfcff7da26.jpg "IMG_20150327_202407_736[1].jpg")
![IMG_20150327_203419_891[1].jpg](https://therpf-f28a.kxcdn.com/forums/data/attachments/200/200846-5ef6a7b12bcf7d37c87530d2e6b97fb6.jpg "IMG_20150327_203419_891[1].jpg")
![IMG_20150329_153629_632[1].jpg](https://therpf-f28a.kxcdn.com/forums/data/attachments/200/200848-6e03fc5d5d78ec246ddbdce92df7e75e.jpg "IMG_20150329_153629_632[1].jpg")
![IMG_20150329_175851_440[1].jpg](https://therpf-f28a.kxcdn.com/forums/data/attachments/200/200847-9f9f18ebe9990da517e7ac094979b1be.jpg "IMG_20150329_175851_440[1].jpg")
![IMG_20150402_143858_557[1].jpg](https://therpf-f28a.kxcdn.com/forums/data/attachments/202/202827-312aa7cc7aec5af9c18c66feb32f55d0.jpg "IMG_20150402_143858_557[1].jpg")
![IMG_20150402_144710_838[1].jpg](https://therpf-f28a.kxcdn.com/forums/data/attachments/202/202829-0640da35c6e439b1dbb4833fa2af785a.jpg "IMG_20150402_144710_838[1].jpg")
![IMG_20150402_180010_933[1].jpg](https://therpf-f28a.kxcdn.com/forums/data/attachments/202/202830-b5669eb1b14cd7610d975571ed9551f0.jpg "IMG_20150402_180010_933[1].jpg")
![IMG_20150403_082719_720[1].jpg](https://therpf-f28a.kxcdn.com/forums/data/attachments/202/202831-8c15a7a037a041e206652aaa2e8b6c9f.jpg "IMG_20150403_082719_720[1].jpg")
![IMG_20150404_075108_145[1].jpg](https://therpf-f28a.kxcdn.com/forums/data/attachments/202/202832-1dc86a0778d3aee9a497403c45d99b36.jpg "IMG_20150404_075108_145[1].jpg")
![IMG_20150404_155630_751[1].jpg](https://therpf-f28a.kxcdn.com/forums/data/attachments/202/202833-78c600f5f8e40255512aeba125ed3255.jpg "IMG_20150404_155630_751[1].jpg")
![IMG_20150404_100756_593[1].jpg](https://therpf-f28a.kxcdn.com/forums/data/attachments/202/202834-f851d4db1ecba8cb18fc6f8ba9612916.jpg "IMG_20150404_100756_593[1].jpg")