spidermanna
New Member
So anyone and everyone who has taken the time to make a Boba Fett costume has had to paint the armor so what I am about to elaborate on is something that is nothing particularly unique or novel or even really insightful. However, it is extremely rewording. Between building the armor and painting the armor was an extremely long period—not because I was working on other projects (well, actually I was, but more on those later) but because the idea of screwing up the paint job on this was keeping me up at night so I did a lot of experimentation, mainly to see if there was a way to apply multiple coats of enamel paint and then chip or scrape or sand them off in layers than made them look natural, such as spraying layers of acrylic (or starch, or hairspray, etc) between each enamel layer. While there may be a way to do this, I ran out of patience trying to find is and did what everyone else does—use masking and overpainting and well, it worked! (Big surprise, right?)
After doing all the traditional bondo’ing, sanding, priming, more sanding, and repriming, paint with metallic silver (which is pretty Beskar-ee, but not really—it is pretty accurate for what we need for Boba Fett and contrasts well with the various greens and yellows).
As I would be doing a LOT of painting with my Badger 360 airbrush, I made a cheap-ass airbrush booth out of the box my new hotwater heater came in (which went out conveniently over Christmas)…
As stated before, Dentedhelmet.com has a TON of tutorials which are way better than mine on painting armor and doing Boba Fett stuff (not so much on making gloves and boots though—lots on where to buy them but not build them)…Anyway, these are from the ESB version of Boba Fett, but you get the point.
Before getting into the actual painting, I figured I would cover an admin technique. What did was treated each piece like a separate workorder of sorts that would be going through different phases, which each phase either requiring a different color or paint, sealer, or weathering. Some pieces required multiple, multiple colors while others just required multiple colors. When they went from silver to base color+masking, they would move from one section of the table to the next and so on until they were all in the same pile. I highly recommend (can’t stress this enough) doing them ALL AT ONCE if using the same colors. Avoid doing one piece or set of pieces one day and doing the others days or weeks later—do them all at once, one right after another to maintain consistency… (FYI, the back plate had some issues so it was a bit behind unfortunately) …
Ok, on to the actual painting…
To achieve a hyper-accurate damage, I used my wife’s Silhouette (competitor with the Cricut) to make damage patterns and cut them out on sticky paper. I then simply stuck them to the armor where they were supposed to go before painting the next layer. In some areas I had to augment them with a bit of masking solution (like the dents), but for the most part this wasn’t necessarily. To keep the sticky part from peeling off the lower layers, I wet the parts with paper towels soaked in soapy water until the sticky basically dissolved which prevented unnecessary peeling. Sometimes I just soaked the part completely…
Like this guy.
Then I wiped all the sticky and making solution and bam!
Also, this is a great way to apply masking solution but be careful because its tempting to ‘paint’ with the metal tip like one of those quills from the 17th century but because it has a metal tip and you are rubbing it on paint, you will see every ‘paint’ line. Don’t say I didn’t warn you…
Painting the Mythosaur—this was not a sticker, but I did use sticker paper to mask the image
Yes, I used wet paper (just regular printer paper—not sticky at all) to mask the image and spread with masking solution. Then remove the paper prior to painting
Yeah, on second though, that didn’t work out as well as I would have liked. Use the sticky paper as masking instead. Wet it down and wipe it off…
It’ll look better when its weathered. Again, no stickers! (Sorry Etsy)
Used the same process for this symbol (which I honestly have no idea what it is—maybe the House of Fett?”)
On thing I did figure out was to try to start in the ‘middle’ (as it were) and work your way outwards as much as possible.
I think I ended up doing tiny bits of touch up with an actual brush! (how proletarian!)…
Again, will look better after weathering…
Occasionally scrubbing was required to get the sticky off but it never damaged the armor.
I think these 3 little spots were supposed to go all the way through the armor but I didn’t want them to so that’s that…
Ok, one super-critical element I need to mention. I recommend not removing ANY of the masking or sticky paper or whatever until the armor is completely painted, especially the green bit. Keep in mind, the armor is not ONE shade of green or a couple of layers of silver and yellow under a shade of green—there are like 4-5 shades of green (Disneyworld reference) in there. As such, his armor is supposed to be difficult to pin down a single color or shade, so I went random with the various shades. Next picture will show it better…
Notice the darkish bit running throughout. Some areas are darkened, others lightened. To make the areas look darker, I misted it with blue (same dark blue from the symbol), not dark green.
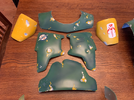
Don’t want to forget the back armor…
Or the Fettkini…
Or the Junk Drawers
Weathering was done with mostly acrylic black (around green parts) and brown (on the yellow parts), mostly around the edges (for accenting) and where carbon scoring would be most prevalent, such as around the dents where I (Used to) assume were caused by laser blasts but after watching 3 seasons of The Mandalorian, I have no idea what caused all these dents…
And because the paint is acrylic, you can rub away the over-sprayed bits on the silver with a slightly damp cotton swab. I made sure to seal the colors in before and after weathering with matte acrylic sealer—at least I hope I did—guess I’ll find out if I ever wear this in the rain (I will NEVER wear this in the rain—I carry giant garbage bags with me if I am at a show that isn’t connected to the hotel)…
Anyway, nothing in here is new—everyone who paints uses very similar techniques and dentedhelmet.com and bobafettbuilders.com and (probably RPF.com) are riddled with better ones than this one. I hope you enjoyed. I think I only the helmet is left…