spidermanna
New Member
This is the first ‘tutorial’ in what might end up being about a bunch of tutorials (depending on how much interest they get or if anyone really cares to read and look at a crap-ton of pictures) describing how I made my Boba Fett costume. Had planned to do this months ago (hence all the pictures) but I am lazy plus there didn’t seem to be that much interest in it on the site I was one since most folks buy their gear or 3D print it. I’m cheap and I hate sanding but one thing I do love doing is building things and overcoming challenges…I guess that’s two things. I will say I got a TON of virtual inspiration and diagrams and pictures and templates from various folks at DentedHelmet.com and BobaFettBuilders.com so I would be remiss if I didn’t mention the awesome people who post on those sites and where I can (remember), I will mention who the are and/or look them up. One issue I did have with those sites was getting usable search results. I knew at the time (and still believe) that everything I have done some one else or many someone else’s have already done. Like stitching up their own gloves or cobbling together a pair of bizarrely shaped boots with spiky toes but I couldn't find any, even though the site goes back like 20 years! I assume its me but in many cases, I had to just on pictures. Like a I said most people apparently buy or 3D print most of the costume parts or look for the original materials and chop them up to make the props—I just couldn’t in good faith do that, not even to a casio calculator that I would have had when I was like 12…
Anyway, so, little background, started working on this in March 2020 right after C2E2 in Chicago where I got to meet one of my (maker) idols, Adam Savage. Prior to C2E2, I’d made a couple of prop guns and whatnot for my kids and a Hicks costume out of fiberglass (which is way before the Buc-ee’s version in the back, which is PVC (except the helmet)). If any of you have worked with fiberglass, then you know it sucks. Its sticky, messy, and gets into everything…But, it was all I knew how to use at the time so the first iterations of the helmet, gauntlets (actually vembraces), and jetpack were all fiberglass and all failures. Unfortunately ,that took me about a year or so to figure out…
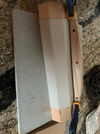
Original heavy cardboard jetpack frame. The template came out of DentedHelmet.com but I appologize, I don't recall who created it but they are awesome!
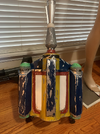
Original Fiberglass version (1 of 2)...“Prepare to do a $h!tload of sanding…”
One day while working on the ‘receiver’ for the EE-3, I thought “What if I threw some corrugated PVC into the oven? What’s the worse that could happen?...Probabably brain damage...
I made a wooden mold this time (that wouldn’t melt or deform)…
And cooked it a could times while it was wrapped around the form…
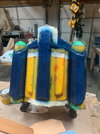
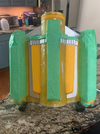
Mind blown! That changed EVERYTHING! All the previous stuff I’d labored over (fiberglass helmet, vambraces, etc) were trashed and everything from this point on was PVC. The large round form for the yellow center crayon (missile holder) was made with 4" schedule 40 PVC and some beveled 2x4s on either side. To make the pieces taught, you heat the PVC, lay it over the form, and push wood slats down on either side or clamps (see above picture)...
Always make pieces oversized so they can be cut down. To cut this PVC, you only need to score it with a razor blade and snap it or cut it with kitchen scissors...
The wooden circles made from plywood would eventually hold up the yellow crayon that is the base of the rocket launcher…I think…
For the protruding parts, I used plastic 'for sale' signs from Menards as they were easy to cut and you can heat bend them with a low setting on a heat gun. The inner piece (thin white piece bellow the "SALE") was made from EVA foam, molded with silicone and corn starch, and cast in Polyurethane (hence forth referred to as "Poly" since its used a LOT on this build)...
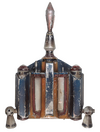
With the frame completed, I started working on the roundy bits (rocket, rocket base, fuel canisters, jet trusters, etc.)
It really helps to have a lathe…just sayin…
These were actually made using cheap plastic Christmas tree bulbs. I put little EVA foam squares into the center and poured them full of Poly. Glue the two halves together, bondo, and lathe until smooth as shown above.
Then came the molds for a bunch of other parts…
Again, helps to have a lathe...
Tubes are just 4" PVC pipe and a thinner one (1.5" I think)
This one was made with a bunch of plastic straw-like coffee stirrers and hot glue…
...which was made this into this...
It was at this point I understood why people prefer to 3D print these…regardless…
The prime building material of choice is Schedule 30 Thin Wall PVC which comes in 4” diameter x 10’ long tubes at any big box store. I make just about everything out of this stuff. It bend easy once heated, glues easy and requires minimal if any sanding (except at jointed areas). It can also be heated and reformed numerous times. Probably not as easy to use as Warbla, but its way, way cheaper and more abundant. That being said, it does smell when you bake it in the oven or with a heat and probably off-gasses toxic fumes at high temps so wear a respirator! I trimmed down PVC caps to make the thin piece (see above)
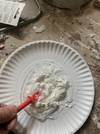
My molding agents are 100% silicone caulking and corn starch. Silicone produces a smell you can taste so be warned. Pre-COVID it was super cheap—now not as much but definitely cheaper than the stuff at the hobby stores. I will say that over time the molds tend to shrink so don’t doddle once you make one—cast the poly within a few days or it might shrink.
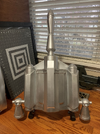
I think I used the cap off of a bottle of vitamins to mold the base of the rocket, but added that later…
The cones of the thrusters were a bit more complicated having extremely thin plastic sheeting glued on the inside and outside with notches cut into the PVC beforehand (don’t glue down the area you intend to cut out!). I shined a light through them to see where they were and cut around them…
I didn’t take any pics of making the little round things in the center of the thruster balls, but they were just ½” PVC pipe notched, filled in with poly, lathed, then casted.
I had a brilliant idea to use clear plastic for the back of the jetpack so I could see what I was doing. This came in super-handy later…
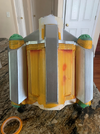
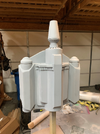
Status up to that point. The “grappling hook” wings don’t come out as saw no use for it—he never used them for that, and it turns out it’s a rocket anyway according to the Book of Boba Fett (always knew it was a rocket!)
The harness is pretty straight forward. To bend PVC pipe, DON’T USE A HEATGUN—use heated sand. Get it up to like 180-dgrees and pour it in with a funnel. Its becomes like a rope; a really hot rope so always wear gloves (wear gloves whenever handling hot PVC). I made a form out of MDF to bend it around. And yes, I welded the strap rings (at also helps to have an oxyacetylene welder (or MIG welder if you have one—I do not ☹…yet). Bend those around an oak form that is wet or it might catch fire!
If you plan to do this for realz, get a mannequin! I call this one Kenny—he is a lifesaver! FYI, the original tube was ½” PVC but changed it to a thinner one later in addition to making the upper straps elastic and the lower straps removable and held on with Velcro (more on that in the Flak Vest tutorial).
Back to the Jetpack. Had a LOT of cleanup to do to make these pretty. All you have to do is put the tube in place and mark where it touches the plastic and trim that bit with a Dremel and keep working your way down…
Making this thing was a nightmare. I 3D printed one as a backup but never had to use it (probably should have though…) My beacon light doesn’t light up—it's just there.
I casted a ¼” dowel rod to make a rounded top for the back of the jetpack
Shown before the edge piece has been trimmed off and wraps around the sides. The cone shaped caps and bases on the “fuel tanks (tubes)” (assume that’s what they are) where just pieces of wood turned in the lathe and casted in poly like most of the parts.
So one of my many “Mannavations” on this build was the added magnetic retractable clips at the base of back of the jetpack. These keep the jetpack from falling off as they hold onto the metal bar on the harness. I used a long skinny magnet to make the bottom “spring back” when pushed in. (Sorry, my garage is a mess...its always a mess...)
More to come in Part IB as I think I ran out of space...
Attachments
-
 1724715699152.png1.5 MB · Views: 78
 -
 1724714867109.png1.5 MB · Views: 78
 -
 1724715663691.png1.7 MB · Views: 86
 -
 1724715644234.png1.6 MB · Views: 102
 -
 1724715619499.png1.6 MB · Views: 92
 -
 1724715557033.png1.3 MB · Views: 88
 -
 1724715531105.png1.6 MB · Views: 77
 -
 1724715508185.png1.4 MB · Views: 79
 -
 1724713118168.png1.5 MB · Views: 94
 -
 1724712666035.png1.4 MB · Views: 81