This project has been nearly two years in the making. In the Summer of 2006, I set out drawing up a model of the Obi-Wan TPM saber. Why? Hasn't the thing been done to death? Between JediVic, Larbel, and the MR Elite, hadn't someone managed to nail it?
No. No one has EVER gotten this saber down quite perfectly.
What drew me in at first was the pommel, which never seemed quite right. But when I really got into it, I found that a number of other details had been botched as well. The pommel cubes have never been nailed. The emitter face has never been replicated to match the hero prop. The assembly of the replicas has never matched the original prop, meaning that the seams where certain parts meet haven't matched. There's a groove on the "neck" area that no one has put in before. And despite overall measurements seeming to be accurate on previous replicas, they just didn't ever "jive" to me. I could always see a "Sithplanet" saber or an "EE" saber ... but never the "Obi" saber. It just wasn't there.
So I developed the models, and showed them to the RPF in October 2006. For the next month or so, members provided input, feedback, and additional source material with which I refined and perfected my model. By the end, I was VERY confident that my design reflected the perfect Obi saber, and the other members of the board seemed to agree.
It was off to the machinists! Or so I thought. It turns out that with all the parts I had in the design, and the limited numbers of sabers I wanted to machine, the price was astronomical. So the project got shelved for a while, until I found an incredible member of this board who is a master machinist. Erik Hertzberg of Orbital Machining (www.orbitalmachining.com) came to the rescue.
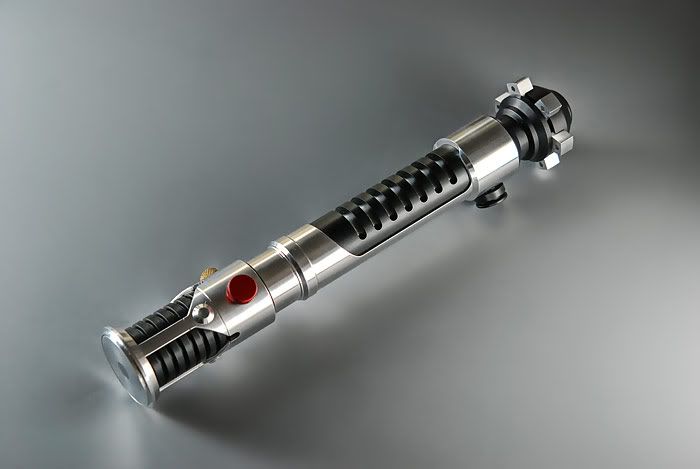
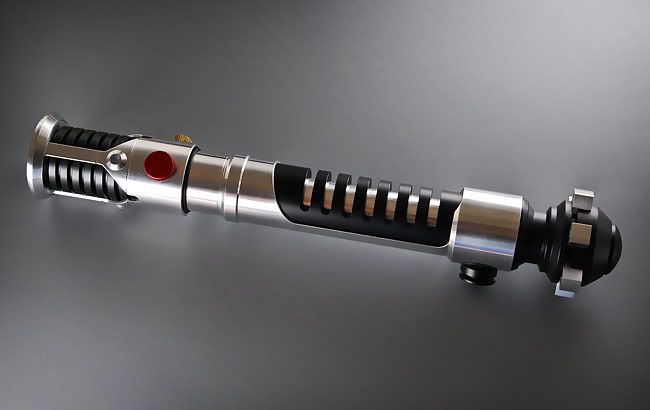
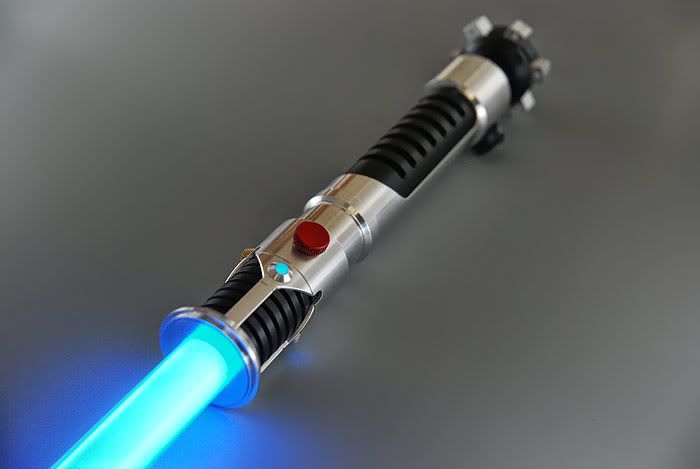
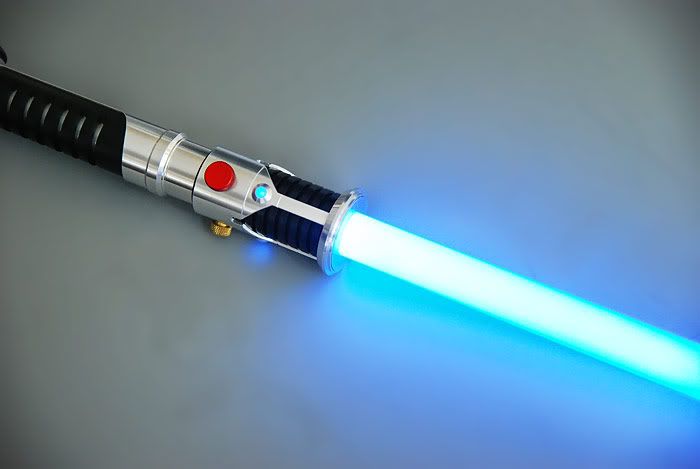
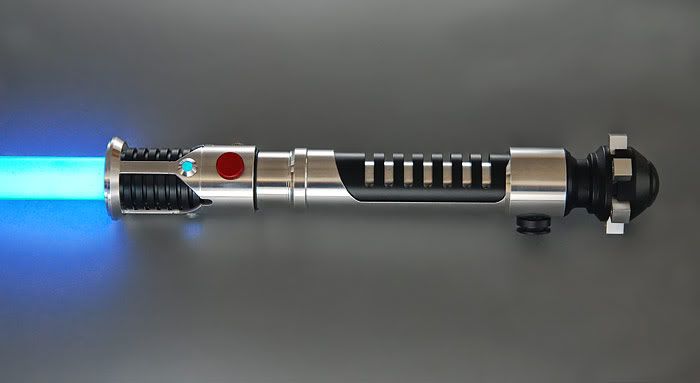
Erik lent his expertise to this project, and took it to perfection at every step of the way. The saber is EXACTLY what I had hoped for, and more. It really exceeded all expectations. The results really speak for themselves, but I'll provide some commentary anyway. It is my distinct pleasure to introduce what I believe to be the first and only PERFECT Obi-Wan TPM Lightsaber:
The Z-Saber Obi-Wan TPM

Why's it so perfect?
As noted above, there are a number of features on this saber that have never really been dealt with appropriately. I'll go from the Pommel upwards, and describe the goodies on the Z-Saber:
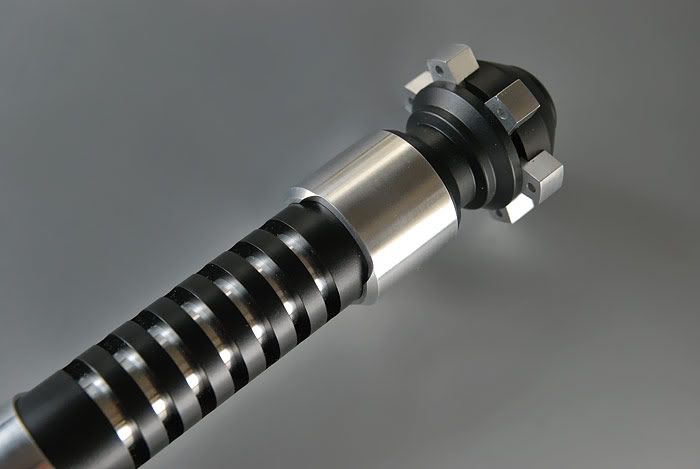
Pommel shape: this has never been done quite right, even on the MR EE. Theirs seems a bit too conical to me, as well as the fact that it doesn't feature all the right fillet radii. They're not all the same! Some corners are rounder than others.
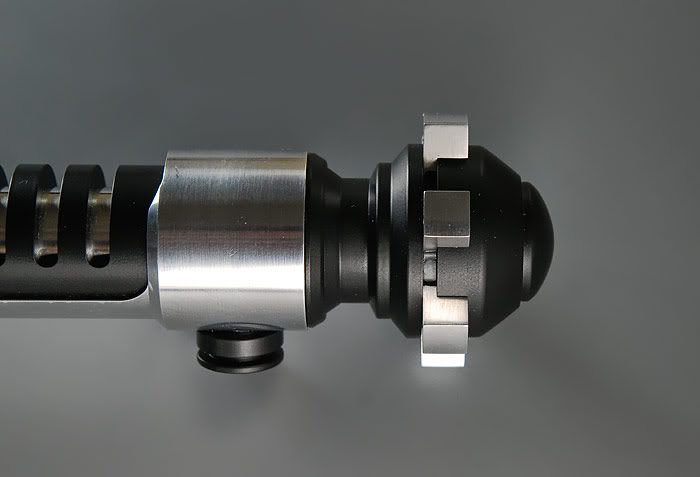
Pommel cubes: again, never quite right. They're always too big (MR standard, Larbel), or too small (MR EE), or shaped wrong (Parks).
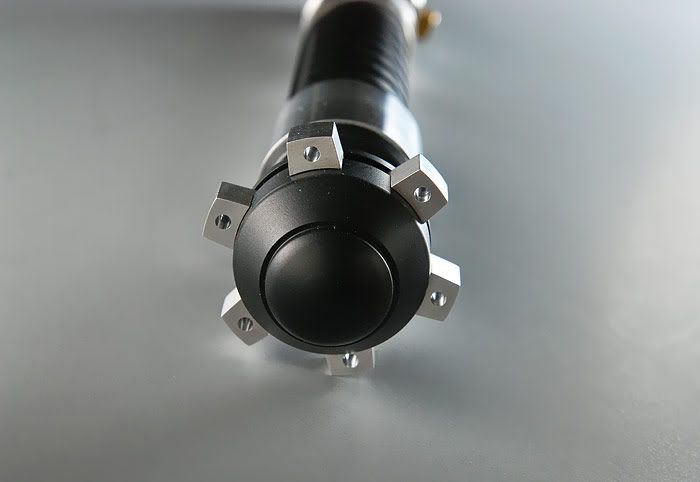
Pommel bevels: where the black part of the pommel meets the saber, there's a small step down. Some sabers have replicated this properly, but not all of them.

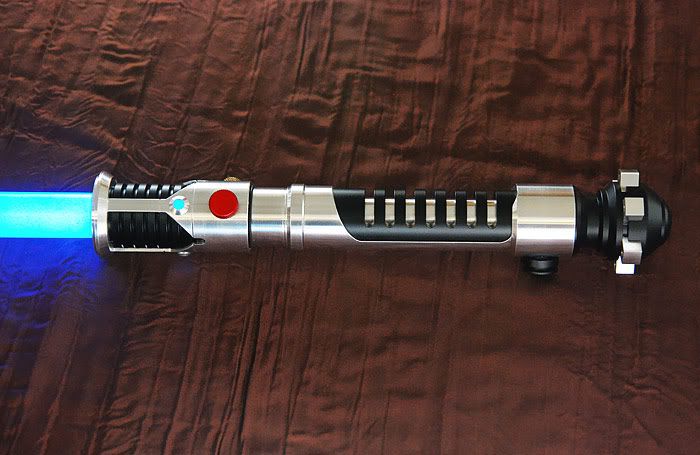
Body cutout: not always right, sometimes the top-down cut is done from the side, etc. This has been done fairly accurately before, but it's no easy task.
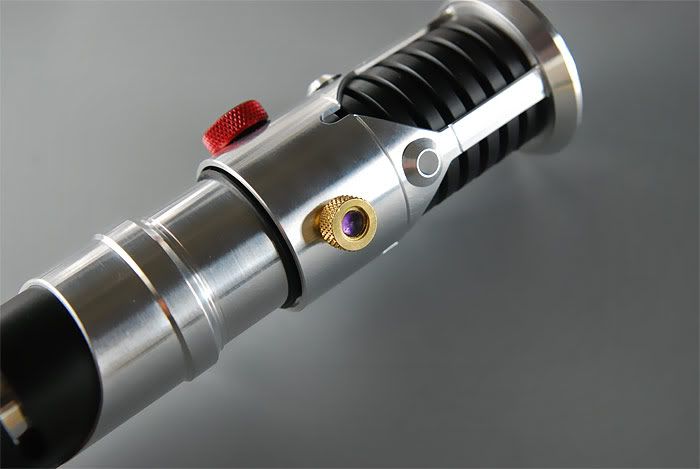
Neck: this has NEVER been done properly before. There is a tiny groove on the neck of the saber that's never been properly replicated. It occurs just after the step-down of the neck piece, and is a result of where the original saber's construction meets. One tube was crammed into another, and had to be machined down to fit. In addition, the saber's shroud (the piece just above the O-ring) does NOT meet the saber's neck. There's a gap, which we've replicated accurately. The shroud piece is a sleeve, and does not meet flush with the neck. Finally, because there was no need to reinvent the wheel on the Red Button and Bike Valve, we used the Romansempire versions that were done so well before. The only difference is that the plastic purple hemi has been replaced by a real Amethyst crystal.
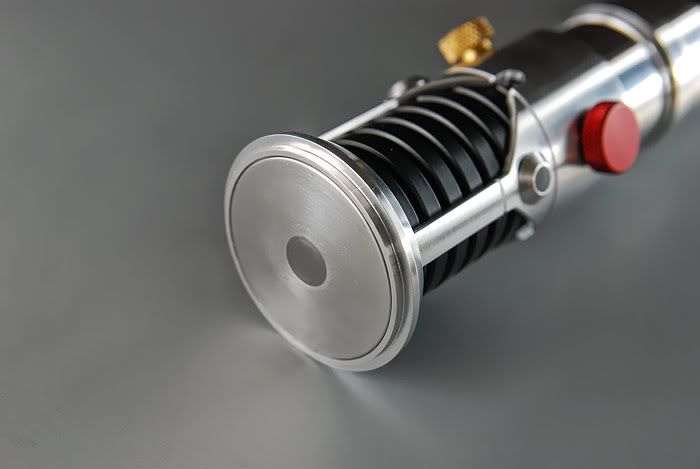
Emitter face: everyone does their own thing here, but no one has bothered to replicate the hero prop, mostly due to lack of reference shots. Well, here it is at last. A disc washer press-fit into the face, with a central disc pressed into that. The center disc on the original prop was the 3/8" rod on which the saber was assembled. MR tried to replicate this on the EE, but did it with a groove instead of a real disc. Close, but no cigar. Here's what the real thing should look like:
Style Features
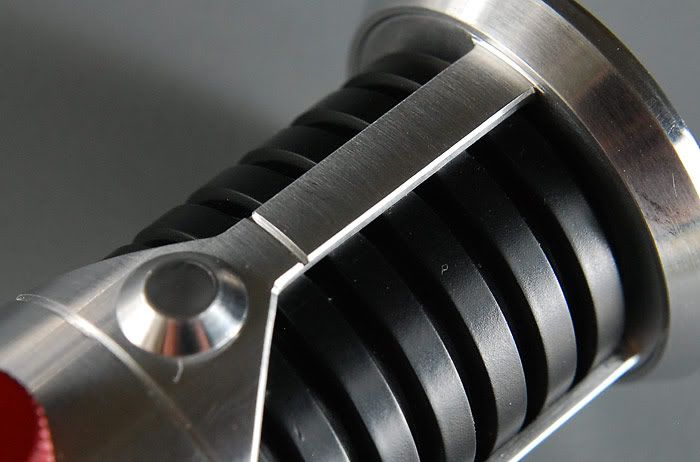
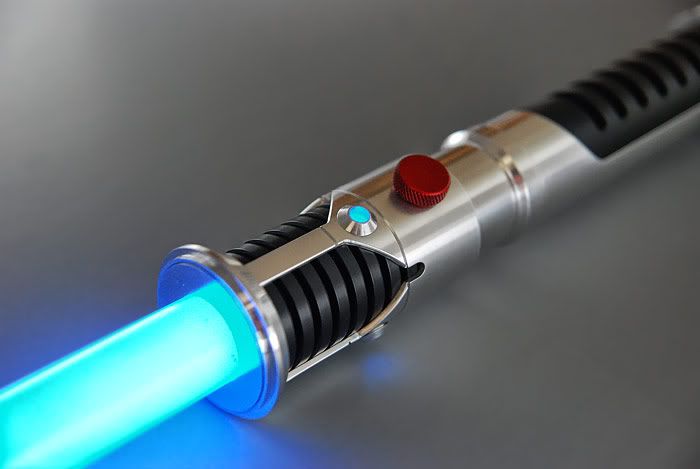
Erik and I put two distinctive features onto this saber that depart from full accuracy. The first of these is a small chamfer on each of the three vertical arms surrounding the "windows" on the emitter shroud. This was part of my design, and really gives a touch of class to the saber. Obi wouldn't leave those edges sharp, no sir!
The second of our departures stems from the description found in the Visual Dictionary. It labels the Covertec clip as the "Recharge Port." Accordingly, we decided to place a recharge port in the center of the Covertec stud, rather than the ugly phillips-head screw that was on the original prop.
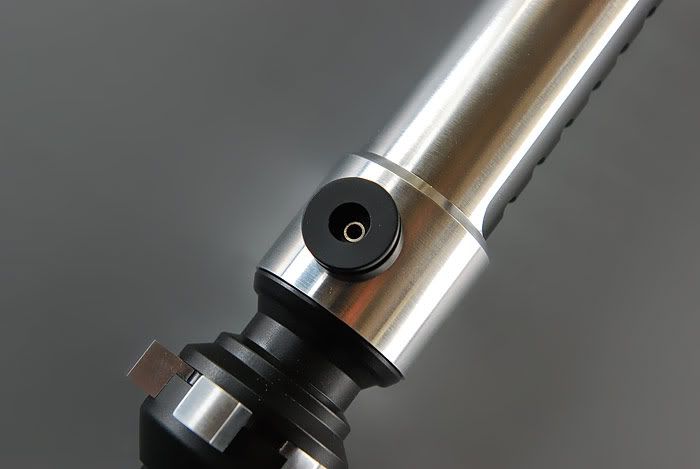
Oh yeah, and while we were at it, we figured we might as well give that recharge port something to do ... so we installed some electronics...
Luxeon III LED
This is the VERY FIRST Obi-Wan saber that has fully-accurate dimensions AND a Luxeon LED. Not one millimeter of accuracy was compromised when engineering the electronics of this saber. With full accuracy as our immutable rule, we searched for ways to maximize the minimal space in this saber in order to cram a working light inside. All credit goes to Erik for the electronics themselves, and they are amazing.

How do they work? Well, as shown already, there is a recharge port in the Covertec clip. The beautiful part is this: the Covertec clip itself ROTATES in order to activate the light. So there is NO compromise on accuracy that would happen if we used a slide switch, pushbutton, or any other kind of activation method. It is still 100% accurate, and has a working LED. In addition, Erik made the LEDs themselves translucent all the way to the saber's core, so that the light from the Luxeon shines through the bezels.
It's been an amazing journey, and I'm incredibly proud of the final product. If you have any questions about the saber, feel free to PM Erik about them, as I'm sure he'll chime in shortly.
No. No one has EVER gotten this saber down quite perfectly.
What drew me in at first was the pommel, which never seemed quite right. But when I really got into it, I found that a number of other details had been botched as well. The pommel cubes have never been nailed. The emitter face has never been replicated to match the hero prop. The assembly of the replicas has never matched the original prop, meaning that the seams where certain parts meet haven't matched. There's a groove on the "neck" area that no one has put in before. And despite overall measurements seeming to be accurate on previous replicas, they just didn't ever "jive" to me. I could always see a "Sithplanet" saber or an "EE" saber ... but never the "Obi" saber. It just wasn't there.
So I developed the models, and showed them to the RPF in October 2006. For the next month or so, members provided input, feedback, and additional source material with which I refined and perfected my model. By the end, I was VERY confident that my design reflected the perfect Obi saber, and the other members of the board seemed to agree.
It was off to the machinists! Or so I thought. It turns out that with all the parts I had in the design, and the limited numbers of sabers I wanted to machine, the price was astronomical. So the project got shelved for a while, until I found an incredible member of this board who is a master machinist. Erik Hertzberg of Orbital Machining (www.orbitalmachining.com) came to the rescue.
Erik lent his expertise to this project, and took it to perfection at every step of the way. The saber is EXACTLY what I had hoped for, and more. It really exceeded all expectations. The results really speak for themselves, but I'll provide some commentary anyway. It is my distinct pleasure to introduce what I believe to be the first and only PERFECT Obi-Wan TPM Lightsaber:
The Z-Saber Obi-Wan TPM
Why's it so perfect?
As noted above, there are a number of features on this saber that have never really been dealt with appropriately. I'll go from the Pommel upwards, and describe the goodies on the Z-Saber:
Pommel shape: this has never been done quite right, even on the MR EE. Theirs seems a bit too conical to me, as well as the fact that it doesn't feature all the right fillet radii. They're not all the same! Some corners are rounder than others.
Pommel cubes: again, never quite right. They're always too big (MR standard, Larbel), or too small (MR EE), or shaped wrong (Parks).
Pommel bevels: where the black part of the pommel meets the saber, there's a small step down. Some sabers have replicated this properly, but not all of them.
Body cutout: not always right, sometimes the top-down cut is done from the side, etc. This has been done fairly accurately before, but it's no easy task.
Neck: this has NEVER been done properly before. There is a tiny groove on the neck of the saber that's never been properly replicated. It occurs just after the step-down of the neck piece, and is a result of where the original saber's construction meets. One tube was crammed into another, and had to be machined down to fit. In addition, the saber's shroud (the piece just above the O-ring) does NOT meet the saber's neck. There's a gap, which we've replicated accurately. The shroud piece is a sleeve, and does not meet flush with the neck. Finally, because there was no need to reinvent the wheel on the Red Button and Bike Valve, we used the Romansempire versions that were done so well before. The only difference is that the plastic purple hemi has been replaced by a real Amethyst crystal.
Emitter face: everyone does their own thing here, but no one has bothered to replicate the hero prop, mostly due to lack of reference shots. Well, here it is at last. A disc washer press-fit into the face, with a central disc pressed into that. The center disc on the original prop was the 3/8" rod on which the saber was assembled. MR tried to replicate this on the EE, but did it with a groove instead of a real disc. Close, but no cigar. Here's what the real thing should look like:
Style Features
Erik and I put two distinctive features onto this saber that depart from full accuracy. The first of these is a small chamfer on each of the three vertical arms surrounding the "windows" on the emitter shroud. This was part of my design, and really gives a touch of class to the saber. Obi wouldn't leave those edges sharp, no sir!
The second of our departures stems from the description found in the Visual Dictionary. It labels the Covertec clip as the "Recharge Port." Accordingly, we decided to place a recharge port in the center of the Covertec stud, rather than the ugly phillips-head screw that was on the original prop.
Oh yeah, and while we were at it, we figured we might as well give that recharge port something to do ... so we installed some electronics...
Luxeon III LED
This is the VERY FIRST Obi-Wan saber that has fully-accurate dimensions AND a Luxeon LED. Not one millimeter of accuracy was compromised when engineering the electronics of this saber. With full accuracy as our immutable rule, we searched for ways to maximize the minimal space in this saber in order to cram a working light inside. All credit goes to Erik for the electronics themselves, and they are amazing.
How do they work? Well, as shown already, there is a recharge port in the Covertec clip. The beautiful part is this: the Covertec clip itself ROTATES in order to activate the light. So there is NO compromise on accuracy that would happen if we used a slide switch, pushbutton, or any other kind of activation method. It is still 100% accurate, and has a working LED. In addition, Erik made the LEDs themselves translucent all the way to the saber's core, so that the light from the Luxeon shines through the bezels.
It's been an amazing journey, and I'm incredibly proud of the final product. If you have any questions about the saber, feel free to PM Erik about them, as I'm sure he'll chime in shortly.
") :thumbsup
:thumbsup