You are using an out of date browser. It may not display this or other websites correctly.
You should upgrade or use an alternative browser.
You should upgrade or use an alternative browser.
The Nylon Gag MK2 F1 Magneto Skimmer
- Thread starter TheNylonGag
- Start date

Will Vale
Member
Not sure what to say other than that this is really inspiring stuff - your last build has certainly been on my mind as I get towards the engines on what I'm doing!
And this one looks amazing - all the fairing and smoothing work is so tidy. It seems almost a shame to hide the splitter plate on the bottom under that wing/duct part seen in white on the last pics!
One question - how much of it is permanently together? It seems like something that would be difficult to paint in one piece with all the undercuts and details.
Cheers,
Will
Thank you my friends for the comments
Thanks Will,
The whole cockpit assemblie is removable, the rear section is also not yet fixed.
That is one of the challenges with scratching your own design, what to permenantly fix and when, what to paint and when, sometimes i have to accept that thinking will take an entire evening and nothing is really visually accomplished but everything has to be thought ahead of time
thanks for the question
Thanks for being with me friends
Lost my Mojo, big time. This thing is really beginning to **** me off.
It's one of those times when you really would appreciate an instruction book.
No such luck
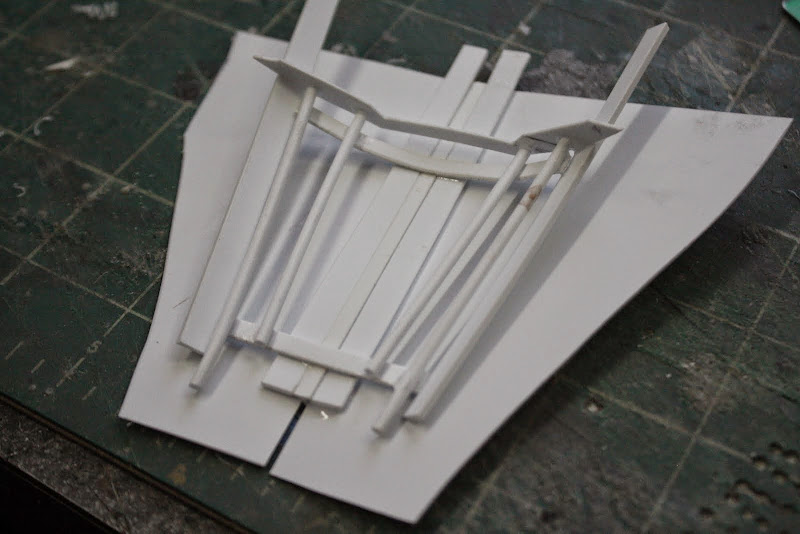
The main issue was the transition between the cockpit cowel opening and hiding everything when closed, One night i just sat and cut card board, taped it on and then threw it in the bin after 10 minutes because it was "OFF".
Gave up, for the time being, and gave the cockpit assemblies a base coat of Tamiya matt black, XF1


Also did a bit of pre-shading on the engines

And hit the detail in the floor
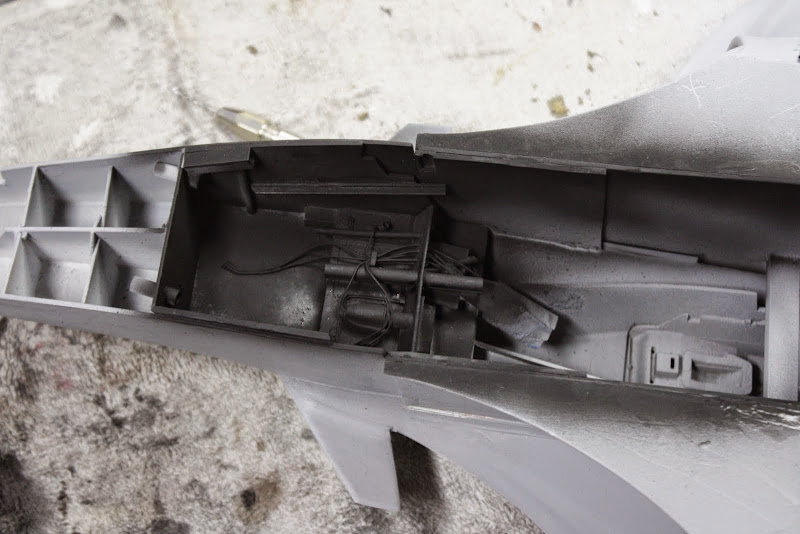
All of these areas will get hit with a silver/gun metal/crome conbination to add some additional depth
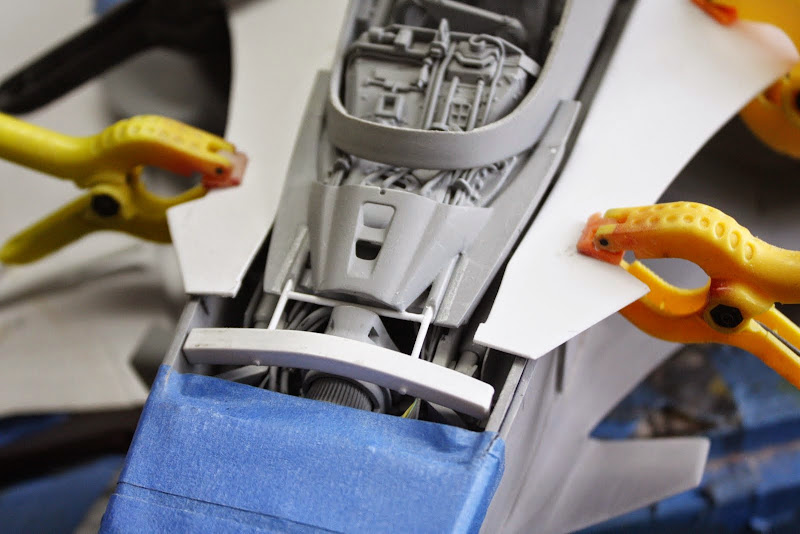
Then moved back to the body work, side pod transition and cockpit canopy transition/blend,

removed clamps

sanded flush

Filled, with additional cockpit cowel in position

Added nose base plate


Was so pissed with this i even thought of selling it on e-bay but for now it seems i'm on it again unless of course someone has some free money to throw my way, no........ok, i'll try and finish it myself then.")
I love scratch building
Gag
One question - how much of it is permanently together? It seems like something that would be difficult to paint in one piece with all the undercuts and details.
Cheers,
Will
Thanks Will,
The whole cockpit assemblie is removable, the rear section is also not yet fixed.
That is one of the challenges with scratching your own design, what to permenantly fix and when, what to paint and when, sometimes i have to accept that thinking will take an entire evening and nothing is really visually accomplished but everything has to be thought ahead of time
thanks for the question
Thanks for being with me friends
Lost my Mojo, big time. This thing is really beginning to **** me off.
It's one of those times when you really would appreciate an instruction book.
No such luck
The main issue was the transition between the cockpit cowel opening and hiding everything when closed, One night i just sat and cut card board, taped it on and then threw it in the bin after 10 minutes because it was "OFF".
Gave up, for the time being, and gave the cockpit assemblies a base coat of Tamiya matt black, XF1
Also did a bit of pre-shading on the engines
And hit the detail in the floor
All of these areas will get hit with a silver/gun metal/crome conbination to add some additional depth
Then moved back to the body work, side pod transition and cockpit canopy transition/blend,
removed clamps
sanded flush
Filled, with additional cockpit cowel in position
Added nose base plate
Was so pissed with this i even thought of selling it on e-bay but for now it seems i'm on it again unless of course someone has some free money to throw my way, no........ok, i'll try and finish it myself then.
I love scratch building
Gag
... This thing is really beginning to **** me off... It's one of those times when you really would appreciate an instruction book... No such luck... One night i just sat and cut card board, taped it on and then threw it in the bin after 10 minutes because it was "OFF"... ok, i'll try and finish it myself then.
Hey Gag,
I had to chuckle reading this post. I'm sure we've ALL been in that exact position several times over. I can't tell you how many times I've sat back, looked at the cockpit I'm building and just wanted to toss my hands in the air and go to bed! And yet... we all keep going back...
EXCELLENT work!
Afternoon everyone,
Thanks for the kind words guys
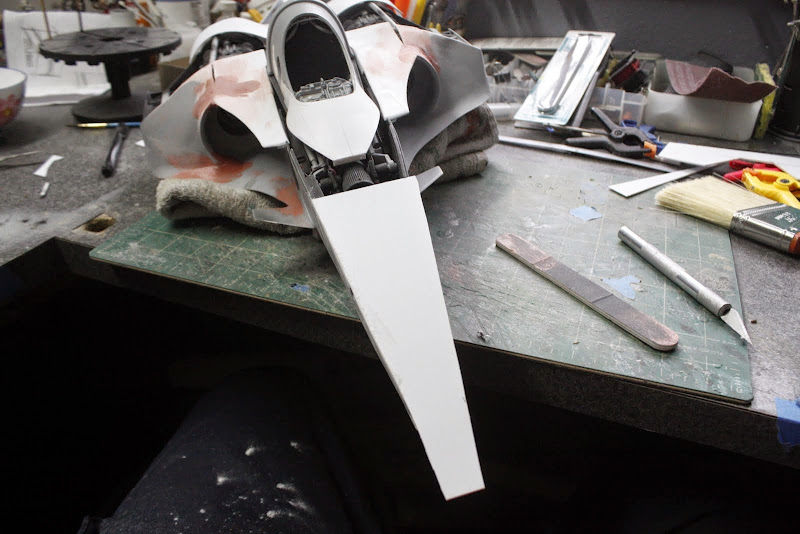
Well after a few weeks away from the MK2 Skimmer i decided to do some painting and a few more body mods on the nose.
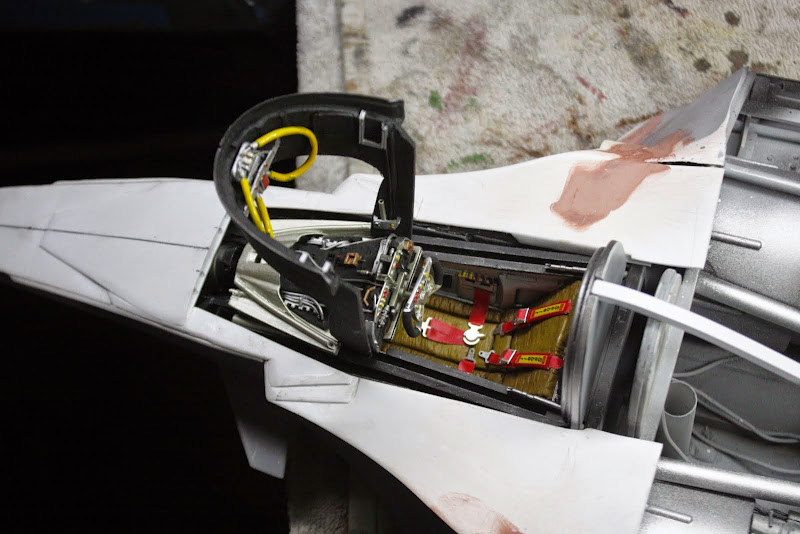
I'm not sure if the detail will be seen or not as i am having difficulty making the transition between open and closed cockpit invisible, so i had a design rethink,
First i started with some upper nose surface detail


I removed the front part of the cockpit frame so it will now be open

I then painted one of the cockpit detail assembly's


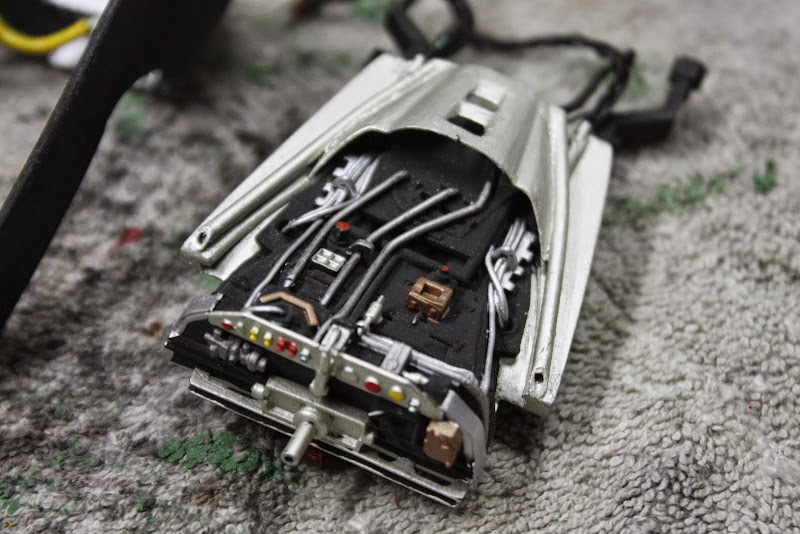
I dry brushed the under floor detail in the main body

I assembled the 5 point seat belts from my Tamiya 1/12th Williams FW14B

I then painted the main cockpit tub

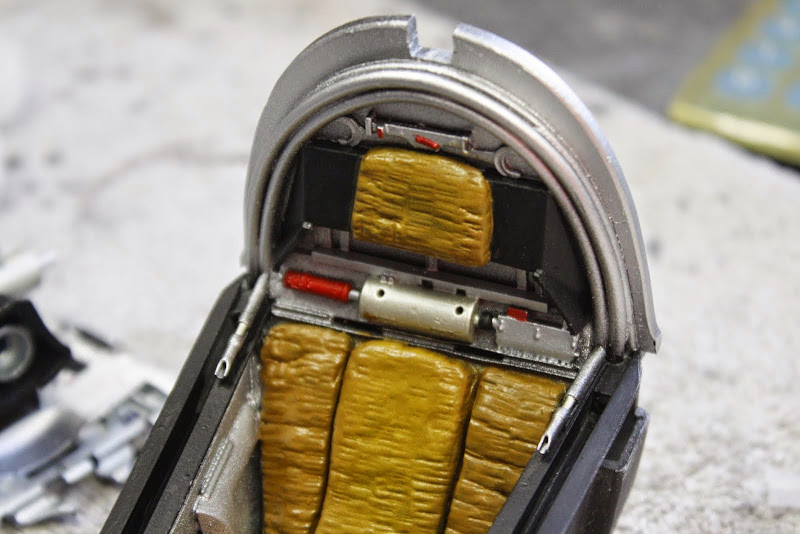

Did a little bit of dry brushing


I then fitted the belts


Then i gave the dash and steering wheel a coat of matt black (XF-1) ready for the detail paint

Thats all i've done so far
A bit more excited to finish this now i have sorted the cockpit issues out
Still a long way to go but i'm getting there
Stay tuned
Take care
Gag
Thanks for the kind words guys
Well after a few weeks away from the MK2 Skimmer i decided to do some painting and a few more body mods on the nose.
I'm not sure if the detail will be seen or not as i am having difficulty making the transition between open and closed cockpit invisible, so i had a design rethink,
First i started with some upper nose surface detail
I removed the front part of the cockpit frame so it will now be open
I then painted one of the cockpit detail assembly's
I dry brushed the under floor detail in the main body
I assembled the 5 point seat belts from my Tamiya 1/12th Williams FW14B
I then painted the main cockpit tub
Did a little bit of dry brushing
I then fitted the belts
Then i gave the dash and steering wheel a coat of matt black (XF-1) ready for the detail paint
Thats all i've done so far
A bit more excited to finish this now i have sorted the cockpit issues out
Still a long way to go but i'm getting there
Stay tuned
Take care
Gag
IEDBOUNTYHUNTER
Sr Member
Looking good. Love the harness.
Al
Al
The gold goes great with the red harness. Looking forward to more!
yuumi2891103
Master Member
The cockpit detail is looking fantastic.
Nice idea to add red seat belt on it.
Makes it so real.
katsu
Nice idea to add red seat belt on it.
Makes it so real.
katsu
kruleworld
Well-Known Member
Well, this was fun to see your hard work coming together. (although i did just get to see 1 years work in one go). awesome, can't wait to see how it turns out.
Only sci-fi scratchbuilders see a juice lid and thinks 'thruster'!!This Tropicana fruit juice lid caught my eye and i thought it would make a perfect thruster nozzle
Evenin All
Well, thanks for the support boys
Still working on the front and did a bit on the underside/back area
Lets have a look
Gave the dash
Cockpit hood
Steering wheel
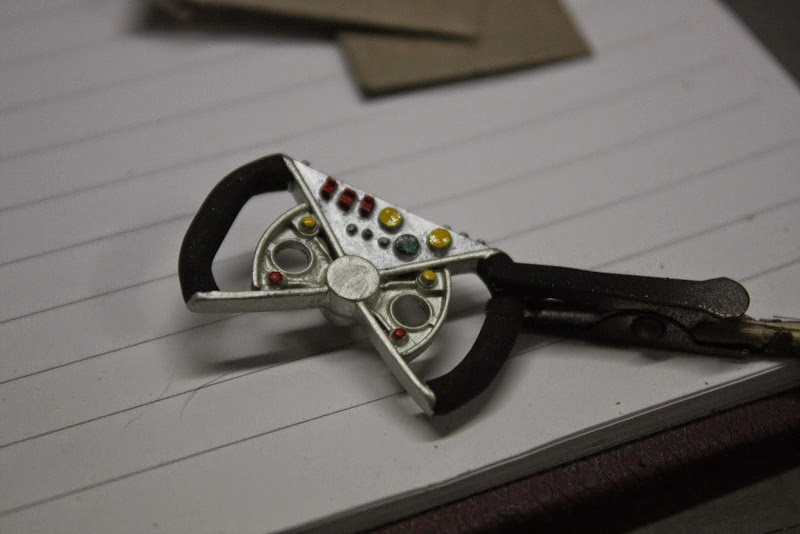
some paint then assembled the whole thing


Made a frame work to cover front

Covered with 1mm styrene sheet
Black glossed

Added magnesium metallic to act as a base

Touched up the details

set a basic shape to the rear underpan

Started to shape the rear crash structure
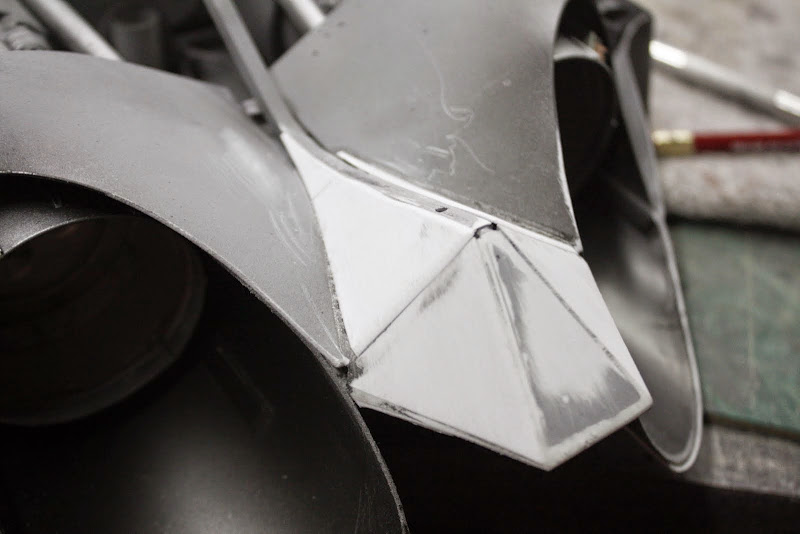
Glued front upper fairing

Added side cockpit edges

Basic first sanding
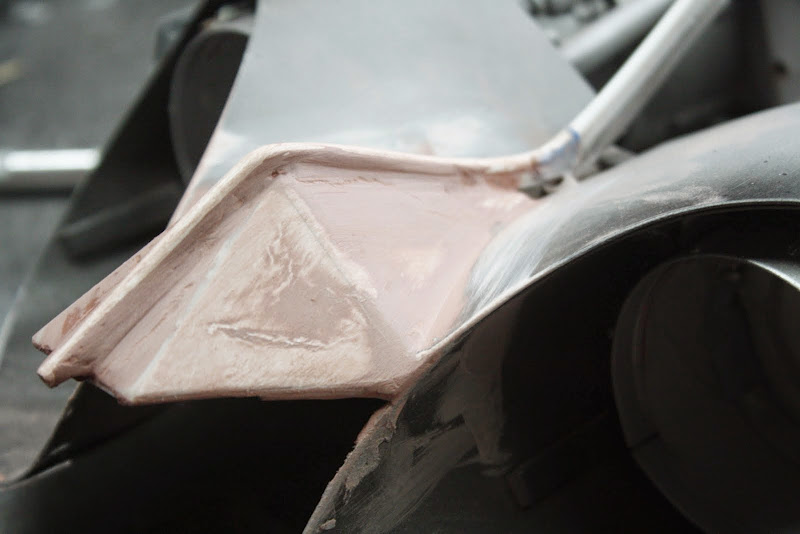
And re-application of filler


thats it so far
Stay tuned
Gag
Well, thanks for the support boys
Still working on the front and did a bit on the underside/back area
Lets have a look
Gave the dash
Cockpit hood
Steering wheel
some paint then assembled the whole thing
Made a frame work to cover front
Covered with 1mm styrene sheet
Black glossed
Added magnesium metallic to act as a base
Touched up the details
set a basic shape to the rear underpan
Started to shape the rear crash structure
Glued front upper fairing
Added side cockpit edges
Basic first sanding
And re-application of filler
thats it so far
Stay tuned
Gag
Wayne Bakken
Well-Known Member
A model kit has nothing on your attention to detail.
I dunno... I mean... if you're going for totally awesome and cool? NAILED IT! That is another piece of artwork in the making!
Similar threads
- Replies
- 2
- Views
- 472