Terminator T-800 Blueprints

There is sculpting, manufacturing, and prototyping. I lean to the manufacturing because it follows the story line better. Following the storyline makes the end result look more believable and realistic. But there is merit to making something that looks like it was a movie prop. In the end it is all art.
 
Last edited:
I was incorrect on how the elbow assembly works. Good research on your end.
 

Attachments

  • Elbow Joint Bearngs and Screws.bmp
    576.1 KB · Views: 466
Last edited:
I forgot to answer your question about finger symmetry. The fingers are the same on both hands, you just have to mirror image the palm plate. There is a right arm and two left arms in this picture, the fingers are the same:
content_t2-330.jpg

Have you seen this site? Lots of great reference material there.

Conqueror_Worm, I think you're on to something with that Du-Bro reference. Specifically, check out Du-Bro model 303, not 302 0r 305, they're different. But the contours on the 303 look EXACTLY like the T-1 hand. Another thing I discovered: check out something called the Du-Bro ball slider. So far, the one I've found is a little over an 8th of an inch in diameter, BUT it looks EXACTLY like the wrist balls with the hex base and everything! I'm beginning to see a whole lot of model aircraft parts on this thing! The more off the shelf, the easier to fabricate.
The 303 is the one I posted ;). I've heard the 305 was used in the Terminator's eye sockets, but I can't confirm that. I'm not sure what hex base you are referring to. I'm pretty sure the wrist joints were a 'dog bone' style joint. (My wrist drawings need to be updated)
87239_01.jpg


One thing though, those Du-Bro solder ends are 13/16 of an inch long which means these hands are going to have to be physically larger than average. Makes me wonder about Arnold.
Yeah, I've heard the T1 arm was too big to fit in Arnold's arm, that's why they redesigned it for T2.

not all of your parts drawn have overall lengths
A couple of people have commented on that, I'll be sure to fix it in the next round of drawings.

Imagine the medial cap is the raceway for cylinder-shaped roller bearings and it goes all the way thru the other side. Imagine the outer humerus frame has a dust cover that hides a much smaller hole underneath so there is material for the offset screw to thread into and the center arm piece is that other side of the raceway and that piece rotates around the medial cap instead of the humerus rotating. Does any of that make sense?
That's a good idea, but I don't think it will work here. Remember, the medial hub and the rest of the humerus is actually a single piece. Most of the broken arms leave that detail out. You can see whats left of the bracket in this picture:
12378.jpg


What about a design that uses press-in type NK or Kaman sealed bearings?.
If you look at that pic of the Las Vegas T-800, Terminator there are hoses attached to the Medial Disk where that offset screw would be. Maybe that screw is a filler for a legacy from an earlier design.
I've got motors, pneumatic pistons, catalogues of actuators laying around my desk and workbench just waiting for the rest of the information. I even considered buying one of those ridiculously expensive life-sized plastic replicas just to destroy it and try and copy it. (how sensible is that?)
I haven't done too much research on bearings (or many other found parts), so any tips you have would be very useful. I've never noticed that hose detail before, that is interesting. I did a little digging on that endo and found this link. There is a nice picture and a video on that site. I know what you mean about waiting for information, I waited and searched for years for blueprints. Eventually I just picked up a cheap cast resin arm and started making my own.

Okay, here's a possible explanation for how the elbow joint may (theoretically) work.
...
What do you think?
Now that I can do! What do you think of these bearings?
 
Good job on that elbow assembly illustration. Also good research on that elbow. Gusset noticeably missing from resin cast model.
 
Last edited:
You may have to draw another picture, lol. Also, could you describe or post a link to a dust cap? I just want to make sure we are thinking of the same thing.

Jamster had a really clever method for machining all the fingers at once. Here is a quick sketch:
Finger%20Machining%2001.PNG

Starting with a single piece of square stock, he first cut the round areas on a lathe, then milled in the rectangular slots to form the ends of the finger segments, then cut the pieces apart to create the individual segments. He has pictures of this in his thread on the endo builders club.

Have you heard of lost foam casting? The only problem with this technique is that you lose your pattern. If the casting doesn't turn out you have to make another one. That would be a real pain if you are sculpting them by hand.
 
I thought you guys might get a kick out of this. I plan on putting up a thread soon discussing some of the work that went in to this all metal endo arm. Here's an earlier shot before adding the cables, cuff and making a few changes. Every piece on this arm was hand machined. No poured parts, no sheet metal. Machined from solid aluminum; fully articulated digits, etc. I'll get a thread up when I can devote a little more time to discuss things.

Cool drawings!

172347-arm2.jpg


172348-arm4.jpg


We're working on his manors; damned terminators are very childish...seemed as good a way as any to demonstrate articulation. :angel

172349-endo2.jpg
 
Last edited:
It's complete now. I simply need to take some updated pics. I was fortunate enough to study the arm you mentioned in person some time ago. As you're probably aware, none of the known machined endo arms are identical; they all served different purposes and very a great deal from piece to piece. Again, I'll get a thread up of my own discussing some of those differences at another time. I don't want to derail this one.

Thank you

This is very, very impressive! Regarding the wrist joint and other parts of the arm, the following link might be of assistance to you:
Album 33 « Gallery 613 « Restoration | LucasFrancisStudio
It's about the restauration of an arm used in T2...
Hope this helps...
 
Last edited:
This is what I just found on page 42 of CINEFEX 47:
"Greg Figiel sculpted a false arm which blended onto Arnold's shoulder", said Shane Mahan. "It was a false shoulder, bicep, forearm and hand based on measurements form Arnold's lifecast. It was actually sculpted over the mechanical arm - which was built by Charles Lutkus - so that when we eventually put the arm inside the finished foam rubber piece it would be a perfect fit."
The mechanical arm - which was also used for shots with the endoskeletons in the future war sequence - incorporated a realistically articulated hand. " The original Terminator had an articulated hand that opened and closed its fingers," recalled Winston, "but I had always wanted to take that technology further - because fingers don't just open and close at one joint. The joints move independently and they can move backwards and they can make an S-shape. When you roll in your fingers, each knuckle is doing something independently. So I wanted to develop this double-jointed, articulated hand. Much of it is selfserving because the audience my not even notice the difference. But I think that attention to detail is what makes people believe what they are seeing."

I have googled Charles Lutkus shortly, but didn't find anything particular regarding the Terminator... But he for sure knows how the hand was built ;)
 
Conqueror_Worm;
The Lost Foam Casting is a really interesting idea.

Also I want to check a couple of measurements with you. The Medial cap, is the diameter 2" and 9/16ths? What is the diameter of the round part of the Humerus Fragment? That figure seems to be missing. Is the thickness of the Medial Cap 13/16"? How about the overall thickness of the Humerus Fragment? 7/8" maybe? These were vague and I struggled with them.

- - - Updated - - -

Rylo;

Amazingly clean machine work. Better than the original from those restoration pics. Very inspirational. It looks like stainless it's so clean.
 
Last edited:
This is very, very impressive! Regarding the wrist joint and other parts of the arm, the following link might be of assistance to you:
Album 33 « Gallery 613 « Restoration | LucasFrancisStudio
It's about the restauration of an arm used in T2...
Hope this helps...

Desponds;

This very interesting. A couple of key things in that 3-page restoration record is the pivot in the forearm under the cuff, the T-bone joint in the central wrist, which Conqueror_Worm predicted and so now it's verified, the metacarpals, which I had assumed were oval or square polished oval after being welded to the wrist plate. A couple of things not clear is how LucasDesigns reattached the metacarpals. In the resin model, there are rectangular slots into which the metacarpals are cemented. The aluminum ones are obviously welded but were broken apart for this restoration. I noticed the wrist base plate had counter-sunk holes where the metacarpals attached to it. I also noticed that the project started out with several of the joints welded together. So clearly, this restoration was to clean it up and make it articulate again. I'd love to know how the metacarpals were supposed to be attached, what the treatment to the wrist plate was for that, (maybe the metacarpals are inset into the plate via those counter-sunk holes and welded from the bottom) and how the knuckle joints are joined. Screw only or two screws into a stand-off like Conqueror_Worm's drawings.
 
Last edited:
You may have to draw another picture, lol. Also, could you describe or post a link to a dust cap? I just want to make sure we are thinking of the same thing.

Okay so the same idea as above with the dual set of sealed bearings around a central pin,
View attachment Humerus with Dust Plug.bmp

but this time everything loaded in from the inside after the forearm is slid into notch in the humerus. First the pin, then outside screw, then dust plug (object on right) then inside screws. Voila! Simple, and stable and smooth moving.
 
Last edited:
Wow, nice arm Rylo! I am really looking forward to your thread, I would love to know more about the different arms.

Album 33 « Gallery 613 « Restoration | LucasFrancisStudio
It's about the restauration of an arm used in T2...
Thanks! I can't believe I didn't notice that gallery before, I've spent a lot of time on that site. Those pics certainly clear up a few details.

The Medial cap, is the diameter 2" and 9/16ths? What is the diameter of the round part of the Humerus Fragment? That figure seems to be missing. Is the thickness of the Medial Cap 13/16"? How about the overall thickness of the Humerus Fragment? 7/8" maybe? These were vague and I struggled with them.
Looks like you found them all. I called out the radius of the round part of the humerus fragment as 1.131", which is a strange number, it should probably be 1.125" (diameter 2.25").
Your drawings are pretty good, you're not free handing those in paint, are you? Regarding your most recent design, what purpose does the dust cover serve? It seems like having that much material separated from the main portion would weaken the joint.

The length of the metacarpals, is that to the surface of the wrist plate or does that include the thickness of the wrist plate? The wrist plate images show holes of a larger diameter than the metacarpals themselves.
Also, the holes for the metacarpals on the wrist plate are missing diameters and the handy cross-hairs. I realize they are to be drilled in compound angles but the hole diameter is missing, except for one that took time to identify.
It is to the surface of the metacarpal recesses in the wrist plate. Be sure to note that the outside two recesses are 1/16" deeper than the inner two. The metacarpals and the holes are both called out as 5/16" dia. I only called out one of the holes because they are all the same size, I guess I forgot to include the 4X annotation. The templates I provided have the center marks, which sheets are you using? Eventually I will update the drawings to reflect the design in this image (countersunk socket head cap screws holding the metacarpals in place so they can be brazed to the wrist plate).
Always check the first post in this thread for the most up to date drawings. Also double check the drawings for errors, Miles Dyson may have signed off on them, but he isn't very good at finding my mistakes ;).
 
Here's a couple of ideas for making the lumbrical pistons more functional.
 

Attachments

  • Lumbical Piston Assy.bmp
    576.1 KB · Views: 451
  • Lumbrical Piston Assy 2.bmp
    576.1 KB · Views: 384
Last edited:
Wow, impressive paint skills, you were able to get perspective and shading. I don't think I've attempted anything so ambitious with paint.
Did you see this template? I know the 10-24 thread is really big (comparatively), but it seems like the easiest way to make a spade bolt is to start with a piece of threaded rod with the correct diameter, then grind the top portion down to the correct width and drill a hole through it. It would take some extra work, but you could make one with a smaller thread. As for hole location, I think as long as the center of the lumbrical piston holes are .375" from the center of the metacarpal holes (to keep the pistons parallel to the mets) you should be able to change their location a little.
Honestly, I haven't put too much thought into the palm yet. Those drawings should be a fairly accurate representation of the resin cast, but to make a real machine it still needs some tweaking, especially the angles of the mets. The pistons also rotate through a different plane than the fingers; I'm not sure how big of an issue that is, but my CAD program doesn't like it.
If it helps, I have in my notes that the distance from the bottom of the humerus to the surface that articulates with the shoulder is 27 cm (10 5/8"). I've also heard of people who download the half scale T-800 pepakura model and scale it up for reference.
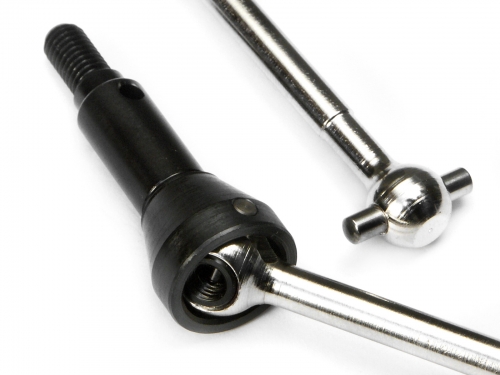
I think I understand your idea, the dust plug holds the pin in place, and the offset cap screw holds the dust plug in place?
I thought construction of my lumbrical piston idea was pretty simple. The body could be made the same way as the one in this thread (start with 3/16 OD" tube, glue short pieces of 1/4" OD tube over the ends). For the internals, attach spring to Du Bro fitting, attach piston shaft to spring, slide the assembly, shaft first, up through the bottom of the piston body. Tighten lower set screw to hold Du Bro fitting in place. Upper set screw can be used to fix the finger at a set angle for display. I like your design, it would prevent the spring from ever being over extended, and the piston shaft can't be pulled out of the housing. It seems like it would be tricky to manufacture the parts, the wall thickness of the cap would only be around 1/32".


Update to List of Drawings:
I just added metric versions for most of the hardware. I haven't been able to find any set screws that are shorter than 3mm. I also haven't seen any metric round threaded standoffs.
 

Your message may be considered spam for the following reasons:

If you wish to reply despite these issues, check the box below before replying.
Be aware that malicious compliance may result in more severe penalties.
Back
Top