(SWTOR) Star Wars: The Old Republich Bounty Hunter

Agriem

New Member
So I'm new to the forum and hardcore costume making. I've dabbled a little but I decided to take on making my PvE armor from Star Wars: The Old Republic that my Bounty Hunter is equipped with. I figured it would be an awesome first costume to do and I was able to gather good reference from in game.

Before I attempt making the more complex Stalker Helmet I wear on my PvE.
StalkerRightFront.pngStalkerFront.pngStalkerLeftFront.png

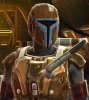
I though I'd start with the much simpler shaped base model for all the Mandalorian helmets in game as my first try using EVA Foam.
BaseHelmFront.pngBaseHelmFrontQuarter.pngBaseHelmRear.png

Working with the EVA foam was fairly easy and I think I will be able to get nice results for the full costume. My errors came in choices of sealing and paint which has cause some cracking. I used Krylon fusion to seal instead of Plasti Dip. My newbie mistake. I ordered a case of Plasti Dip today. If I can't reseal and repaint the helmet, I did save all my templates to remake it again. Live and learn.

The helmet is my first completed piece for the costume. I will put it aside until later to maybe try to remedy some issues with it, but I'm fairly happy with the results for my first try.
Helm_F.jpgHelm_L.jpgHelm_R.jpgHelm_P.jpg

I tried to keep the major details of the helmet so its recognizable but added some details and altered the side to make to give it more depth and a little more comfortable. The paint scheme is a throwback to Boba Fett which are my actual colors in game when color matched to the chest piece.

I'm on to the making the Outrider Jacket as the next major piece of the costume using what I learned so far. I plan not to make the same mistakes. I will also have to learn to properly wire the LEDs for this piece.

outriders-flight-jacket-400x400.jpg

I have most of the pieces. It's just a matter antiquing and aging them all. Stay tuned for progress. :)
 

Attachments

  • Stalker-Female-Helmet.png
    Stalker-Female-Helmet.png
    124.7 KB · Views: 90
  • Screenshot_2012-01-09_19_11_34_022685.jpg
    Screenshot_2012-01-09_19_11_34_022685.jpg
    76 KB · Views: 91
  • BaseHelmRearQuarter.png
    BaseHelmRearQuarter.png
    186.1 KB · Views: 129
  • BaseHelmSide.png
    BaseHelmSide.png
    197.8 KB · Views: 128
Last edited:
Here is some photos from the build. The base of the helmet is 6 total pieces cut from 12"x12" floor mats.
IMAG1714.jpgIMAG1713.jpgIMAG1715.jpg

Details cut from 3/8" L200
IMAG1721.jpgIMAG1722.jpgIMAG1723.jpg

Started cutting details into and sculpting with the dremel.
IMAG1745.jpgIMAG1746.jpg
 
Carved in the ventilation/heat sink looking pieces. Decided to make ear muff pieces so my ears weren't crushed when the helmet was on.

IMAG1753.jpgIMAG1754.jpgIMAG1755.jpgIMAG1756.jpgIMAG1757.jpg

I used a dremel with a brush wheel to scar the surface for battle damage.
IMAG1774_1.jpgIMAG1775_1.jpgIMAG1776_1.jpg
 
I sealed the bare foam using diluted Elmer's glue mixture. Used Krylon Fusion as a base. Then Krylon brilliant metallic gold.
IMAG1781_1.jpgIMAG1782_1.jpg

I sealed the gold with a couple layers of clear. Chip masking was done using Vasoline. Sprayed with a deep red primer/filler. Which I didn't photograph. Wiped clean, remasked the same areas and sprayed with Italian Olive paint.
IMAG1805.jpgIMAG1806.jpgIMAG1809.jpg

Wiped clean.
IMAG1824.jpgIMAG1828.jpgIMAG1829.jpg

I dry brushed some gold antiquing paint to muddy up some areas a bit and break up the cleanliness. Did a light coat of Duplicolor metal effex for a bit of metallic sparkle. Then a couple coats of acrylic clear coat before weathering more.
IMAG1833.jpg
 
So I ended up getting really busy last year with work and what not. Had to hold off working on the costume for awhile. With Wizard Con coming up this weekend here, I'm trying to push to get as much done as I can. I have most the base pieces just need to do the weather and coloring. I also have a very weathered WWII M1 garand clip belt (like the one pictured but more beat up) and a airline seat belt extender that I plan on using for the buckle. I have a used, hopefully already weathered, olive flight suit on the way from eBay for $10.
Jacket_4.jpgm1-garand-ammo-belt.jpg

I started tackling the base for the Outrider Jacket tasks on Saturday. This is the pleather jacket I got off Amazon. It was far more plasticky and cheap looking than the Amazon photos which you can kind of see. Much thinner of a material. Probably a copy of that jacket but serves my purposes at least. Took a bunch of different grit sand paper and a meat tenderizer to it to scuff it up and take down some of the shine. I also decided to cut out the lining of the jacket that was too tight a fit on my arms with sleeves leaving little flexibility. Plus the lining made it extra hot to wear.
Jacket_0.jpg

It came time to start getting the variation in the color to make it look more like leather. I made a wash with acrylic black paint mixed with some acetone and water to thin it. I used a paint brush to apply the wash randomly along seams, edges, and spots that would likely get dirty. After letting the brushed wash soak in for a minute i would wipe it off with a paper towel. Then put a couple very light dabs of the black paint straight on the paper towel and lightly scratch it over the previous wiped surfaces stretching it as much as I can so it was just tinting the surface. Made sure to scratch at multiple angles and directions rubbing with more pressue close seams lightening as I moved away. Like the smear tool in photoshop. That helped to get some fade from darker to the lighter spots. Most visible on the sleeves from the cuffs and the shoulders to the middle.
Jacket_1.jpgJacket_2.jpg
The color change was pretty nice and subtle. Looks a little more like leather than glossy plastic stuff, I think. Also puts me around the color range of the game jacket. You can see the before (right) and after (left) on the front of the jacket before I finished it.
Jacket_3.jpg

I think I should have enough black paint to doe the bottom half of the sleeves black from seam to seam like the game jacket. Then gotta pinstripe the white on it. I'm still not sure what would be the best way to do the lighted collar pillowy bit. I thought about trying to start with an travel neck pillow but they are too tight to work. Anybody have any suggestions on the best way to craft the bomber collar? I was thinking of carving up a pool noodle.
 
I honestly have no ideas for the collar, lol. I would have probably gone with your initial idea of a travel pillow, but they're not quite the right shape. I'm not sure you'll get the right shape with a pool noodle either - they're pretty stiff to bend in such a tight curve (at least the ones I'm familiar with, but I haven't played with one in probably 10-15 years so I don't know if they've changed since then!).

Loving this so far. I keep thinking I might make a SWTOR costume sometime but my main (Smuggler) is a Twi'lek and I don't want to deal with the lekku and body paint! I guess I will have to make another alt character. ;)
 
I got to the two toning last night. Taped off the seams around the lower part of the sleeves to get clean edges right up to seems so it looks like the fabric was already that color when it was made. I took a thicker paint brush and applied little amounts of paint as a time moving my brush in circular motions with decent pressure to blend it and spread it as far and thin as possible. This lets the acrylic dry quick and not be 100% opaque. After 2 coats it had the color and was still transparent enough to see the variation up close.
TwoTone_01.jpgJacket_8.jpg

From normal viewing distance it has a nice solid black color. The contrast was much more noticeable once the tape was removed.
TwoTone_02.jpg

Looking at the game image it looks like the pocket flaps are also black and they have a black stripe so I did that too. Same process. The pockets are bigger and less square than the ones on the game model though. I'll probably make foam tabs to put on the edge for the little metal looking bit that is on the flaps in the game.
TwoTone_03.jpg

Just need the little pin stripe line left for the coloring before moving on the more complicated bits of the plating and neck piece. I guess realistically the pin stripe would be welting but I'm not about to unseam and restitch the sleeves to get it. I might leave the stripe off. Right now it has a feel like Poe's/Finn's jacket and Han's jacket from the new movie.
 
Had just a little bit of time last night so I did the striping following the same process as the two toning. The way this jacket is made there is only one visible sewn seam on the back of the arms. The front seam sits pretty low. I decided not to do the stripe on the front so it doesn't look weird or cover up the little bit of black visible from the front.
Jacket_Stripes.jpg

I tried to knock out the belt while I was at it. Took some sand paper to scuff up the airline buckle. Cut the strap in half melting the ends with a lighter so it doesn't fray.
AirlineBelt.jpg

Took out the strap holding the two halves of the ammo belt together which ended up being almost exactly the same length as the airline belt. Laced the new belts in place where the old strap adjusted and done. The back of the belt is now actually the front with the airline buckle. The stock square lock buckle is on the back. Being able to take the belt apart into 2 halves is kind of nice for packing it away.
Belt_steps.jpgBelt_06.jpg

A quick test and the belt fits and is adjustable. The pockets are a little further back than I'd like. The jacket unfortunately will cover the belt most of the time since it is longer than the in game jacket that stops right at the belt line. When I get some more time I may try sewing the airline buckle to the original strap in place of the shiny new airline belt material. Ideally I'd like to get the new buckle onto the normal front so the pockets are more visible while wearing it. I wonder if they can be welded to the wire buckle.
Belt_test.jpg

Slowly but surely making progress. Going after work today to see if I can get a pool noodle to attempt the bomber collar. Only the harder pieces of the jacket left.
Progress_01.jpg
 
So I ran out of time to finish my jacket. Apparently getting pool noodles in winter is hard without ordering online? Anywho I decided to cease work on my jacket and wear it as is to the con today. While looking for the pool noodle at Walmart I did find these $5 dart blasters that looked kind of cool. Decided might as well throw some heavy blaster pistol props together until I can make my Aurek Pistols.

I had to do a few mods to cover up the holes left where the clip goes. Digging through my junk I found some old camera film containers. Perfect fit with some cutting to do a little knod to the DL blasters over the clip area.
HeavyBlasters_01.jpg

I had to figure out what to do with the big holes where the clips slide through. So I cut off the first "barrel" of the clip snapping it into place and gluing it. I found a couple old air hose adapter pieces I drilled out to slide over the end extending the clip piece some. Now it's a contained barrel floating in a barrel shroud.
HeavyBlasters_02.jpg

It was getting really late in the night/early morning and I had to get them painted. It was cold and damp so that didn't help. Heat gun to the rescue. Hit them with a couple coats of Krylon 2x Matte Black paint as a base. Once they were dry to the touch, mostly, I did a super quick and rough dry brushing of 2 parts pewter to 1 part white acrylic mix for a silver.
I didn't like the handle black so I taped it off and brushed on some brown for a woodish handle.
HeavyBlasters_03.jpg

By this point it was 2 or 3 in the morning. Work was in 6 hours and the con in 13. So I stopped working on them. I didn't seal them with clear since I figured I would be going back later to touch them up. Overall though I think they came out alright. Look decent from a distance. I made some wire hanger hook holsters that the guns just hang from. I didn't take pictures of those yet. It's the fastest way I could think to have the guns look like they are attached to my leg like in the game. Unfortunately they can swing and end up not in the upright position. When stationary I can get them to stay, but not walking.

Sadly my flight suit doesn't arrive til tomorrow so I'm just wearing dark jeans, brown leather hiking boots that match the jacket, and my olive boba shirt. I already has a coworker ask me if I was dressing up as Finn with just the jacket on. I will try to get some pictures at the con tonight in my WIP. After today I have til Chewbacchus to finish it now.
 
Those blasters do look quite convincing, actually! But I can't wait to see what else you come up with. I look forward to seeing pics of your outfit, even if it's not finished!
 
I had at 15-20+ people stop me for pictures and lots of people coming up telling me I looked awesome. So that was nice. Only 1 person knew I was an Old Republic Mandalorian. Most everyone else thought I was Boba Fett, some take on him, or a weird mashup. One guy dressed as a storm trooper thought I was Starlord. I still have not got my flight suit. Hope it isn't lost in shipping somewhere. My Boba backpack actually ended up filling the gaps where the jacket plating would be. At least from the front. You can kind of see the little holster hooks on my legs. Unfortunately the way they zip tied the triggers back at security kept them from hanging straight up and down like they were supposed to.

The only pic I was able to get of myself was coming across a "clan" of Mandalorians. Maybe some of the pictures people took of me will surface on the web. There were 2 Mandalorian Mercs there but I wasn't able to get a picture with them. We just gave each other the silent nod through our expressionless helmets in passing while they were "patrolling".
12540769_10102311922331518_4652617572718567067_n.jpg
 
Last edited:
So I got my flight suit in. Apparently it was stuffed in my mail box while I was expecting a small box or something. I snapped a couple pics of my "holsters" while trying it on. It's just a wire coat hanger I straightened, cut in half, and bent into hooks laced through the clip belt holes.
Belt_back.jpgBelt_side.jpgBelt_side_blaster.jpgBelt_front_blaster.jpg

The flight suit is a little snug as it's a 38 short but once I get it on it seems fine. A bit tight in the crotch but it was only $10 on eBay so can't really complain. I need to unstitch the velcro patch pieces from it but one more piece down.
 
This thread is more than 8 years old.

Your message may be considered spam for the following reasons:

  1. This thread hasn't been active in some time. A new post in this thread might not contribute constructively to this discussion after so long.
If you wish to reply despite these issues, check the box below before replying.
Be aware that malicious compliance may result in more severe penalties.
Back
Top