You are using an out of date browser. It may not display this or other websites correctly.
You should upgrade or use an alternative browser.
You should upgrade or use an alternative browser.
Studio Scale Tyrell Pyramid
- Thread starter Pyramidrep
- Start date
Pyramidrep
Sr Member
There is not a lot of Plastruct used on the Close Up Section. On the 8 foot model, yes. There is some cross over though between the 2 models.it seems that they used a lot of Plastruct pieces
The front facade of the CLOSE UP INSERT MODEL is made up of a series of resin casts and etched brass patterns with some additional model parts. There is some of the etch from the sides of the buttresses used to detail some areas and also the etch for the Blimp is used to detail areas on the roof.
Where the elevator grilles are, there are a series of detailed channel resin casts used ( 4 -5 different types), the narrowest used also on the other model. If you look at any images that are online you can see that the upper& middle left and right hand side are in fact the same pieces with some additional model parts. The triangular sections either side of Tyrells office are also repeated lower down where the angled diagonal channel is. They appear to have chopped the same patterns to detail the spaces.
This is a big miniature as well, the facade ( over) 5 foot by 4 foot. There are dimensions quoted in a book “ Film Architecture” and my drawing is within 10mm of the quoted overall dimensions.
All of this ties in with an interview in Cinefex 9 with Mark Stetson regarding the models being constructed from a series of cast resin master patterns. It speeds up the project and is very cost effective.
That’s “my 2 cents worth on it” Or as far as I can figure out so far.
If there is anyone else here on the forum ( and it has been discussed here in the past), please feel free to chime in.
I’ m always grateful for any comments.
Last edited:
Pyramidrep
Sr Member
Since I am on the forum this evening, I ‘ll just show the result of my marathon research through the Close Up insert Model. I might do another few days work on it before I come back to finish it in another few months ( still a work in progress) but I‘m pretty sure the clues to the last of the model kits I‘m looking for aren’t here.
Still it’s not wasted time and the front facade of the CLOSE UP is pretty much resolved. The missing detail strips on the drawing to the front and left & right edges are the same ,with the ones on the edges with addition width and detailing added. I have 95% of the model parts Identified.
So there are parts from 18/ 19 different model kits( and some assorted additional model parts) with only 4 of these kits also used on the 8 foot model. There are some very expensive large scale model kits here ( as I found out) and they also relate directly to the details of the background vehicles, the tanker, lobster Spinner and Rachel’s Spinner.
The dimensions for the facade are approximately 64 x 56 inches ( drawing here show less than half-scale to fit an A1 sheet)
One of the things I noticed about the Museum model is that at some stage the left hand side Elevator hood has been replaced. The panel layout and distinctive model parts originally are not the same.
I ’d love to know who has the missing model of Tyrells office from this. Some of you will know that the interrogation room model is currently owned by a UK Collector.
Next time I‘m here, I show you all something with twinkling lights.............. ( that’s not a Christmas Tree).
Last edited:
Pyramidrep
Sr Member
joberg,As for the "Interrogation Room" isn't RiddleyVille who has it?
yeah. That’s right. Geoff Hutchins had one of the great Blade Runner collections. Sadly Geoff passed away a few years ago and the collection is now looked after by his wife Tracey and Jamie his son. I contacted Jamie a few months ago and he was very kind and helpful with some information I was looking for.
I seem to have inadvertently got sucked into looking at the Close Up model but it is a lot easier than the other brute I’m working on. Maybe because of the experience I’ve gained from the other.
As NS4 mentioned, it takes a lot of time and effort to do this type of work - to trace the parts, measure & photograph them and get them drawn into CAD. I know some people wouldn’t bother to do this stage of work and throw themselves into attempting to build just from photo reference. I don’t think it’s possible on such a big complicated build. I have to have a solid foundation to keep an overall view and control of the project otherwise it could easily come “off the rails”.
The great joy about the work is that you constantly learning new things and the little nuances that you can find are Blade Runner gems. You might know that Mike McMillan was the model maker who built the elevators and that his initials MM are on the structural supports on the elevators. But did you know his initials are also on facade of the Close model itself?.
I ‘ll leave you to find those yourselves.
Thank you again for your support.
Last edited:

Pyramidrep
Sr Member
BrundleFly, Many thanks .
PM sent to you.
PM sent to you.
Pyramidrep
Sr Member
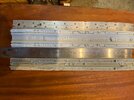
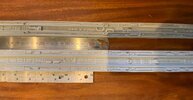
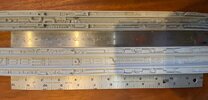
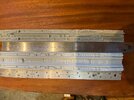
Thought I would have plenty of time to finish the buttress but have been too busy with other work. So maybe next week or two. But here’s a taster of the front screen finished ( front left hand side) with the lighting pattern attached. I worried that the brass would not support itself when glued with the acrylic supports but in fact it does just fine and it’s exactly as shown in that video of Mark Stetson holding one of the brass screens up.
It’s looks spectacular with the lights behind but you have to wait for that.
Happy Christmas to one and all.

It’s looks spectacular with the lights behind but you have to wait for that.
Happy Christmas to one and all.
Last edited:
brandomack
Sr Member
You’ve got this one, right?

stevielewis
Sr Member
Where do you look for such items?
brandomack
Sr Member
Got it from someone that had friends that built the Tyrell model in ‘82Where do you look for such items?
Pyramidrep
Sr Member
Brandomack,You’ve got this one, right?
Wow. Thank you for posting that image.
I read on another thread on the forum here that you had a casting of the corner piece so that the first time that piece has been seen in a more complete form because the master pattern that was sold last year by Propstore has a number of small pieces missing from it.
You‘ve probably seen that I re- built that pattern in May (post #82) this year

but in August during an exceptional heatwave ( a rarity in Ireland) that and 2 other patterns I had near finished, warped ( I had then on a tabletop close to a window). I saved the small parts but have to rebuild ( frustratingly) them again.
Do you mind if I ask is there a copy of that casting available/ for sale? it would be great to have for reference.
brandomack
Sr Member
Mine is warped as well, it came that way.Brandomack,
Wow. Thank you for posting that image.
I read on another thread on the forum here that you had a casting of the corner piece so that the first time that piece has been seen in a more complete form because the master pattern that was sold last year by Propstore has a number of small pieces missing from it.
You‘ve probably seen that I re- built that pattern in May (post #82) this year
View attachment 1524212
but in August during an exceptional heatwave ( a rarity in Ireland) that and 2 other patterns I had near finished, warped ( I had then on a tabletop close to a window). I saved the small parts but have to rebuild ( frustratingly) them again.
Do you mind if I ask is there a copy of that casting available/ for sale? it would be great to have for reference.
Pyramidrep
Sr Member
Mine is warped as well, it came that way.
I suppose it was a valuable lesson learned. I built the detailed patterns on bases of 2mm clear polystyrene and layered up the different levels of detailing. I never expected that they would warp. Next time I’ll put them on heavier bases to avoid the loss of work. I can also see that those smaller resin casts may have to have acrylic bases cast with them as with the larger patterns to avoid any deformation.
Thank you again for that image since it clarifies the missing detail on the pattern. Very appreciated.
Similar threads
- Replies
- 1
- Views
- 159