joberg
Legendary Member
Kermet, I appreciate the work/efforts you're putting into making this particular model. Not easy since there's a lot of greeblies/details to reproduce. You're using wood as a primary medium since, it seems, you like that particular way of working and achieving the right results.
I rarely use wood for my build because:
The medium has to be sanded many times over (specially the end grain ) to make sure it doesn't look like "fur" is growing on it after painting it (by "fur", I'm talking about the raised grain of the wood that occurs when putting any kind of paint/varnish on it)
So, if you had used plastic pipes, for example, to build your guns; the sanding would've been at a minimum
Same with some of the flat rounds...very difficult to do that on a band saw and at that scale. Plastic parts at your local hardware store would've made those sharper. I hope you'll find my comment as a constructive critique and that it'll help you build better now and in the future
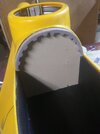
Take your time making little details crispier. For example: in your main engine trench, the sides are detailed with small pieces making it a ribbed look. That's good, but the pieces aren't spaced evenly. Next time, make a jig of the spacing you want to achieve and glue one piece, then put the jig flush with your first glued piece and proceed with the second piece and again for everyone of those until your side is done.
Eager to see your next update
I rarely use wood for my build because:
The medium has to be sanded many times over (specially the end grain
) to make sure it doesn't look like "fur" is growing on it after painting it (by "fur", I'm talking about the raised grain of the wood that occurs when putting any kind of paint/varnish on it)So, if you had used plastic pipes, for example, to build your guns; the sanding would've been at a minimum
Same with some of the flat rounds...very difficult to do that on a band saw and at that scale. Plastic parts at your local hardware store would've made those sharper. I hope you'll find my comment as a constructive critique and that it'll help you build better now and in the future
Take your time making little details crispier. For example: in your main engine trench, the sides are detailed with small pieces making it a ribbed look. That's good, but the pieces aren't spaced evenly. Next time, make a jig of the spacing you want to achieve and glue one piece, then put the jig flush with your first glued piece and proceed with the second piece and again for everyone of those until your side is done.
Eager to see your next update