Starting Mark 39 Gemini

MZX

Active Member
Greetings!

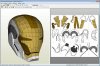
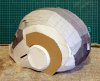
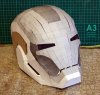
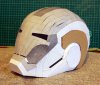
I started to build Mark 39 Gemini.
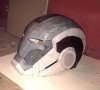
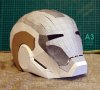
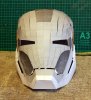
Ended stage 1 (paper/cardboard), now prepare the model to an epoxy resin.
Will write here about the process.
Thanks everyone in RPF for an inspiration :)

IMG_3490.JPG IMG_3488.JPG IMG_3487.JPG IMG_3486.JPG
 

Attachments

  • IMG_3486.JPG
    IMG_3486.JPG
    341.6 KB · Views: 679
  • IMG_3487.JPG
    IMG_3487.JPG
    358.2 KB · Views: 794
  • IMG_3489.JPG
    IMG_3489.JPG
    324.2 KB · Views: 633
  • IMG_3490.JPG
    IMG_3490.JPG
    419.7 KB · Views: 678
  • IMG_3488.JPG
    IMG_3488.JPG
    353.8 KB · Views: 161
Last edited:
Who's file are you using? Usually we builders credit those who modeled what we are building.

Sorry, I don't know, who is author. In .PDO didn't filled any information, filename was just "Mark 39 helmet.pdo".
Here it is:

starting-mark-39-gemini-mk39.jpg-240358d1381260147
 

Attachments

  • mk39.jpg
    mk39.jpg
    96.9 KB · Views: 8,812
Now fixed all bad places and coated with first layer of polyester resin.
starting-mark-39-gemini-dsc_0239.jpg-240359d1381260432
 

Attachments

  • DSC_0239.JPG
    DSC_0239.JPG
    106.6 KB · Views: 2,853
  • Like
Reactions: MZX
Oktober 13, starting stage 3, putty and sanding:

DSC_0246.jpgDSC_0250.jpg

Bought a small sander, very comfortable.

32e09707-d936-42a1-883b-6cc1900cab7d.jpeg
 
What kind of putty are you using? I think this is my first time seeing someone use putty. Can't wait to see how it sands out!

I use Guntex 2k UniPutty 332, very handy, fast (about 15 min to dry) and clean finishing putty. I buy it for $5 in auto store here in Russia.
200px-Шпатлёвка_2К_Guntex_332.png
 
Finished stage 3 "rough grinding". Added some primer to help find and fix bad places at stage 4, "fine grinding".

IMG_3572.jpg IMG_3573.jpg IMG_3576.jpg IMG_3577.jpg IMG_3579.jpg
 
Oktober 16. Working on fine grinding, almost good:

IMG_3584.jpg IMG_3585.jpg IMG_3586.jpg

I think i need to spend more time for fine grinding, but...
In my country people say "ideal is the enemy of good", so tomorrow or may be today i will start stage 5, painting.

PS. Of course, prior to the paint i need to add stripes, fine details, draw the areas to be painted in different colors and cut faceplate.
 
Hey bud, the helmet is looking very nice.

Keep up that sanding! Believe me, I know it's a PAIN, but what you got so far is worth it!!!
 
Thanks for support! :)

Oktober 18.
Almost finished sanding.

IMG_1.jpg IMG_2.jpg IMG_3.jpg

Now cutted out faceplate and eyes, added borders and details with small file and reinforced edges of the mask with epoxy clay:

IMG_4.jpg IMG_5.jpg IMG_6.jpg

I decided to reinforce the helmet by polyester resin inside, because i think now it's too thin.
 
Evening of October 18.
Resin and clay is hardened, so I sanding again. Many places to fix, many places to sand.
 
Hello everyone!

Helmet is almost done: strengthened, fixed disproportions and painted.
Now will make it more stronger by two coats of Krylon's Triple-Thick Crystal Clear Glaze and finally make it wearable.
So it is now:

IMG_3781.jpg IMG_3783.jpg IMG_3784.jpg IMG_3785.jpg IMG_3786.jpg IMG_3788.jpg

And in place with other ready helmets:

IMG_3791.jpg

PS. Oh, more To-do - face plate opening mechanism.
 
Back
Top