DirtyBrush
Active Member
Hey all, I made this piece last year and completely forgot to share it on the forum, I thought some of you might be interested in seeing it!
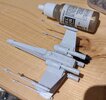
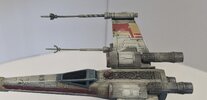
I set out to make a 1/144 scale diorama of one of my favourite cinematic moments - the Trench Run. I also decided to venture into using LED filaments to bring the scene to life ala-Boylei Hobby Time.
I sourced some 1/144 Bandai X-Wings and their Death Star Attack set, and I got to making. I soon realised that I didn't have enough Death Star tiles to make it as large as I needed, and so rather than buying another set, I moulded and cast some additional tiles purely for personal use to get it done (model-kit gods and lawyers forgive me).
I started with the X-Wings, and the first job was to fit these tiny little cool-white LEDs into the engine cans. The Bandai kits are superbly designed, and so all I needed to do was to hollow out the cans a little and feed the wire into the main body and out of the hole for the display stand.


To tint the white LEDs I used some offcuts from a transparent red sprue I had laying around, and by some miracle it turns out that cool white LEDs + transparent red plastic = perfect X-Wing engine colour (or 'pink' as some people call it).

After assembly it was on to painting. Unfortunately I don't have any progress pictures for the painting of the X-Wings, but I did make a video on the process as well as a video for the diorama that I'll link at the bottom of this post if you want more info. I'm really happy with how they turned out, and the process was very similar to painting larger models with some miniature painting techniques chucked in.
Essentially:
- Grey primer
- Black panel lining
- Diluted off white airbrushed
- Hand painted coloured panels
- Stickers used for squadron markings
- Chipped some paint away using a small file
- Satin varnish
- Black/sepia wash mix (heavy coat)
- Wipe away with cotton bud and leave in recesses
- Off-white drybrush to dull colours and give them that ILM dusty look
- Pastel powder for burnt sections on engines and recesses
- Matt varnish (gloss for canopies)
This process was the same for Luke, Biggs and Wedge, however, I did Biggs first as a test model and somehow the grey came out a bit darker/colder than Luke and Wedge.


So with the X-Wings finished it was time to tackle to diorama base and those LED filaments...
I made sure I had all the tiles I needed and arranged them in a layout that I liked before gluing them onto a base and backboard. I included two turrets that came with the kits (even though they aren't technically the correct style for the trench run).


And then I had to paint a lot of different shades of grey (not quite 50). I started with a black primer, base coat of mid-grey, 2 highlights of lighter greys, a black wash (wiped away as with the X-Wings), then a final zenithal highlight of pure white. For the streaks and dust I used a thick black wash and then layered some dark brown and black pastel powders, then sealed it all with a matt varnish.


To place the X-Wings on the diorama I drilled holes in the side and used some styrene tubes painted the same grey as the tiles. This allowed me to run the wires through to the back of the diorama and also hide the supports quite nicely.


I also drilled holes for two lengths of thin steel wire for each end of the LED filaments, and plotted out three pairs of turbolaser shots moving along the trench. I soldered the filaments on, wired them and the X-Wings up to two 3v battery packs, painted the border black, and then it was done!


I hope you enjoyed the walkthrough, I've linked the two videos below in case you want to check them out! (Prior warning, they're quite long and overly detailed, something I'll work on for my next foray into youtube, haha!)
I set out to make a 1/144 scale diorama of one of my favourite cinematic moments - the Trench Run. I also decided to venture into using LED filaments to bring the scene to life ala-Boylei Hobby Time.
I sourced some 1/144 Bandai X-Wings and their Death Star Attack set, and I got to making. I soon realised that I didn't have enough Death Star tiles to make it as large as I needed, and so rather than buying another set, I moulded and cast some additional tiles purely for personal use to get it done (model-kit gods and lawyers forgive me).
I started with the X-Wings, and the first job was to fit these tiny little cool-white LEDs into the engine cans. The Bandai kits are superbly designed, and so all I needed to do was to hollow out the cans a little and feed the wire into the main body and out of the hole for the display stand.
To tint the white LEDs I used some offcuts from a transparent red sprue I had laying around, and by some miracle it turns out that cool white LEDs + transparent red plastic = perfect X-Wing engine colour (or 'pink' as some people call it).
After assembly it was on to painting. Unfortunately I don't have any progress pictures for the painting of the X-Wings, but I did make a video on the process as well as a video for the diorama that I'll link at the bottom of this post if you want more info. I'm really happy with how they turned out, and the process was very similar to painting larger models with some miniature painting techniques chucked in.
Essentially:
- Grey primer
- Black panel lining
- Diluted off white airbrushed
- Hand painted coloured panels
- Stickers used for squadron markings
- Chipped some paint away using a small file
- Satin varnish
- Black/sepia wash mix (heavy coat)
- Wipe away with cotton bud and leave in recesses
- Off-white drybrush to dull colours and give them that ILM dusty look
- Pastel powder for burnt sections on engines and recesses
- Matt varnish (gloss for canopies)
This process was the same for Luke, Biggs and Wedge, however, I did Biggs first as a test model and somehow the grey came out a bit darker/colder than Luke and Wedge.
So with the X-Wings finished it was time to tackle to diorama base and those LED filaments...
I made sure I had all the tiles I needed and arranged them in a layout that I liked before gluing them onto a base and backboard. I included two turrets that came with the kits (even though they aren't technically the correct style for the trench run).
And then I had to paint a lot of different shades of grey (not quite 50). I started with a black primer, base coat of mid-grey, 2 highlights of lighter greys, a black wash (wiped away as with the X-Wings), then a final zenithal highlight of pure white. For the streaks and dust I used a thick black wash and then layered some dark brown and black pastel powders, then sealed it all with a matt varnish.
To place the X-Wings on the diorama I drilled holes in the side and used some styrene tubes painted the same grey as the tiles. This allowed me to run the wires through to the back of the diorama and also hide the supports quite nicely.
I also drilled holes for two lengths of thin steel wire for each end of the LED filaments, and plotted out three pairs of turbolaser shots moving along the trench. I soldered the filaments on, wired them and the X-Wings up to two 3v battery packs, painted the border black, and then it was done!
I hope you enjoyed the walkthrough, I've linked the two videos below in case you want to check them out! (Prior warning, they're quite long and overly detailed, something I'll work on for my next foray into youtube, haha!)