After finally getting my gloss black spray paint, I was finally able to finish the build.

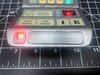
I added the relevant stickers to the plexiglass parts, as the title of this thread shows, I chose to do the Mk X. Almost all of these plexiglass sections I just ended up pressure fitting into place, and they seem very secure. I did mess up the Image Record/Library cluster, stickers slipped a little, so I may ask to get another sticker set for that to redo it.

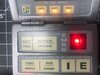
The EMRG section I painted gloss black, and sealed. Then the sticker was added. I did use a spot of hot glue to hold this panel in place. And the red EMRG button again just was pressure fit it in. I will see how some of these pressure fits go over time, and I may add some spots of super glue. But this will likely not be handled every day, so I think it will be fine.

And done!
There are some minor imperfections and blemishes in my build. But I am very happy with how this turned out.
Big thanks to stapleton13 and gmprops for making such awesome kits, it was really a treat to build. It looks fantastic, and is super satisfying to have as part of my prop collection.

Next up for me are kits from the same builders, the Star Trek boomerang phaser.
 

Attachments

  • IMG_2374.jpeg
    IMG_2374.jpeg
    2.1 MB · Views: 312
  • IMG_2376.jpeg
    IMG_2376.jpeg
    2.2 MB · Views: 366
Looks awesome. Any thoughts as far as eventually putting a small screen in it? Something where you could load up an actual working readout?


Thanks!
The tricorders with working screens are super cool. For me that is several steps above my current knowledge base for electronics and programing. Currently the best I do is soldering and continuity testing haha. I would be interested in possibly getting another tricorder someday and doing that upgrade, however I will likely always leave this one as is.
Most of the props I have collected are based on the original prop itself, not one pretending to be a real tool. And I like that a lot, because often I find the way the original prop was made so fascinating from a filmmaking standpoint. Like my Luke Skywalker ESB lightsaber, rather than getting a replica that is a 'working' lightsaber, I got one from The Graflex Shop that is made like the prop. Down to the point where if you put in batteries and a flash bulb, it works as a flash gun. Because Star Wars was made on a B movie budget, and lots of kit bashing happened, and I think that's super cool. So I like that this tricorder replica is pretty darn close to how the original was made, with its sticker screen haha.

TL;DR: The tricorders with working screens and buttons are super super cool, but I won't be modding this one to that extent.

Sorry that was likely way to long a response for a simple question but there you go! Thanks for letting me ramble!
 
Sorry that was likely way to long a response for a simple question but there you go! Thanks for letting me ramble!

No, no. It's totally cool. I'm the same way-though the only replica I ever had was a type II phaser my aunt bought me at a convention back in '89. I don't know who made it or what's happened to it. I really wish I'd taken better care of my stuff.
 
No, no. It's totally cool. I'm the same way-though the only replica I ever had was a type II phaser my aunt bought me at a convention back in '89. I don't know who made it or what's happened to it. I really wish I'd taken better care of my stuff.

Totally. I had a lot of old Star Trek action figures that I wish I had kept. Was that a type II TOS phaser? Very cool. My next project is a Type II boomerang phaser that I'll likely start a thread for in the next couple days once the electronics get here.
 
Just wanted to share my Tricorder build. This is going to be a Mark X build, from late Next Generation, Voyager, and DS9.

The body is from Stapelton Productions (Stapleton Productions), and the electronics are from gmprops (by PropEFX).

Both are incredibly well made and I recommend picking up any of their products, you won't be disappointed.

I am also using this tutorial as well as my own main guidance on the build. Mk IX Tricorder - YouTube


First thing I did was sand all the body parts with a fine sanding sponge, just to smooth things out. Then I added the lights and board to the lower panel with hot glue. Then after some trial and error I got the upper LED array into the main body. Then some bondo and sanding to get the two parts of the main body attached. I am also regularly testing the boards to make sure that I am not breaking a solder.


View attachment 1298516
Hi. I'm doing the tricorder build right now, does it matter what side of the magnet is facing the Reed switch?
 
Hello again.

Thank you for such a prompt response. I have one more question..... In regards to wiring up the door, I soldered the wires to the hinge and then the hinge to the main board like in the instructions, the charge from the battery goes to the door and only flickers when it opens. At first I thought this might be a connection issue but when I close the door little more than halfway then the LEDs and the door turn on completely as they should and stay that way. When I close the door and reopen it, it flickers again so I tried that again and yet again if I close at 3/4 of the way the LEDs turn on perfectly. Can you help me figure out what's causing this? I can't figure it out. Thank you so much
 
Some hinges do not have the best connectivity. Remember: the hinge is mechanical and the electrical connectivity depends on moving surfaces. The hinge is mounted through a shaft. The two leafs of the hinge can oxidize over time as well as the middle shaft. This oxidization can act as an insulator which will impede the flow of current. You could try spraying some contact cleaner in to the shaft of the hinge to help clean away some of the oxidation. Another more drastic measure is to squeeze the shaft area with needle-nosed pliers so that the hinge has a tighter movement over the shaft. Other than that, the only solution is to replace the hinges. Also, in most cases only one of the hinges is responsible for the poor contact, not both.
 

Your message may be considered spam for the following reasons:

If you wish to reply despite these issues, check the box below before replying.
Be aware that malicious compliance may result in more severe penalties.
Back
Top