You are using an out of date browser. It may not display this or other websites correctly.
You should upgrade or use an alternative browser.
You should upgrade or use an alternative browser.
ST Tech Manual Phaser Build-Up *NEW PICS - POST 59*
- Thread starter TridCloudwalker
- Start date
Re: ST Tech Manual Phaser Build-Up
Sorry, everyone, still not much progress to show today. I'm still waiting for paint to cure. However, final assembly should be taking place within the next day or two.
Here's the P2 with it's shiny new paint job:

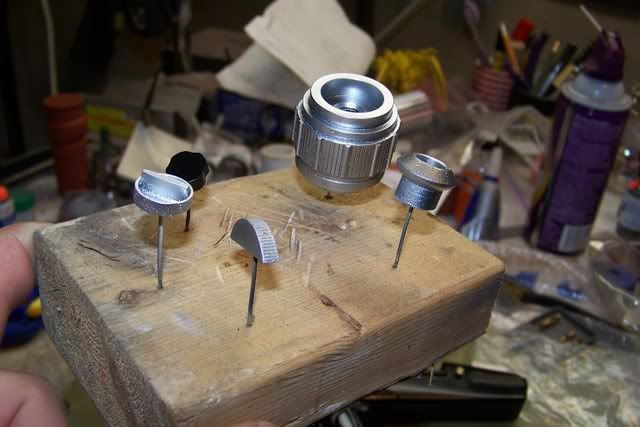
And here are the Alcladed parts (they look dull in the photo, but are quite chromey in person):
More to come tomorrow...
Sorry, everyone, still not much progress to show today. I'm still waiting for paint to cure. However, final assembly should be taking place within the next day or two.
Here's the P2 with it's shiny new paint job:
And here are the Alcladed parts (they look dull in the photo, but are quite chromey in person):
More to come tomorrow...
Re: ST Tech Manual Phaser Build-Up
So Replicator1701, are you thinking about doing another run *hint hint* *nudge nudge*")
So Replicator1701, are you thinking about doing another run *hint hint* *nudge nudge*
Re: ST Tech Manual Phaser Build-Up
Almossssst therrrre, alllllmost theeerrreee........
It'll be finished very early next year.
Happy new year, everyone!
Almossssst therrrre, alllllmost theeerrreee........
It'll be finished very early next year.
Happy new year, everyone!
Re: ST Tech Manual Phaser Build-Up
I've got to tell you. Franz would be totally honored you are building this.
I used to drive Franz Joesph home from the grocery store every now and then after he quit driving. I lived right around the corner from him. He was a remarkable man. You would not believe the arguments that went on around those phaser, tricorder and communicator drawings.
Re: ST Tech Manual Phaser Build-Up
Thank you. And for not really having any reference material, he did a phenominal job on his drawings. And they have developed a history and love as rich as the originals.
Thank you. And for not really having any reference material, he did a phenominal job on his drawings. And they have developed a history and love as rich as the originals.
Re: ST Tech Manual Phaser Build-Up
You're welcome.
My best friend in High School was married to Franz's daughter. He was going to snag me an original drawing from the Tech Manual, but it never happened. Unfortunately he got divorced and passed away a couple of years. But he had the original drawing of the phaser hanging in his living room.
Replicator1701
Well-Known Member
Re: ST Tech Manual Phaser Build-Up
I was planning on a small run in a few months.
I'm just really busy on some other projects right now.
When I do I'll post it in the Junker
So Replicator1701, are you thinking about doing another run *hint hint* *nudge nudge*
I was planning on a small run in a few months.
I'm just really busy on some other projects right now.
When I do I'll post it in the Junker
Re: ST Tech Manual Phaser Build-Up
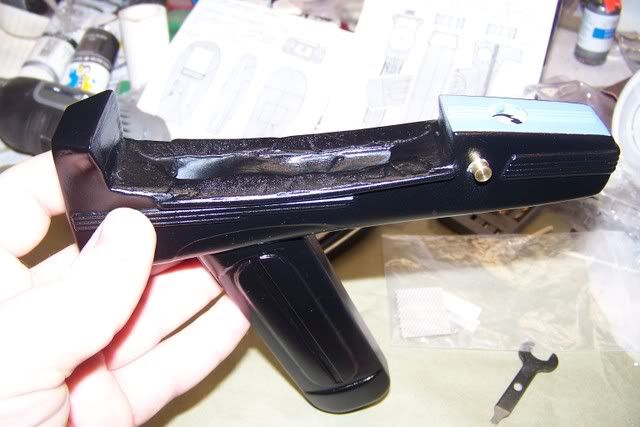
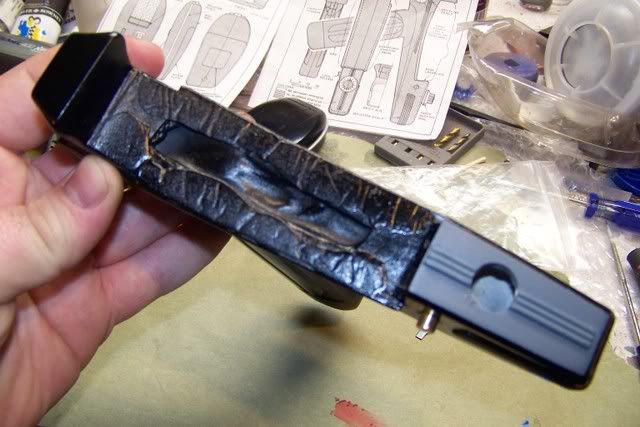
Here are the last two in progress photos:
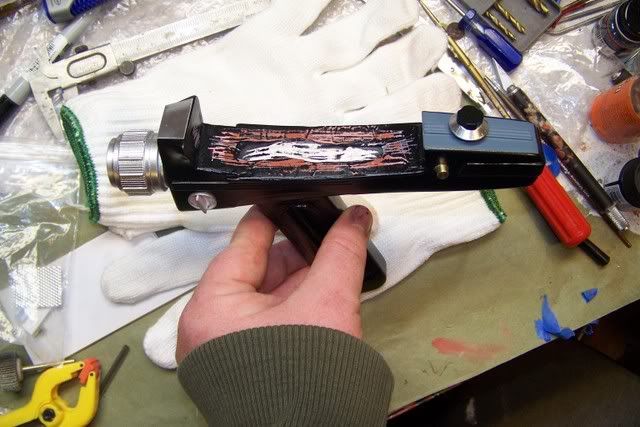
Glue channels and pins cut for small pieces:

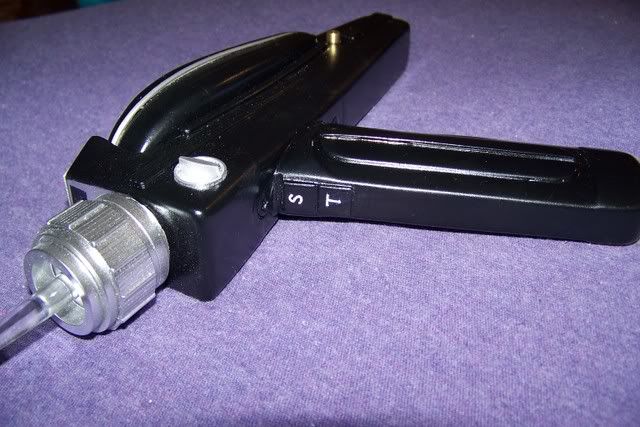
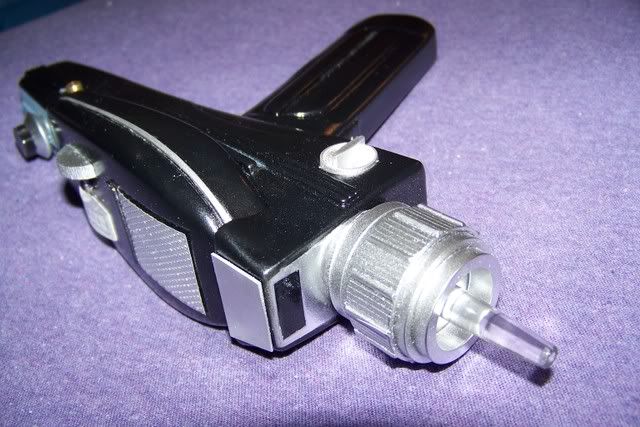
A strip of aluminum tape wrapped around the bottom of the emitter to keep it snug in the hole that was a hair too big. It was secured inside by a dollop of epoxy glue. Also, you cant see it, but I scribed an S and T into the triggers as per Franz's drawings and filled with white paint, then sealed with clear semi-gloss:

The phaser is completely finished. I'm just waiting for the camera batteries to recharge so I can take some photos. They should be ready in about an hour.
Check back.
Here are the last two in progress photos:
Glue channels and pins cut for small pieces:
A strip of aluminum tape wrapped around the bottom of the emitter to keep it snug in the hole that was a hair too big. It was secured inside by a dollop of epoxy glue. Also, you cant see it, but I scribed an S and T into the triggers as per Franz's drawings and filled with white paint, then sealed with clear semi-gloss:
The phaser is completely finished. I'm just waiting for the camera batteries to recharge so I can take some photos. They should be ready in about an hour.
Check back.
Lord Abaddon
Sr Member
Re: ST Tech Manual Phaser Build-Up
You're a very lucky person to have known him. From the few interviews I've read with him as well as having been totally absorbed in the Trek works he made he seemed like someone that would be just great fun to talk to.
So you have no idea what happened to that drawing? It would be ashame if something that is such a part of Trek history was lost.
Count me in! I missed the first one unfortunately and a few months from now would be perfect.
Gorgeous work! I love doing props myself when I can, but I've had projects sitting on hold for years now due to personal issues so just can't justify it now. So I love seeing when others do such great work. I would love to have a finished TM Phaser II as well as a Brad Nelson someday.
I've got to tell you. Franz would be totally honored you are building this.
I used to drive Franz Joesph home from the grocery store every now and then after he quit driving. I lived right around the corner from him. He was a remarkable man. You would not believe the arguments that went on around those phaser, tricorder and communicator drawings.
You're a very lucky person to have known him. From the few interviews I've read with him as well as having been totally absorbed in the Trek works he made he seemed like someone that would be just great fun to talk to.
You're welcome.
My best friend in High School was married to Franz's daughter. He was going to snag me an original drawing from the Tech Manual, but it never happened. Unfortunately he got divorced and passed away a couple of years. But he had the original drawing of the phaser hanging in his living room.
So you have no idea what happened to that drawing? It would be ashame if something that is such a part of Trek history was lost.
I was planning on a small run in a few months.
I'm just really busy on some other projects right now.
When I do I'll post it in the Junker
Count me in! I missed the first one unfortunately and a few months from now would be perfect.
Here are the last two in progress photos:
<snip>
The phaser is completely finished. I'm just waiting for the camera batteries to recharge so I can take some photos. They should be ready in about an hour.
Check back.
Gorgeous work! I love doing props myself when I can, but I've had projects sitting on hold for years now due to personal issues so just can't justify it now. So I love seeing when others do such great work. I would love to have a finished TM Phaser II as well as a Brad Nelson someday.
Re: ST Tech Manual Phaser Build-Up
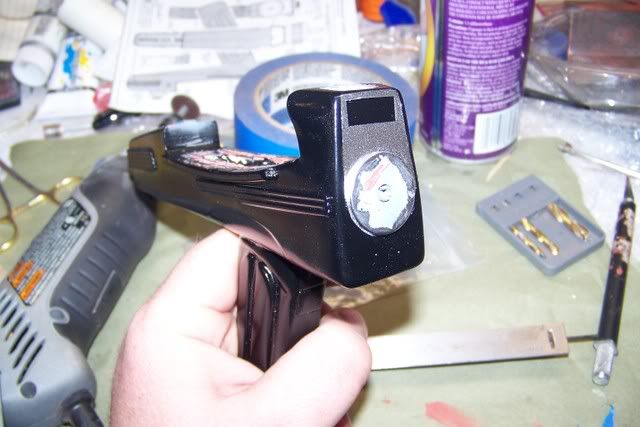
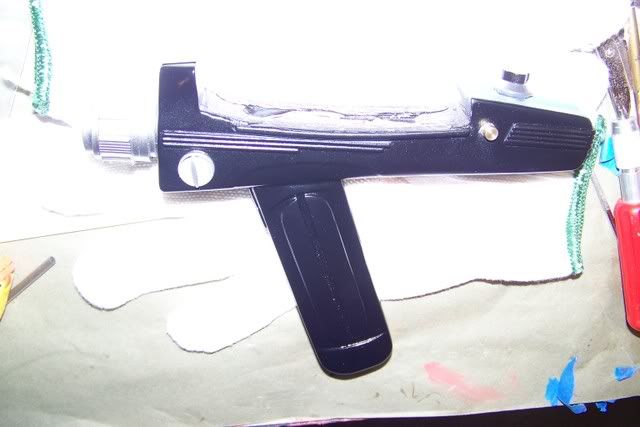
God, I can't photograph props to save my life. In person, the finish is flawless, yet somehow my bazillion mega-pixel camera picks up every single dust particle and cat hair and makes it look like I had the phaser sitting in a vaccuum cleaner bag for a while. Hopefully, the proud owner of this can take and post some better photos when he receives it.
But in the mean time:
Re: ST Tech Manual Phaser Build-Up
Fantastic job man.
Your photos are suffering from the flash.
Light your object and take pictures with no flash. Or go outside and use normal daylight with a plain white background.
Terrific build though.
LA, the drawing went to someone who recognized it's significance (a big Trek fan).
Fantastic job man.
Your photos are suffering from the flash.
Light your object and take pictures with no flash. Or go outside and use normal daylight with a plain white background.
Terrific build though.
LA, the drawing went to someone who recognized it's significance (a big Trek fan).
Re: ST Tech Manual Phaser Build-Up *FINISHED*
Thanks!
The sun is down over here. I'm going to try shooting a few more in the living room with some halogen worklights shining indirectly onto it.
EDIT: Meh, didn't work. I'll try to take some shots in the daylight if I get home from work in time tomorrow.
Thanks!
The sun is down over here. I'm going to try shooting a few more in the living room with some halogen worklights shining indirectly onto it.
EDIT: Meh, didn't work. I'll try to take some shots in the daylight if I get home from work in time tomorrow.
Last edited:
Replicator1701
Well-Known Member
Re: ST Tech Manual Phaser Build-Up *FINISHED*
Yes the flash does bad things!
I turn off the flash. With my camera, You press the button in half way
and it auto focus and adjusts for the room lighting. It gives me a blue
ready symbol and then you can press it in all the way to take the picture.
Most digital cameras are set up this way.
Yes the flash does bad things!
I turn off the flash. With my camera, You press the button in half way
and it auto focus and adjusts for the room lighting. It gives me a blue
ready symbol and then you can press it in all the way to take the picture.
Most digital cameras are set up this way.
Re: ST Tech Manual Phaser Build-Up *FINISHED*
Great build, looks fantastic!!! and I'll definetly be in on that run Replicator1701 when it comes around.
Great build, looks fantastic!!! and I'll definetly be in on that run Replicator1701 when it comes around.
Re: ST Tech Manual Phaser Build-Up *FINISHED*
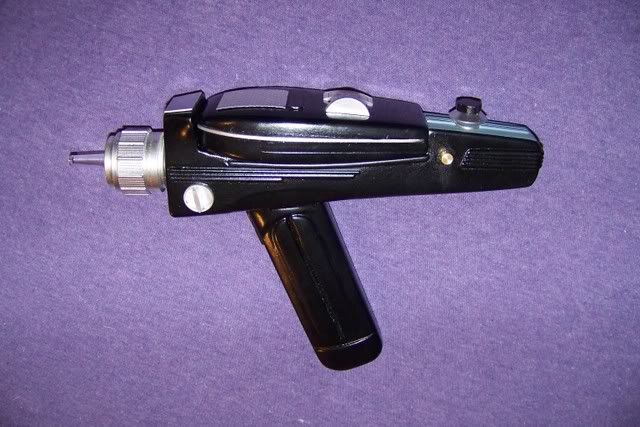
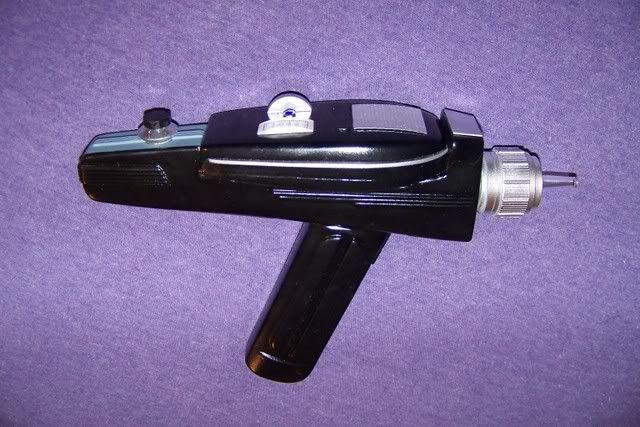
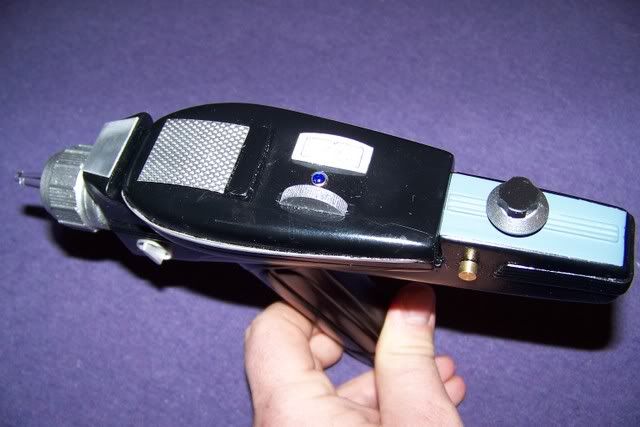
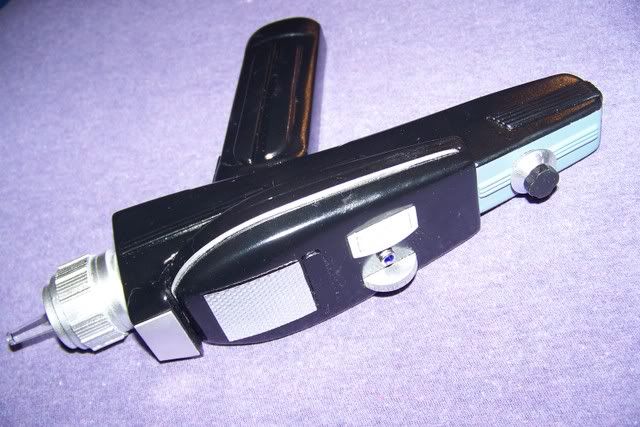
I finally got some decent pics. It was overcast out, but at least it was sunlight on a white background:
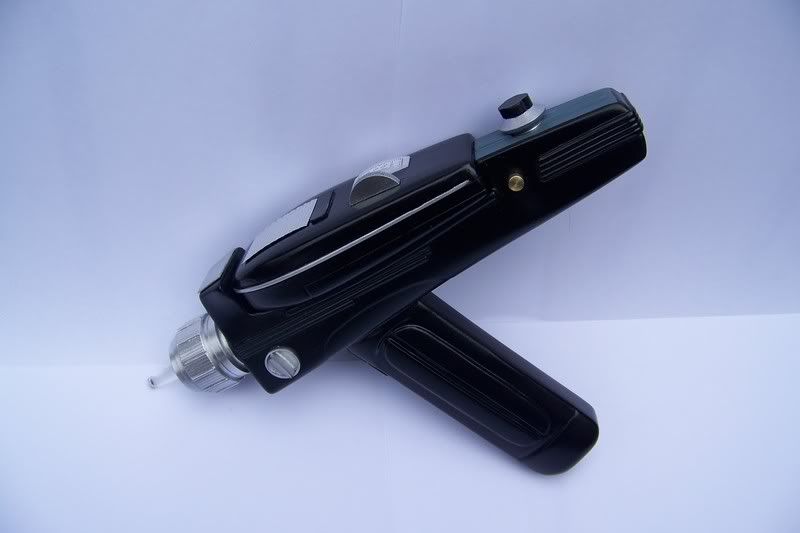


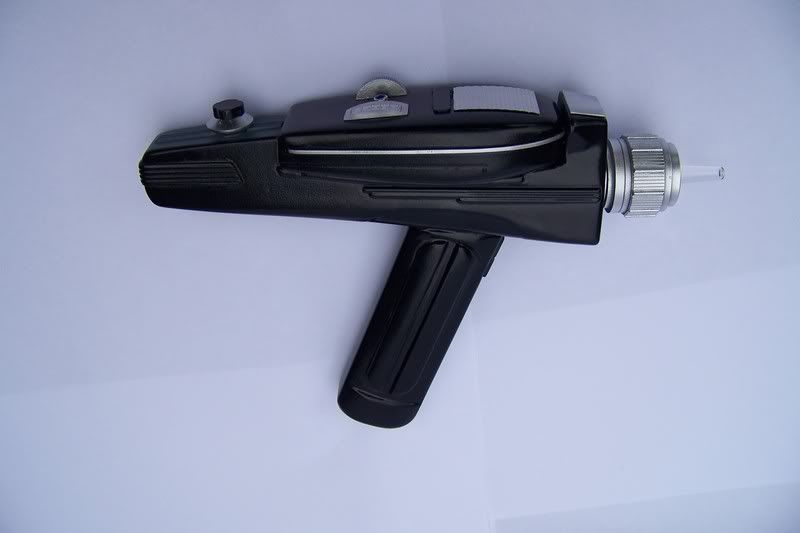
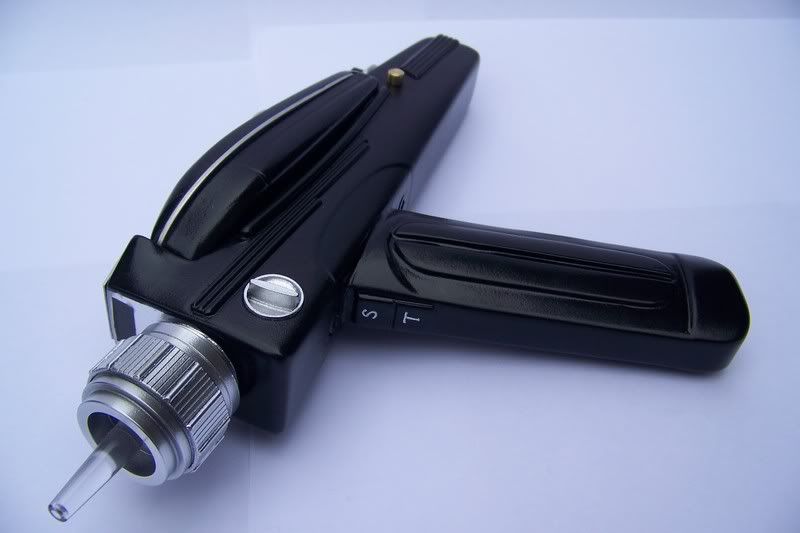
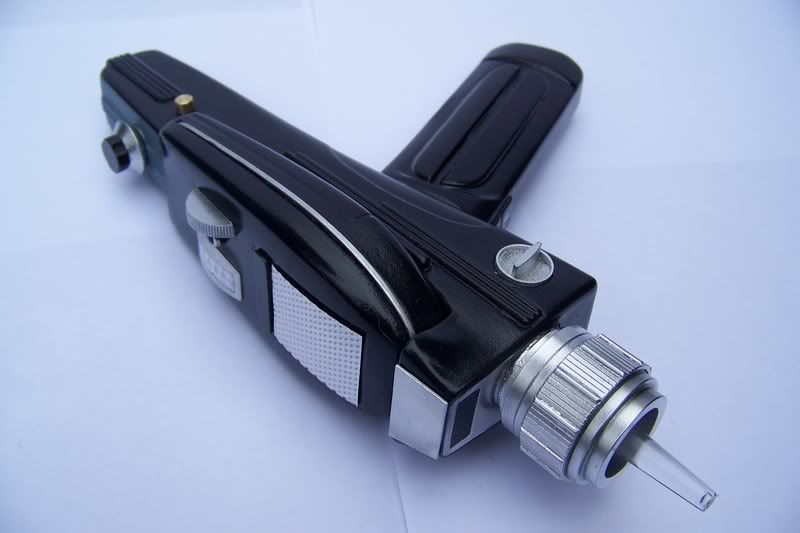
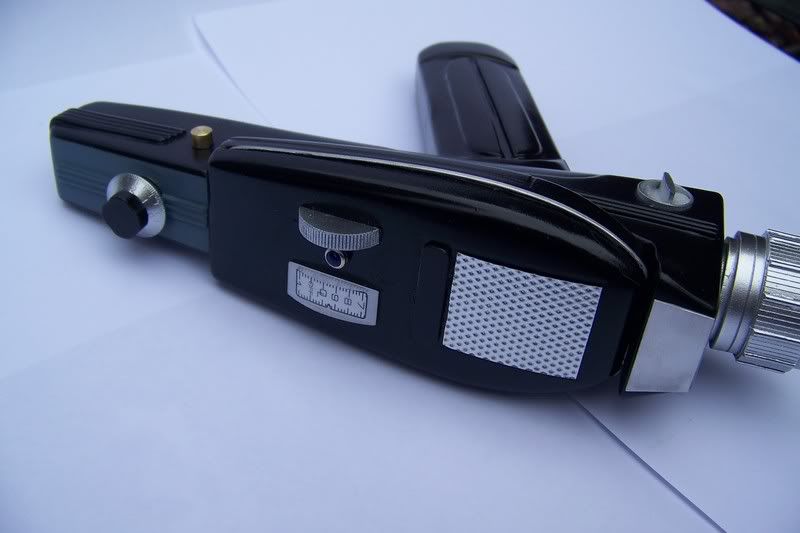
I finally got some decent pics. It was overcast out, but at least it was sunlight on a white background:
Similar threads
- Replies
- 1
- Views
- 1,121