Space 1999 Eagle Transporter Build Club (PIC HEAVY!)

Re: Space 1999 Eagle Transporter Build Club UPDATED 15/04 (PIC HEAVY!)

Well, well, well....
Four months out of the year is the heavy trash pickup in my area. Along with one's own regular trash (the usual cans, bottles, egg shells, coffee grounds, etc.) one can also throw out such things as furniture, metal items paint cans and whatnot. April is such a month. Earlier, I was disassembling an unneeded box spring for a mattress, to throw out the metal components and to cut up and burn the wood parts. After removing a zillion staples which held the fabric cover in place, I notice each corner has a plastic covering underneath. Behold...
View attachment 91102
It is translucent to light. Behold...
View attachment 91103
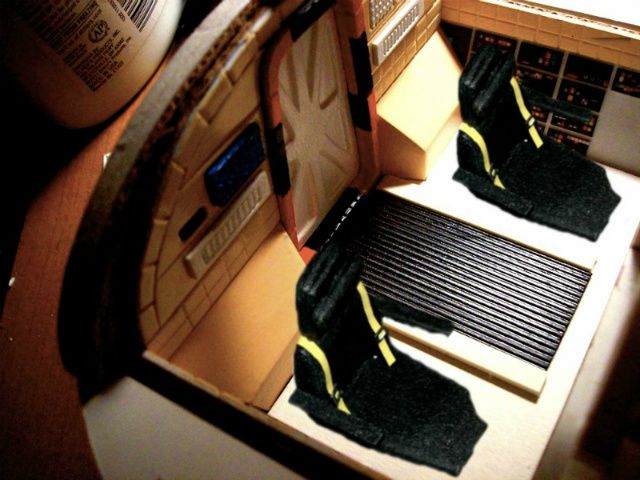
With a yellow color behind it, it just might work out for the inner sides of the eagle cockpit!
View attachment 91104
If the plastic happened to be yellow, I'd be sold immediately. But, four corner pieces gives me plenty to conduct tests with!
You may see these pop up again in the future. Now I have these and those clear pieces of plastic back yonder in the thread. The clear parts are much thinner and will be easier to work with. These new parts are much thicker and I do like how they diffuse the light coming through. I'm not even sure if I'm going to be lighting this thing yet, but it's always good to have a choice of materials!
 
Re: Space 1999 Eagle Transporter Build Club UPDATED 15/04 (PIC HEAVY!)

You clever ol' stick!!!! What a brilliant find! Shame about that centre rib, but otherwise, a perfect fit! You could always prime it and buy a rattle can of orange acrylic paint. Acrylic yellows, oranges and reds are translucent anyway.....alternatively, pop along to your local sign writing shop, and grab an off-cut of a translucent sticky backed plastic.....pop it straight onto your newly discovered pieces and, Hey Presto!!!
 
Re: Space 1999 Eagle Transporter Build Club UPDATED 15/04 (PIC HEAVY!)

...Shame about that centre rib, but otherwise, a perfect fit!...pop along to your local sign writing shop, and grab an off-cut of a translucent sticky backed plastic.....pop it straight onto your newly discovered pieces and, Hey Presto!!!

Actually, the center rib I don't see as a problem. Since the curve doesn't exactly match my Eagle interior, and the curve of the plastic is...I can't think of the geometric term for it, but let's just say "irregular", so I'd have to cut out pieces anyway that happen to match my needs! So the rib isn't exactly a blessing in disguise, but it is, well...disguised as a blessing or disguised as a disguise or something!!:lol

Oh, and the sign shop is a keen idea!
 
Re: Space 1999 Eagle Transporter Build Club UPDATED 15/04 (PIC HEAVY!)

I thought for a fleeting moment that these panels might come in handy for the light panels in the passenger pod, but checking your recent pictures confirms that all the light panels in there are flat. Ah, well.
These might be handy if I were to build a Moonbase Alpha corridor or maybe Main Mission, though!:lol
*he says while eternally trapped in his command module*:unsure
 
Re: Space 1999 Eagle Transporter Build Club UPDATED 15/04 (PIC HEAVY!)

*he says while eternally trapped in his command module*:unsure

I did phone them and they ASSURED me that a locksmith was on his way to free you...That was HOURS ago, though! :lol

Hey, if you want to see a true MASTER craftsman build a 12" Eagle with every single working part and detail that is only found on the 44" Eagle, then check this out. This guy is either a genius or a raving lunatic!!!

http://www.eagletransporter.com/forum/showthread.php?t=4861
 
Last edited:
Re: Space 1999 Eagle Transporter Build Club UPDATED 15/04 (PIC HEAVY!)

I doid phone them and they ASSURED me that a locksmith was on his way to free you...That was HOURS ago, though!

I'll check the 12" once I got out of here..

Dang...you should've called a Commlocksmith!!:behave
 
Re: Space 1999 Eagle Transporter Build Club UPDATED 15/04 (PIC HEAVY!)

:eek

It took me four hours to read that whole thread...You did it already!!!???:lol
 
Re: Space 1999 Eagle Transporter Build Club UPDATED 15/04 (PIC HEAVY!)

:eek

It took me four hours to read that whole thread...You did it already!!!???:lol

No, nooo...when I saw what it was, I realized I had already read it. I did breeze through again, though!
 
Re: Space 1999 Eagle Transporter Build Club UPDATED 15/04 (PIC HEAVY!)

I glued the paper floor template to cardboard and carefully cut along the embossed edge. It didn't give me any problems, and the finished piece easily popped into place. Now before I can paint it, I need to make the center "ramp".
View attachment 91155View attachment 91156
Using a piece of textured styrene from an old project, I cut a piece to the desired width, and cut two pieces of a flat, rectangular styrene rod for the edges. That's one thing I like about styrene: it comes in so many useable shapes (rods, tubes, textured sheets, etc.), and until this project came along I'd forgotten all about the product! Anyhow, I test-fitted the pieces for my ramp. This is one area where I'm taking a few creative liberties with the design. My "ramp" is actually quite flat, and not as raised as the one on the live-action set for the show. I don't want to re-live the nightmare of trying to justify the exterior and exterior design discrepancies, and I definitely don't want to bore anyone by talking about it again! Suffice it to say that this configuration works for me!
View attachment 91157View attachment 91158View attachment 91159
Now, on to painting my ramp. I used this particular textured styrene because a) I had it handy and b) I wanted it to have a "rubber mat" look to it. I sanded down the edge by the door to give it a bit of a bevel, and added a coat of black paint. A small amount of fine plastic dust from the sanding remained in the grooves, and mixed with the paint as I brushed. I rather liked the soft grit texture it added, and after the second coat of paint, I was satisfied with the rubber mat look!
View attachment 91160View attachment 91161View attachment 91162
Placing the pieces back in the command module, I am satisfied as to how it looks. This change in the platform will no doubt affect the basics of the control lever placement up front, but I'll deal with that when I get to it!
View attachment 91163View attachment 91164
 
Re: Space 1999 Eagle Transporter Build Club UPDATED 15/04 (PIC HEAVY!)

*pops in*
Just needed a little dizzy...thanks!
*pops back out*
 
Re: Space 1999 Eagle Transporter Build Club UPDATED 15/04 (PIC HEAVY!)

Damn! :eek
That's so SHARP! I am DEFFO going to revisit my cockpit. Maybe even rebuild it completely. I think I went in too quickly and the results are......sloppy. I know I could do it so much better than I did. Not as good as yours, but better than mine. The materials I use are, in themselves, too limiting.


*pops in*
Just needed a little dizzy...thanks!
*pops back out*
With skills like that, I think we ALL feel a little dizzy.....
 
Last edited:
Re: Space 1999 Eagle Transporter Build Club UPDATED 15/04 (PIC HEAVY!)

I am DEFFO going to revisit my cockpit. Maybe even rebuild it completely.

Hmm...one man's purgatory is another man's paradise!!
I dunno...I like your cockpit. Mine (to me at least) seems to look..sterile, or something. During my brief career as a comic artist, my ink lines always seemed to lend themselves to a "sci-fi" look. I had always wanted to try something like a western or horror comic, just to see if I could do it. I always had a hard time "grubbing it up", so to speak.

I still worry over your cockpit only in terms of cracking that module shell open. It reminds me of an old car commercial where they had a jeweler riding in the back of the car, and ostensibly splitting a diamond while the car rumbled along the road! I guess the idea was to demonstrate the smooth ride, but even as a kid I was skeptical:rolleyes. I wish I could remember what car that was for.

Besides, imagine if you re-did your cockpit, then I looked at it and decided to re-do mine! Then you saw mine and opted to re-do yours again! And that's not even considering the rest of the ship!! Anything could happen!!:eek
 
Re: Space 1999 Eagle Transporter Build Club UPDATED 15/04 (PIC HEAVY!)

:lol :lol :lol
At the very least,I just would like to tidy mine up a bit...The side wall control panels are dog rough on mine. I want to replace them with the printed ones like I sent to you, and you used. They look great! Your cockpit feels "sterile" because you have no seats in it yet. I felt the same way about mine; there was all this clean empty space and it felt cold. the seats changed that feel completely for me. Hopefully, these two pics will show you exactly what I was feeling at the time.
I felt that I had the proportions right but without the seats, it all just felt....empty....not real. Does that make any sense?? :wacko
294e25e9.jpg

20120315_000558.jpg


As for splitting the Command module, As soon as I get a dry day, I am finally getting around to fibre glassing the inside and bedding aluminium foil into the wet fibreglass resin. I will only foil the rear half of the CM i.e. the area above and to the sides of the Cockpit. I will scrunch up the foil and then flatten it out before sticking it down to refract the light a little more. The CM will be tough as hell once glassed. I can then drill the holes for the sensors etc. I need to get back to the CM now and get it sorted out to a finishing stage. I have finally resolved the wiring issues, and how to connect/disconnect the wiring in each separate module. This will allow me to break the Eagle down into its component modules and reassemble it, without disturbing any of the wiring looms. More on that later.
My advice to you is......build a chair! You'll feel much better when you see it installed :lol
 
Last edited:
Re: Space 1999 Eagle Transporter Build Club UPDATED 15/04 (PIC HEAVY!)

Actually it does make sense, yeah. Sort of a "house with the children grown up and moved away" feeling. I'll have to try building a couple of seats and see what happens!
 
Re: Space 1999 Eagle Transporter Build Club UPDATED 15/04 (PIC HEAVY!)

Even if you temp make some out of card to fill the whole. It will give you an idea :)

Crappy picture editing from me but how about this?
eagle-0196d.jpg
 
Last edited:
Re: Space 1999 Eagle Transporter Build Club UPDATED 15/04 (PIC HEAVY!)

Thanks for building my seats for me! What a pal! Now I don't have to bother with them!:)

Actually looks pretty awesome! Now I'm motivated again!:cool
 
Re: Space 1999 Eagle Transporter Build Club UPDATED 15/04 (PIC HEAVY!)

Too much stuff to quote to try to reply to. I will just say your guys work is absolutely stunning. I think this thread needs to be one of the Best of Threads posted on the Facebook page.
 
Re: Space 1999 Eagle Transporter Build Club UPDATED 15/04 (PIC HEAVY!)

Too much stuff to quote to try to reply to. I will just say your guys work is absolutely stunning. I think this thread needs to be one of the Best of Threads posted on the Facebook page.

That's very kind of you to say, Mr. G. Your confidence in us is humbling!:$

Minor update:
I had to make a couple more of these things, so make 'em I did.
View attachment 91259
I painted them and glued them in place.
View attachment 91260
See? I told you it was a minor update!
 
Back
Top