You are using an out of date browser. It may not display this or other websites correctly.
You should upgrade or use an alternative browser.
You should upgrade or use an alternative browser.
Space 1999 Eagle Transporter Build Club (PIC HEAVY!)
- Thread starter Atlanthia
- Start date
Re: Space 1999 Eagle Transporter Build Club 2 UPDATES 04/04 (PIC HEAVY!)
Hi Guys!, I am sorry for the delay in updating - I have unfortunately been a little tied up with helping sort the arrangements for my sister's funeral. I did, however, find a little time to spend on constructing the pod. I have built and installed the first of four sliding pod doors. These need to be built, prepped, painted, finished and finally installed before I can build up the floor and internal sloping ramps etc, because I will not be able to remove them afterwards. I have been reading extensively about the disparities between the studio model doors, and the studio set doors. The models have the door detailing sitting proud, whereas the studio set doors have the detailing imprinted into the door. This is because any detailing that sits proud of the door surface, would hinder it sliding open and closed. I have decided, nevertheless to follow the external detailing as on the 44" Eagle pod doors and have the detailing sitting proud of the door surface. I didn't want to sculpt the profile of that detailing into the door surround as, the gap would show when the door was closed. My solution is to build up the door edges to match the depth of the inner detailing, as in the photo below.
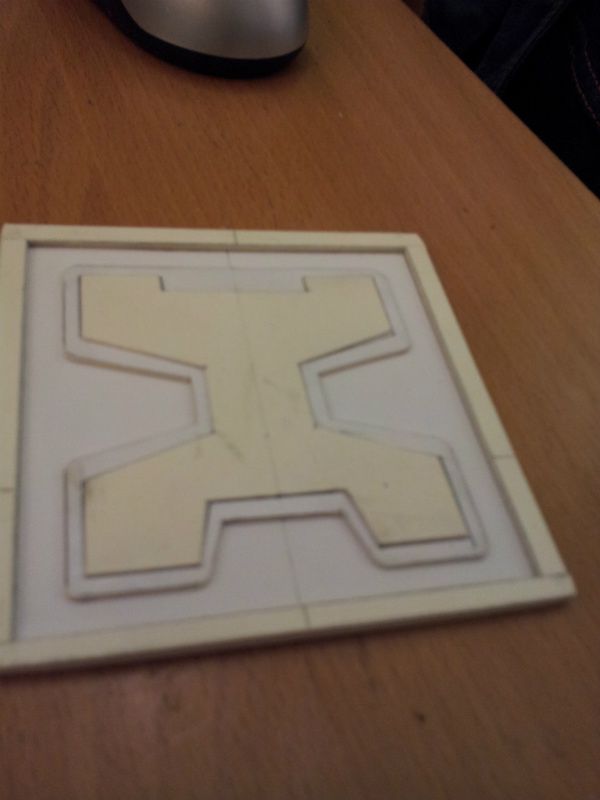
This allows the door to slide smoothly open and closed, and also, it leaves no unsightly gaps in the door surround. I know it means that it is no longer screen accurate in the true sense but it IS totally functional, as this 15 second video shows. Just click on this picture:
[URL=http://s290.photobucket.com/albums/ll249/Hahns_off/50%20Inch%20Eagle%20Transporter/?action=view¤t=20120407_234840.mp4] [/URL]
This door is slightly loose in its frame at the present. This is because I have built it to allow for filler and paint which will take up the slack. Here is a picture of the door in place and the last one is of the door runners on the inside. Looking at the inside picture, you can see that the door runners will be easily hidden behind the walls, ramped floor and the ceiling, when they are installed. I am pleased as punch!


My question to the guys on here that know is this: Does the counterpart of this door, on the opposite side of the pod, also open to its respective right, or does it open to its respective left? If the answer is to the left, then that would mean that both doors slide towards the front of the Eagle, which makes sense, as both would also disappear into the Moon buggy compartments. However, if the second door ALSO slides to its right, it would slide into the wall of the seating area, and I don't remember seeing it do that....I would really like to resolve this problem as soon as possible, with your help as it is now holding up the build. PLEASE help me out here :cry
Anyway, I hope you enjoyed this little update, and choose to post a little comment - positive OR negative. All are welcome!
Hi Guys!, I am sorry for the delay in updating - I have unfortunately been a little tied up with helping sort the arrangements for my sister's funeral. I did, however, find a little time to spend on constructing the pod. I have built and installed the first of four sliding pod doors. These need to be built, prepped, painted, finished and finally installed before I can build up the floor and internal sloping ramps etc, because I will not be able to remove them afterwards. I have been reading extensively about the disparities between the studio model doors, and the studio set doors. The models have the door detailing sitting proud, whereas the studio set doors have the detailing imprinted into the door. This is because any detailing that sits proud of the door surface, would hinder it sliding open and closed. I have decided, nevertheless to follow the external detailing as on the 44" Eagle pod doors and have the detailing sitting proud of the door surface. I didn't want to sculpt the profile of that detailing into the door surround as, the gap would show when the door was closed. My solution is to build up the door edges to match the depth of the inner detailing, as in the photo below.

This allows the door to slide smoothly open and closed, and also, it leaves no unsightly gaps in the door surround. I know it means that it is no longer screen accurate in the true sense but it IS totally functional, as this 15 second video shows. Just click on this picture:
[URL=http://s290.photobucket.com/albums/ll249/Hahns_off/50%20Inch%20Eagle%20Transporter/?action=view¤t=20120407_234840.mp4]
 [/URL]
This door is slightly loose in its frame at the present. This is because I have built it to allow for filler and paint which will take up the slack. Here is a picture of the door in place and the last one is of the door runners on the inside. Looking at the inside picture, you can see that the door runners will be easily hidden behind the walls, ramped floor and the ceiling, when they are installed. I am pleased as punch!


My question to the guys on here that know is this: Does the counterpart of this door, on the opposite side of the pod, also open to its respective right, or does it open to its respective left? If the answer is to the left, then that would mean that both doors slide towards the front of the Eagle, which makes sense, as both would also disappear into the Moon buggy compartments. However, if the second door ALSO slides to its right, it would slide into the wall of the seating area, and I don't remember seeing it do that....I would really like to resolve this problem as soon as possible, with your help as it is now holding up the build. PLEASE help me out here :cry
Anyway, I hope you enjoyed this little update, and choose to post a little comment - positive OR negative. All are welcome!
Chrisisall
Master Member
Re: Space 1999 Eagle Transporter Build Club UPDATES 08/04 (PIC HEAVY!)
So... I'm assuming you studied under Meddings...?
So... I'm assuming you studied under Meddings...?
Re: Space 1999 Eagle Transporter Build Club UPDATES 08/04 (PIC HEAVY!)
:lol
If, my good friend, you are referring to the inimitable Derek Meddings, my answer is I wish!!!
I would have LOVED to have worked in an environment like that.....
Your reference is taken as a compliment of the highest order!
P.S. Friendship request sent
:lol
If, my good friend, you are referring to the inimitable Derek Meddings, my answer is I wish!!!
I would have LOVED to have worked in an environment like that.....
Your reference is taken as a compliment of the highest order!
P.S. Friendship request sent
Last edited:
Chrisisall
Master Member
Re: Space 1999 Eagle Transporter Build Club UPDATED 08/04 (PIC HEAVY!)
I'm just amazed by the attention to detail. Doors that OPEN?
*Small side rant*
The best thing about Space: 1999 was, IMO, the Eagles. I had a model of one back in the day. I have models of the Enterprise, the Jupiter 2, the shuttle from Armageddon, Vipers, Galactica, Falcon, X-Wing...
Why none from Firefly, or Avatar? Or the Star Wars prequels?
CGI.
Ships are overcomplicated pixely cartoons now. No sense of real tactile presence. Eye candy only, not for modeling or touching.
So now, even movies/shows I *LOVE* have instilled me with near ZERO interest in making models from said projects.
Specific example: Firefox isn't the best movie ever made, but boy would I like to make a model of one someday. X-Men was a really good movie, but the X-jet was just a toon- no interest in making one no matter how cool the design.
To wrap up here: Derek Meddings is lookin' down, smiling at this thread.
Build, baby, BUILD!:thumbsup
Re: Space 1999 Eagle Transporter Build Club UPDATED 08/04 (PIC HEAVY!)
:lol :lol :lol
That is the COOLEST post on this WHOLE thread!!! Not because of the undeserved compliments that you pay to me and Bob, but because of the two polar examples you give. I, also LOVE the Firefox plane. It was bordering on BRUTAL in its design...and yet, it had a singular beauty that made you want to break into its hangar, just to see it and touch it....As for the X-jet........personally, I would rather build a case against St. Peter than build a model of that.......
You ROCK, Chris and anyone who hasn't already checked out your thread:
http://www.therpf.com/f11/my-tos-viper-squadron-project-141725/
They don't know what the are missing!
If you do check it out, please give it a 5 star rating !!!
Re: Space 1999 Eagle Transporter Build Club UPDATED 08/04 (PIC HEAVY!)
Hi everyone, I hope you had a great Easter weekend
Another update...
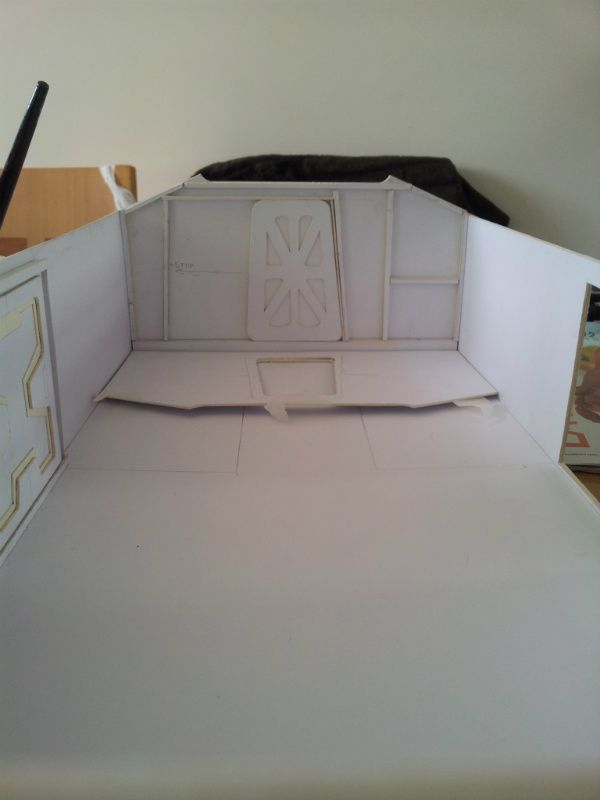
I have made some progress on the passenger pod. I have managed to build all four of the pod doors now and am in the process of constructing the runners etc on which they will slide. They will, of course, slide into their respective cavities so, this means that all four pod walls will need to be fitted out with mini stud-work and then skinned inside - just like dry wall! Here is a picture of one of the end walls to illustrate.
The inner wall then covers all this and pretties it up:

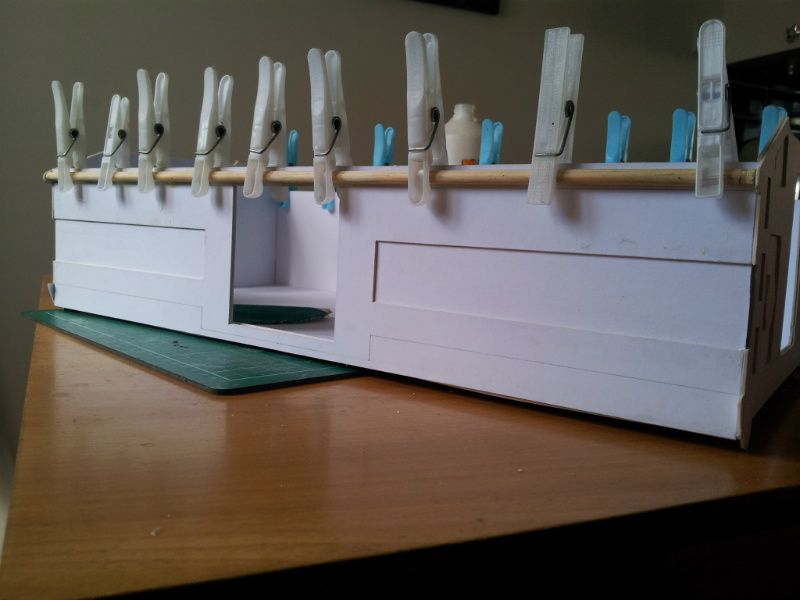
I have also cut and fitted a piece of 7mm dowel along the upper edge of each side of the pod. This is to help me form the bull nose detail once the roof has been constructed and installed, and also to add a little more rigidity to the structure. Sorry about the clothes pegs, but they make great clamps!

The pod ends are also starting to take shape. I am adding the little details etc, piece by piece. Here are a couple of shots with the door installed.
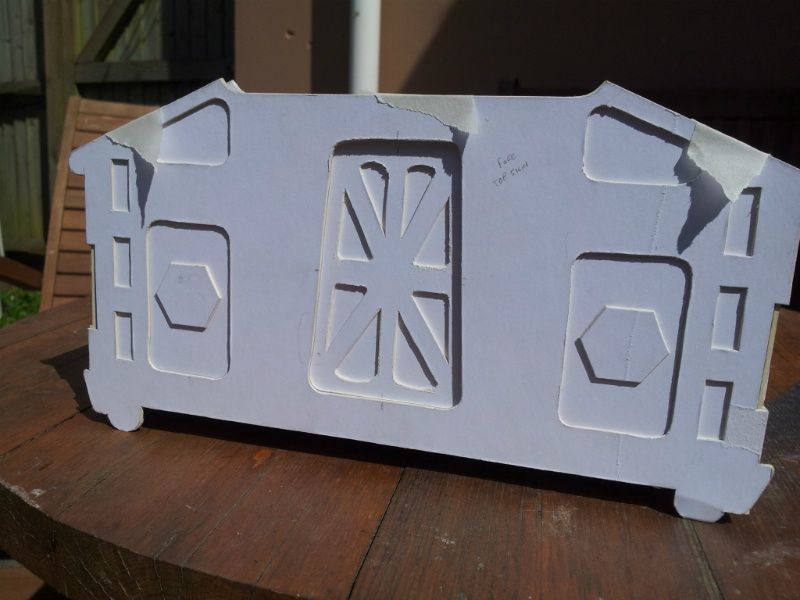
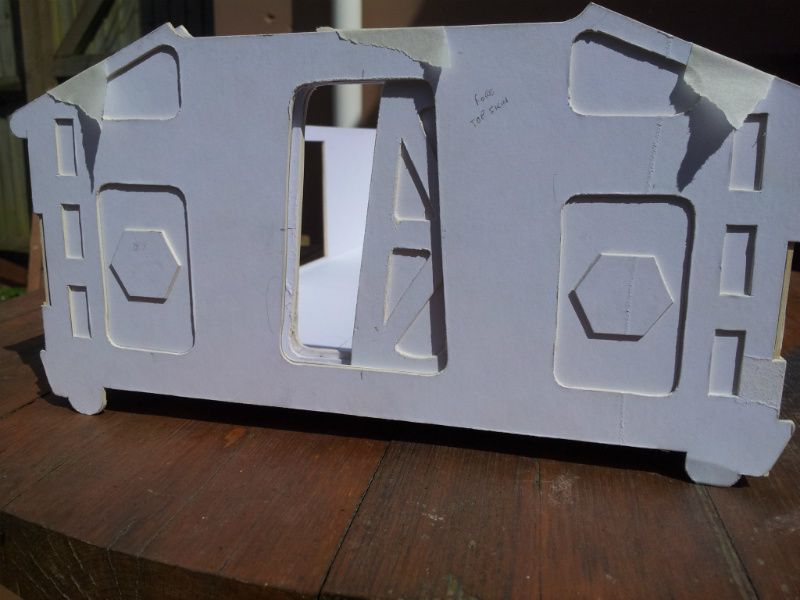
I have made a start on the two cages that sit directly either side of the pod. These are constructed using dowel and industrial grade superglue. The joints will then be filled/finished with Chemical Metal. It's like bondo but ten times stronger. You can even re-thread bolts with it. Any way, here are a couple of pictures of how it is looking.
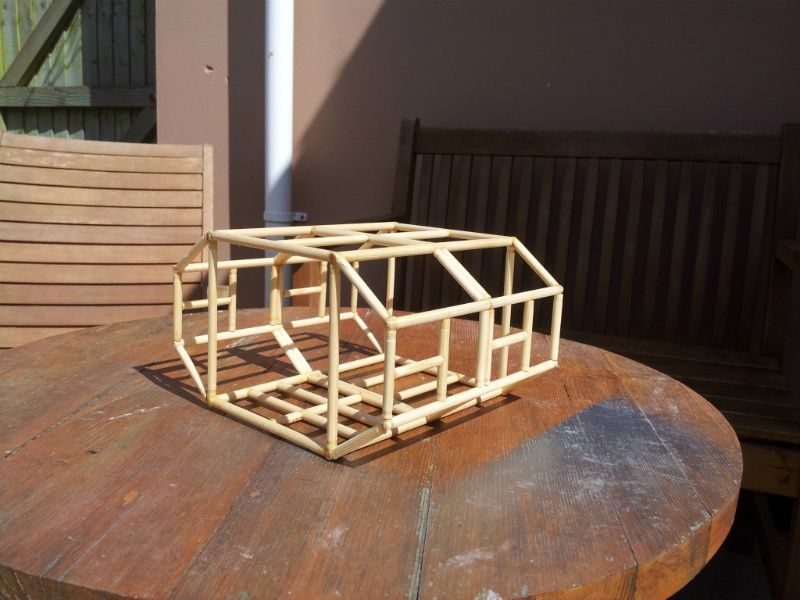

I will be constructing the walkway compartments from hardboard, to add a little more strength and rigidity to the cages. After extensive measurements and calculations, I have come to an "executive decision" regarding the two walkway compartments, but I will explain more when the time comes
Here are a couple of pictures to finish off with. Thank you for looking in, guys and I look forward to your comments.


Hi everyone, I hope you had a great Easter weekend
Another update...
I have made some progress on the passenger pod. I have managed to build all four of the pod doors now and am in the process of constructing the runners etc on which they will slide. They will, of course, slide into their respective cavities so, this means that all four pod walls will need to be fitted out with mini stud-work and then skinned inside - just like dry wall! Here is a picture of one of the end walls to illustrate.

The inner wall then covers all this and pretties it up:

I have also cut and fitted a piece of 7mm dowel along the upper edge of each side of the pod. This is to help me form the bull nose detail once the roof has been constructed and installed, and also to add a little more rigidity to the structure. Sorry about the clothes pegs, but they make great clamps!


The pod ends are also starting to take shape. I am adding the little details etc, piece by piece. Here are a couple of shots with the door installed.


I have made a start on the two cages that sit directly either side of the pod. These are constructed using dowel and industrial grade superglue. The joints will then be filled/finished with Chemical Metal. It's like bondo but ten times stronger. You can even re-thread bolts with it. Any way, here are a couple of pictures of how it is looking.


I will be constructing the walkway compartments from hardboard, to add a little more strength and rigidity to the cages. After extensive measurements and calculations, I have come to an "executive decision" regarding the two walkway compartments, but I will explain more when the time comes
Here are a couple of pictures to finish off with. Thank you for looking in, guys and I look forward to your comments.


Last edited:
Re: Space 1999 Eagle Transporter Build Club UPDATED 12/04 (PIC HEAVY!)
Another small update...
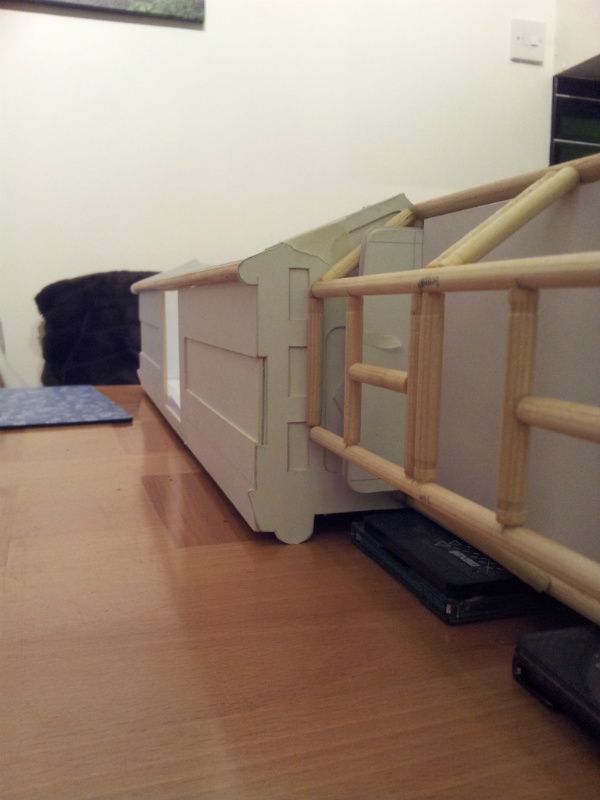
I have started construction on the forward walkway. This is my first departure from the 'scriptures' so to speak, in that I have decided to modify the model slightly in order to incorporate the TV Set. As it stands, the walkway doors do not/cannot function because there is nowhere for them to slide. So, following the example that Roberto Baldassari made on his Eagle artwork, I have built an extension at each end of the walkway to allow the doors to actually function. Also, I have increased the width of the walkway to take up the gap either side so that the bulkheads will rest up against the shelves. This will allow me the space to put the TV Set inside the walkways and I feel that the two little triangles where the door corners exit the cage is a very small price to pay in order to achieve this. The bottom corner will be obscured by the shoulder pod and the top corner will be obscured by the Passenger pod itself.
I know that this will seem like sacrilege to some, but we all build Eagles for our own reasons. My reasons are, as I said, to try and make the inside and outside work together, and that is what I am asking myself: What would an Engineer, faced with this problem, do? I believe he would do exactly what I have done. Take up the wasted space and make that door slide.
Here are some pics to show you just how little it really impacts, considering the benefits it creates.
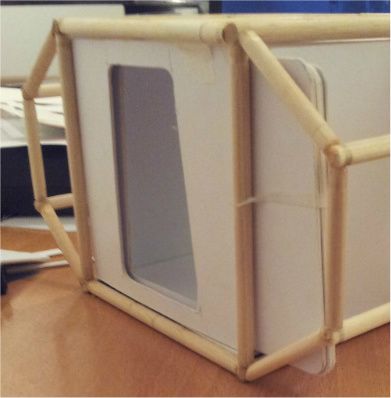

You can see here how far the door protrudes through the frame. The next pictures are the same angle but with the pod in place. Suddenly, it is no longer an issue and also, once the shoulder pods are in place, it will be barely noticeable.

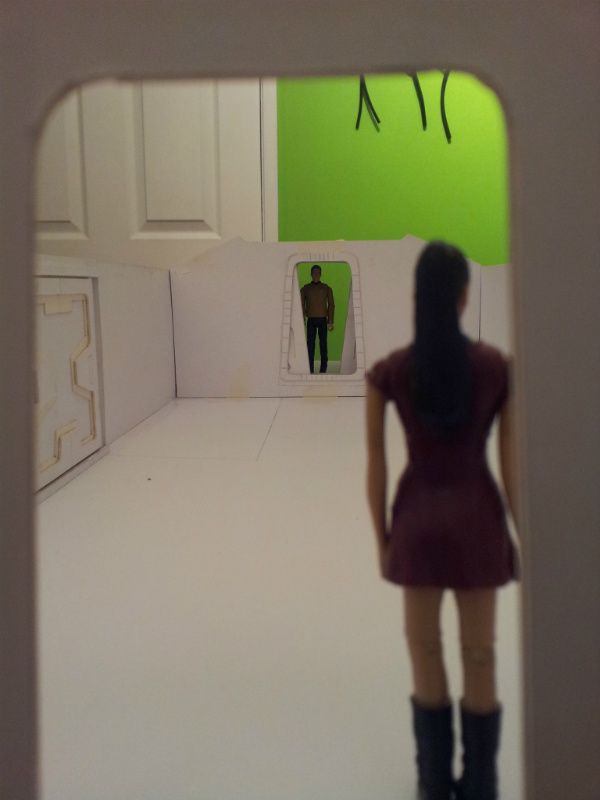
So that covers the aesthetics on the outside. Now for the advantages on the inside. This next picture is taken as if standing in the Cockpit doorway, looking along the forward walkway and across the passenger pod to the rear passenger pod entry which leads to the rear walkway. Does that make sense???:wacko :lol This is all going to be rendered as per the TV set, or as close as I can get it but the space functions well AND the doors all work! :cool

This is from the opposite side of the pod, looking forward.
This last one is for perspective with a figure placed at midpoint.

Another small update...
I have started construction on the forward walkway. This is my first departure from the 'scriptures' so to speak, in that I have decided to modify the model slightly in order to incorporate the TV Set. As it stands, the walkway doors do not/cannot function because there is nowhere for them to slide. So, following the example that Roberto Baldassari made on his Eagle artwork, I have built an extension at each end of the walkway to allow the doors to actually function. Also, I have increased the width of the walkway to take up the gap either side so that the bulkheads will rest up against the shelves. This will allow me the space to put the TV Set inside the walkways and I feel that the two little triangles where the door corners exit the cage is a very small price to pay in order to achieve this. The bottom corner will be obscured by the shoulder pod and the top corner will be obscured by the Passenger pod itself.
I know that this will seem like sacrilege to some, but we all build Eagles for our own reasons. My reasons are, as I said, to try and make the inside and outside work together, and that is what I am asking myself: What would an Engineer, faced with this problem, do? I believe he would do exactly what I have done. Take up the wasted space and make that door slide.
Here are some pics to show you just how little it really impacts, considering the benefits it creates.


You can see here how far the door protrudes through the frame. The next pictures are the same angle but with the pod in place. Suddenly, it is no longer an issue and also, once the shoulder pods are in place, it will be barely noticeable.


So that covers the aesthetics on the outside. Now for the advantages on the inside. This next picture is taken as if standing in the Cockpit doorway, looking along the forward walkway and across the passenger pod to the rear passenger pod entry which leads to the rear walkway. Does that make sense???:wacko :lol This is all going to be rendered as per the TV set, or as close as I can get it but the space functions well AND the doors all work! :cool

This is from the opposite side of the pod, looking forward.

This last one is for perspective with a figure placed at midpoint.

Last edited:
Chrisisall
Master Member
Re: Space 1999 Eagle Transporter Build Club UPDATED 12/04 (PIC HEAVY!)
I'm freakin' dizzy! This is so cool, I'm amazed beyond the capacity for rational comment.
I'm freakin' dizzy! This is so cool, I'm amazed beyond the capacity for rational comment.
greylocke
Sr Member
Re: Space 1999 Eagle Transporter Build Club UPDATED 12/04 (PIC HEAVY!)
Oh Wow! You know if I ever get time to get back to the UK I'm gonna have to take you and the Missus out to dinner, right? Very creative handling of build issues to make a totally awesome prop. Kudos and Salutations sir.
Oh Wow! You know if I ever get time to get back to the UK I'm gonna have to take you and the Missus out to dinner, right? Very creative handling of build issues to make a totally awesome prop. Kudos and Salutations sir.
greylocke
Sr Member
Re: Space 1999 Eagle Transporter Build Club UPDATED 12/04 (PIC HEAVY!)
Responded and acted upon Good Sir.
Thank you, both. I really appreciate the feedback.
Chris, I will look in on your Vipers' Nest in a little while
Grey, Notification sent!
Responded and acted upon Good Sir.
LMFAOSchwarz
Sr Member
Re: Space 1999 Eagle Transporter Build Club UPDATED 12/04 (PIC HEAVY!)
Staggering progress, Mr. A! :thumbsup By the time I get around to making progress, you'll be finishing up details on yours. Maybe I should just quit while I'm behind! :unsure
Staggering progress, Mr. A! :thumbsup By the time I get around to making progress, you'll be finishing up details on yours. Maybe I should just quit while I'm behind! :unsure
greylocke
Sr Member
Re: Space 1999 Eagle Transporter Build Club UPDATED 12/04 (PIC HEAVY!)
NO NO NO NO NO! You need to keep going. You are going to the same place as he is just by a different route, and I'd love to see how you get there. The journey is 90% of the trip, and the methods you are using are giving me ideas for how I can do other projects. Both of yours project are giving me ideas. And inspiring me try try to branch out into different areas of building. So please don't be discouraged and continue your build.
Staggering progress, Mr. A! :thumbsup By the time I get around to making progress, you'll be finishing up details on yours. Maybe I should just quit while I'm behind! :unsure
NO NO NO NO NO! You need to keep going. You are going to the same place as he is just by a different route, and I'd love to see how you get there. The journey is 90% of the trip, and the methods you are using are giving me ideas for how I can do other projects. Both of yours project are giving me ideas. And inspiring me try try to branch out into different areas of building. So please don't be discouraged and continue your build.
Re: Space 1999 Eagle Transporter Build Club UPDATED 12/04 (PIC HEAVY!)
What he said.....
NO NO NO NO NO! You need to keep going. You are going to the same place as he is just by a different route, and I'd love to see how you get there. The journey is 90% of the trip, and the methods you are using are giving me ideas for how I can do other projects. Both of yours project are giving me ideas. And inspiring me try try to branch out into different areas of building. So please don't be discouraged and continue your build.
What he said.....
LMFAOSchwarz
Sr Member
Re: Space 1999 Eagle Transporter Build Club UPDATED 12/04 (PIC HEAVY!)
All right, all right...I'm out-voted. So, on I go!
All right, all right...I'm out-voted. So, on I go!
greylocke
Sr Member
Re: Space 1999 Eagle Transporter Build Club UPDATED 12/04 (PIC HEAVY!)
Thank you sir... I look forward to your next update. I'm really wanting to see how the command module comes together, especially with the detail you are putting into it.
All right, all right...I'm out-voted. So, on I go!
Thank you sir... I look forward to your next update. I'm really wanting to see how the command module comes together, especially with the detail you are putting into it.
Chrisisall
Master Member
Re: Space 1999 Eagle Transporter Build Club UPDATED 12/04 (PIC HEAVY!)
Good.:thumbsupAll right, all right...I'm out-voted. So, on I go!
LMFAOSchwarz
Sr Member
Re: Space 1999 Eagle Transporter Build Club UPDATED 12/04 (PIC HEAVY!)
Ooookay, time for the trapezoidal boxes behind the pilot seats. This was fun :unsure, having to trim the angle which intersects with the angled walls. With proper blueprints and/or math this may have been quite easy, but math doesn't equate into my idea of a good time model building, so "eyeball" it is! At least once the angle was established, I could just make a mirror image part for the other side!
View attachment 90620View attachment 90621View attachment 90622
This is the part where I'm really glad I made the interior of the module removable. It would have been such a pain to try to make all these parts and inserting them from the outside virtually impossible. With the edges on either side of the door now made, things are beginning to look a little more finished...even though 'finished' is still quite a ways off! I guess 'solid' is more the word to use.
View attachment 90623View attachment 90624View attachment 90625
Prior to going to bed, I added a bit more glue to the edges fore a bit more strength, as well as adding a little brace. This brace will also give me something to hold while painting the exterior!
View attachment 90626
The morning sun shone on a new day, only to illuminate the fact that the excessive glue had melted a bit of the plastic overnight :confused! Well, nothing that a little fill won't be able to fix, but I'll do that in a bit. First, I added little plastic ridges on the inside to hold the front piece in place while I glued it in. I could just picture that little bugger sliding around while trying to place it, so this was extra insurance.
View attachment 90627View attachment 90628View attachment 90629
Also, I'd like to thank you guys for encouraging me to continue. This year so far has been one unexpected problem after another, and it has worn down my enthusiasm for things that didn't seem "important" I'd forgotten in my own belief that each obstacle is just another challenge to overcome. It's the very thing I'd tell someone else in a similar situation, so I'm not going to hypocritically ignore my own advice! I hope you all get something out of this...you help make it happen! :cheers
Similar threads
- Replies
- 3
- Views
- 217
- Replies
- 19
- Views
- 1,138
