Rnmld91
New Member
This is probably my favorite prop from any movie ever, and has been a long time in the making. I'm slightly more confident in my skill, and after about 3 attempts at it this is what I have been able to come up with. Let me stress that I'm not an expert in metalworking by any means; it's just something I like to do for fun. I used copper for the earlier versions, but this latest one is in nickel silver (which is around 60% copper, with the rest being nickel and zinc) with copper plates used only for the front and back faces. It's a much more affordable and tougher choice than real sterling silver, which I thought was suitable since there would be less warping of the material while working with it.

I started out by cutting out two octagons out of the metal, while making sure of the dimensions by gluing both sheets together and carefully filing away until they were the same shape. This is essential and determines the shape of the entire locket, and ensures that both halves meet more or less perfectly when closed. After cutting them out and brazing the copper sheets to them, I cut out the sheet lengths that would be used for the framing portion and made sure they fit in perfectly with the sheet. This is much more difficult than it sounds; and was achieved by lots of hammering, using a vice clamp and binding the pieces together with steel wire (as shown below) to ensure there were no gaps.
I attempted to make this easier by constantly hammering against a wooden octagonal template I made around one inch thick, along with an aluminum template around half an inch thick that I had made for an earlier attempt. These both helped maintain the overall shape of the frame as I was working on it.
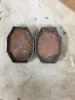
Once I was happy with the shapes of the two halves, I had to do a lot of filing and grinding to make sure both were perfectly flat and more or less equal in width. This was also quite a challenge as I didn't know the exact dimensions of the screen used locket, though I was aiming at making it slightly larger than the Noble version, which I own and used as a reference. The main locket face ended up being around 4.1 cm long.


The faceted crystals were another story entirely and honestly felt like a whole separate project! They were made with Castin Craft epoxy resin, cast in plasticine as mold material. It was not the greatest option since I had to continuously remake the mold every casting. Since the finished castings were by no means the perfect shape, I had to carefully hand file each facet with a diamond file to make sure they were the right size and shape. The color of the finished castings however was slightly yellowish and not clear, which may have been due to the product being expired or the way I mixed the two solutions in the first place. However I later found that the yellowish color was an advantage, since the crystals would have to be backed by the copper plates, which both went together well giving it a beautiful look that I found was very close to that of the actual prop. The two 'bubbles' were carefully carved in with a round diamond bit. The polishing was done by using 600, followed by 1000 and finally 1500 grit paper, and finished with a polishing powder (not sure which type) and water on a microfiber cloth. Tiny bubbles can be seen included, which I didn't mind as I thought added to the ancient looking effect. I realize the prop lockets have much more inclusions in the crystals, but I'm not exactly sure how to go about creating that effect, though I'm very happy with how they turned out.


I ran into quite a few problems along the way and I had to retrace my steps. If you can tell from the above photo, the bottom half was about a millimeter longer than the upper one. This was solved by cutting a segment of metal off, filing down the face plate and re-soldering another segment that would fit in properly into the frame. And this was just one of the problems; because of the constant heating that was done for soldering and annealing purposes, some of the sides would come loose. This also was a result of constantly hammering the pieces to maintain the octagonal shape.
Hopefully I will be able to get the few remaining appendages (hinge, clasp, etc) to work. I will probably not be adding the thin chain that is seen around the rim of the screen prop, as I'm afraid more parts will come apart due to the heat. We'll see how it goes from there.
I started out by cutting out two octagons out of the metal, while making sure of the dimensions by gluing both sheets together and carefully filing away until they were the same shape. This is essential and determines the shape of the entire locket, and ensures that both halves meet more or less perfectly when closed. After cutting them out and brazing the copper sheets to them, I cut out the sheet lengths that would be used for the framing portion and made sure they fit in perfectly with the sheet. This is much more difficult than it sounds; and was achieved by lots of hammering, using a vice clamp and binding the pieces together with steel wire (as shown below) to ensure there were no gaps.
I attempted to make this easier by constantly hammering against a wooden octagonal template I made around one inch thick, along with an aluminum template around half an inch thick that I had made for an earlier attempt. These both helped maintain the overall shape of the frame as I was working on it.
Once I was happy with the shapes of the two halves, I had to do a lot of filing and grinding to make sure both were perfectly flat and more or less equal in width. This was also quite a challenge as I didn't know the exact dimensions of the screen used locket, though I was aiming at making it slightly larger than the Noble version, which I own and used as a reference. The main locket face ended up being around 4.1 cm long.
The faceted crystals were another story entirely and honestly felt like a whole separate project! They were made with Castin Craft epoxy resin, cast in plasticine as mold material. It was not the greatest option since I had to continuously remake the mold every casting. Since the finished castings were by no means the perfect shape, I had to carefully hand file each facet with a diamond file to make sure they were the right size and shape. The color of the finished castings however was slightly yellowish and not clear, which may have been due to the product being expired or the way I mixed the two solutions in the first place. However I later found that the yellowish color was an advantage, since the crystals would have to be backed by the copper plates, which both went together well giving it a beautiful look that I found was very close to that of the actual prop. The two 'bubbles' were carefully carved in with a round diamond bit. The polishing was done by using 600, followed by 1000 and finally 1500 grit paper, and finished with a polishing powder (not sure which type) and water on a microfiber cloth. Tiny bubbles can be seen included, which I didn't mind as I thought added to the ancient looking effect. I realize the prop lockets have much more inclusions in the crystals, but I'm not exactly sure how to go about creating that effect, though I'm very happy with how they turned out.
I ran into quite a few problems along the way and I had to retrace my steps. If you can tell from the above photo, the bottom half was about a millimeter longer than the upper one. This was solved by cutting a segment of metal off, filing down the face plate and re-soldering another segment that would fit in properly into the frame. And this was just one of the problems; because of the constant heating that was done for soldering and annealing purposes, some of the sides would come loose. This also was a result of constantly hammering the pieces to maintain the octagonal shape.
Hopefully I will be able to get the few remaining appendages (hinge, clasp, etc) to work. I will probably not be adding the thin chain that is seen around the rim of the screen prop, as I'm afraid more parts will come apart due to the heat. We'll see how it goes from there.


") . As for the engraving, I'm probably gonna go with chasing, which basically involves hammering in the runes with steel punching tools that have been shaped with either flat or curved ends, resembling chisels. I've practiced a bit on some scrap metal, with the tools made from different sized screws. However, it'd be nearly impossible to cover up any mistakes if I made any. If that method doesn't work, I'll probably use some engraving bits on a Dremel. I'll definitely use the latter method for the back plate, which contains lots of illegible, tiny script which would be difficult to create otherwise. I still haven't decided if I want to take the risk of including the large S in the middle. I could just leave the circle empty like it appears in the fake version (the locket from the cave). Both versions are great in my opinion, but ideally I'd like to replicate the real horcrux version.
. As for the engraving, I'm probably gonna go with chasing, which basically involves hammering in the runes with steel punching tools that have been shaped with either flat or curved ends, resembling chisels. I've practiced a bit on some scrap metal, with the tools made from different sized screws. However, it'd be nearly impossible to cover up any mistakes if I made any. If that method doesn't work, I'll probably use some engraving bits on a Dremel. I'll definitely use the latter method for the back plate, which contains lots of illegible, tiny script which would be difficult to create otherwise. I still haven't decided if I want to take the risk of including the large S in the middle. I could just leave the circle empty like it appears in the fake version (the locket from the cave). Both versions are great in my opinion, but ideally I'd like to replicate the real horcrux version.


.jpg")


