alldrops
New Member
Hey all!
I spent quite a while trying to find a screen-accurate Star-Lord blaster 3d model, but I wasn't 100% satisfied with the models I was finding (both free and paid), so I decided to learn 3D modelling to get as many details as I could, and after a good few months learning, I'm pretty happy with how far I've come
I started designing my own, but then came across an amazing model by Henry3DCreations on Etsy and it was the most screen accurate model I've seen so far. I've made a few edits here and there but for the most of it, it was great by itself

Went through a TON of sanding + filler primer layers. This was the part the took the longest to get done, and since I didn't have a lot of time available to do it all at once, I had to do in small periods between a few days. After I was happy with it, Added a layer of Flat Black Primer and it was ready to be painted.

Then went ahead and airbrushed metallic black for the whole base, silver metallic on... well, the silver part lol and a lighter silver and gold for the pipes.
For the front pipes (the last pipe parts before the muzzle), I mixed some gold and black in order to get that worn out gold effect, but just 2 very light layers so it wouldn't lose the silver underneath.

As for the little grill area on the top barrel - man that was a pain. I tried 3D printing but since it was too small, my printer couldn't handle it. Tried finding different things and patterns to fit in that area and had no luck with it AT ALL.
Until one day I decided I was gonna forget about the elevated texture on it and just hand paint it.
I thought to myself "just gonna go and buy my dog some food and treats, and after I come back home, I'll paint the goddamn grill" - my friends, magic was in the air on that day. Got my little guy a little deer antler and as I was about to throw away the package/bag, it's like there was a divine light in it.
Here, you can see for yourselves:

It as the exact thickness I needed, with the exact shape I was looking for.
Brushed it silver real quick and tried it on and it looked AMAZING!

With that done, I went ahead and started the weathering process.
Went with a few different layers for the scorching marks on the muzzle: sepia > red > blue

With all that done, just went with some black shoe polisher across the whole blaster and removed the excess. Used a kitchen mat to add a carbon fibre effect on the grip but I forgot to take photos of the process.
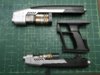
Here's how the finished Blaster is looking! Hope you guys enjoy this

I spent quite a while trying to find a screen-accurate Star-Lord blaster 3d model, but I wasn't 100% satisfied with the models I was finding (both free and paid), so I decided to learn 3D modelling to get as many details as I could, and after a good few months learning, I'm pretty happy with how far I've come
I started designing my own, but then came across an amazing model by Henry3DCreations on Etsy and it was the most screen accurate model I've seen so far. I've made a few edits here and there but for the most of it, it was great by itself
Went through a TON of sanding + filler primer layers. This was the part the took the longest to get done, and since I didn't have a lot of time available to do it all at once, I had to do in small periods between a few days. After I was happy with it, Added a layer of Flat Black Primer and it was ready to be painted.
Then went ahead and airbrushed metallic black for the whole base, silver metallic on... well, the silver part lol and a lighter silver and gold for the pipes.
For the front pipes (the last pipe parts before the muzzle), I mixed some gold and black in order to get that worn out gold effect, but just 2 very light layers so it wouldn't lose the silver underneath.
As for the little grill area on the top barrel - man that was a pain. I tried 3D printing but since it was too small, my printer couldn't handle it. Tried finding different things and patterns to fit in that area and had no luck with it AT ALL.
Until one day I decided I was gonna forget about the elevated texture on it and just hand paint it.
I thought to myself "just gonna go and buy my dog some food and treats, and after I come back home, I'll paint the goddamn grill" - my friends, magic was in the air on that day. Got my little guy a little deer antler and as I was about to throw away the package/bag, it's like there was a divine light in it.
Here, you can see for yourselves:
It as the exact thickness I needed, with the exact shape I was looking for.
Brushed it silver real quick and tried it on and it looked AMAZING!
With that done, I went ahead and started the weathering process.
Went with a few different layers for the scorching marks on the muzzle: sepia > red > blue
With all that done, just went with some black shoe polisher across the whole blaster and removed the excess. Used a kitchen mat to add a carbon fibre effect on the grip but I forgot to take photos of the process.
Here's how the finished Blaster is looking! Hope you guys enjoy this
Attachments
Last edited: