RookFett's MPC 22" Eagle Transporter Build

Sorry for the lack of update - but my MK 1 spray booth broke, so I built a better model, the MK 2.
PB_MKII.JPGPB_MKII_2.JPG

All said - cost about $100 in parts, but I also increased the airflow, and added separate switches for the light, fan. (LED lighting) -

In the one pick - you can see the RU 23" Eagle with Lab I've been putting off for ages - along with the new Eagle. (also working on a resin figure for a client).

Will be working on the Eagle this Saturday - as long as the wife aggro is small..
 
Started the build this weekend - must say, pretty happy so far.

The parts go together better than most, and the seam work is minimum.

There are the usual ejector/parting lines that need to be removed, small disks of plastic (sanded) will help with the ejector marks.

I added small cut pieces of plastic to help strengthen some of the long joints, good habit to get into.
IMG_4808.JPG


For the long spine assembly, they used a slot/key joint, so I used some curled plastic pieces to cover the joint. Once I sand them, the joint will be gone, and it will have some added strength.

IMG_4823.JPG IMG_4820.JPG


Pay attention to the part diagrams and the assembly sequences! Especially with the leg pods and the passenger pod. They used the same sprue numbers for the parts, but they go on differently depending which side it's on.

Best to lay them out as you assemble each pod - I also added small strips inside to help lock in the parts. (tagging inside to help keep things in order also!)


IMG_4814.JPG IMG_4826.JPG

The engines went together really well. Indeed, I will not use the metal parts on this kit, since I feel the ones in plastic look just as good. (plus I am a bit worried about the weight on the plastic vs the aluminum parts)

The way they molded them allows for no seam lines! pretty nifty.

I am working on milling the side thruster pod pack, have to remove that 1mm extra, there is just enough plastic to do it - but if you go to far, you will need to rebuild the face.


Like I said - pretty happy with the kit, some minor work and I think it will be a good looking Eagle to add to my collection.


Finally, I light blocked the cockpit area, for some smd led lighting.

IMG_4812.JPG


Next time - will start work on the leg assembly and the engine tube array. The springs supplied seem really stiff - but I have to wait to see if they will flex enough for the scale.


More later - thanks!
 
Did some more work on the Eagle -

Covered all the lines that show up with very thin plastic and liquid cement. Bit of sanding to blend - smooth surface.
IMG_4851.JPGIMG_4852.JPG

No real surprises, however, when making the side cages - they have the parts marked incorrectly.

They show an "A" and "B" part - but they are all "B" parts. (the "A" part is actually the bottom piece)

I also found it was easier making the cages by gluing the bottom frame and top frame first, with attaching vertical pipes, placing the equipment shelf next, then attaching the center bars to the pod leg holder.

(one note - when placing the vertical bars next to the pod leg slot, make sure both are vertical, I had to sand just a little on the notched bar to allow for both bars to be straight.)

The side bar assembly were than able to snap right into place and at the proper angle.


For more accurate detailing, I added the ridge around the fuel balls, currently just raised lines (barely .24mm or so)
IMG_4842.JPG

I just cut some 1mm stock in long strips and superglued it as I wrapped it around the ball. cut a small notch for the pipe attachment.


The long trapezoid spine wasn't as difficult as I thought it would be, just follow the instructions and make sure to test fit prior to gluing. The angles stick pretty good if the horizontal pieces are the same length.

IMG_4846.JPG

One thing I did notice on the box art/pictures, they show a sliding switch on the bottom - perhaps they planned to light up the cockpit but scraped the plans?

I will be adding a small led in the cockpit, since I probably going to use magnets to hold the beak on, I can then switch it on when I want lights there.


Some more notes:

There are mold lines, (minimum), but they are there - lots of sanding. The ejector marks are a problem - especially on the spine assembly, sanding or filling in with circles of punched plastic is the way I am taking care of them. (same technique as the line fix, glue in place, sand smooth)

Test fitting the glass is showing some fit problems - still haven't figured out what I will do to correct that. The angle is not exact, so there is a slight gap along the top.
 
Added some magnets to the front cockpit, to hold it in place.
IMG_4855.JPGIMG_4856.JPG
Used some plastic angled bar to hold the magnets in place on the internal pit, while the ones on the back wall are simply glued in place.

Little paint on the back wall - and the magnets will blend in. (not that you can see much in there anyway)

next up is the yellow led package to provide lighting.


Moving to the pax pod, the top plate is slightly warped, so a quick bath in hot water and heavy pressing sorted that out.

Added some horizontal balsa beams to hold it up in the middle - it was too easy to push it out down. (the middle part isn't glued down in this shot)

IMG_4853.JPGIMG_4854.JPG

I had all ready painted the inside of the windows a flat black, but masked the outside to keep the "button" glass look.

Right now - just filling in the various gaps on the piping in the engine assembly, should have more to post in a day or so.
 
More updates from the hanger:

Decided to cut the locating pegs on the gear assembly in order to sand it smooth and level so it will sit flush on the pod.

IMG_4871.JPG

I made small locating marks to center it when I glue it into place.

IMG_4872.JPG

Still crafting the new aluminum legs - should have them this week.


Moving on to the engine block, I will be using my turned aluminum bits I made to replace the fuel spheres, having a drill press helps out a lot!

(the mod I made to the kit part were a bit too large, plus I preferred the looked of the turned bits.)

IMG_4865.JPGIMG_4867.JPGIMG_4870.JPG

Used 30 min epoxy for the initial joint, then superglue with accelerator for the rest. The epoxy allowed for adjustments as it set.


Spent a few hours scribing some panel lines on the leg pods, pax pod, and tunnel corridors.

IMG_4861.JPGIMG_4862.JPG

Once I paint it all, I will go back in with a pencil to scribe the rest.


Now I am in the process of prepping for painting the sub-assemblies - then moving on to final construction.


Some hints:

Leave the pax pod roof off till the end. You may wish to put some ballast inside to depress the leg springs.

Work in sub-assemblies, easier to handle.
 
That's looking great! Can't wait to get to mine... someday... when the desert ices over and the camels come skating home. But in the meantime it's fantastic watching what you're doing with the kit, and we'll all benefit from your fine documentation. Thanks!
 
Thanks VFX Freak!


Right now I am making new legs out of aluminum.

IMG_4882.JPG
Bottom Part

My first one was made with the thinner part, but I had a lot of wobble, so next three will be thick part first then this side.

IMG_4883.JPG
Top Part

After this, run them over to the milling machine to flatten the ends so they fit in the kit parts.
 
Last edited:
More work -

Priming all the parts with Dupli-color Perfect match scratch filler primer, nice smooth finish and lets you sand to make it even smoother.

IMG_4891.JPG

For the parts that will be silver, following that up with Dupli-color flat black - for the next coat of silver to follow.

IMG_4900.JPG


Then moving on to using Rust-oleum 2X flat white primer for all the white bits. After weathering - I think it will be a pretty close match to Ford Diamond white that was used on the original model.

IMG_4899.JPG


Working on the cockpit beak line, priming it, putty, sand, primer, wet sand, primer, eventually the seam will go away without removing the raised detail.

IMG_4896.JPG IMG_4897.JPG

Letting things dry now - hope to finish this up this weekend.

Things left to do:


Finish metal bits for the landing struts (have 3 made, need to make another, smaller bit broke off so have to start over from scratch)
IMG_4901.JPG
(Mental note: always machine from larger radius to smaller....)


Weathering
decals
vinyl cut strips for the "racing stripes" on the spine bars.
LED lighting for the cockpit
 
Good job! I like your paint booth, too.

Regards, Robert

Thanks!


I finished milling my landing struts -

IMG_4904.JPG

I didn't square off the ends of the smaller post, since I will be filing them for fit.

Finishing up the initial base coat on the model, this weekend I will be finishing the detail and weathering.
 
Masking time!

Why use decals when you can paint it?


The bottom was pretty easy to mask - mostly straight lines - I usually paint the entire area, even if it's covered with other parts, in this case, the leg covering will cover most of the middle, but it allows crisper demarks between the two colors.

IMG_4905.JPG

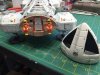
For the side of the pods, I found if you paint the thruster area black - then mask the trapezoids with tape, then spray in white, you get sharper lines.

Make sure you paint the middle section of the trapezoids - even though the small thruster block sits on top - it make the black run into it, looking better.

First the black, after masking the sides,
IMG_4906.JPG

Then masking the trapezoids that will remain black, and spraying white,

IMG_4909.JPG

Finished product:

IMG_4910.JPG


The beak masking was a bit more detailed - took about an hour to get it just right:

IMG_4911.JPG

After coating the assemblies with Krylon UV-Resistant clear coating, I put in the L-shaped masking marks - Thunderbirds Go!

IMG_4912.JPG IMG_4913.JPG IMG_4914.JPG IMG_4917.JPG


IMG_4928.JPG IMG_4929.JPG

I removed the masking from the pod windows, they look pretty good!

I painted them inside with black, like the original model was, and the clear parts look deeper.


IMG_4930.JPG


Moving on to the landing gear assemblies:


In future builds, I will be drilling out the struts where there are actual bolts and nuts, to make it stronger, especially since I am using aluminum struts. The way they are now, they are pretty strong for what they do, but I think it will look better and be more secure. But since I wanted to finish this build, I used what is in kit.


I also removed a few coils to the springs, since I am not using the aluminum bells, they are a bit too strong to depress enough to look right. (remember to add weight to the pod, and beak to balance the weight in the rear! - I added a few ounces to balance it out with the stuff I put in the engine/cockpit)
Tip for makers using their own square parts for the landing gear - file the edges a bit so you have a slight chamfer - this will allow you to plug it into the pod. I also recommend you mark the pods Port/Starboard, Fore and Aft, because they are easy to mix up and when you glue the legs on - your finished :)

IMG_4907.JPGIMG_4908.JPGIMG_4922.JPG


IMG_4918.JPG IMG_4919.JPG IMG_4920.JPG

The springs/struts actually work - which is pretty satisfying after spending all that time making them!

I am glad I added the extra support inside the pods to hold up the crossbar the struts plug into, they feel pretty sturdy when pushing them up and down.


Now to slide the pods into the cages, they went in pretty well, but my starboard fore pod was tighter than I liked, I believe it was the coats of paint I applied.

In the future, must remember to mask off parts like this that slide in to prevent paint build up. Also - the small pins/holes that allow the engine section and cockpit section to connect need to be clean to make a smooth connection.

IMG_4923.JPG IMG_4924.JPG IMG_4925.JPG IMG_4926.JPG


I added some greeblies to the bottom of the corridor pods, some left over 1/72 hornet parts and small squares of plastic, plus scribed lines to add more detail.

IMG_4935.JPG


Placing the beak was getting me closer to finishing it!

IMG_4927.JPG


So - I have to clean up the beak windows, add some more weathering details, then onto the decals.

Should be later this week - it's hard to step away when I am this close to finishing it - but no rushing!
 
Looking great! I love the simplicity of the masked "panels" (I think you called them L panels?). So effective at giving the model more detail and scale with a minimum of effort. Those guys were clever.
 
Thanks for the kind words!

Had a slight setback - I thought my joints on the beak were pretty solid, I spent a lot of time to make sure the seam didn't show:

IMG_4945.JPG

But as I was putting it on and off the rest of the model, I heard a slight "snap" and discovered the seam popped at the edge:

IMG_4944.JPG

So now, my plan is to re-sand, re-putty if needed, and re-paint. I will be adding some internal support, in the form of pieces of plastic glued inside to prevent the two halves from moving. I am also thinking of adding a beam between the top and bottom to discourage bending.


Moving on to more masking:
IMG_4937.JPGIMG_4942.JPG

Painting in the lighter gray and blue panels.

IMG_4938.JPG IMG_4939.JPG


Since I coated the model with acrylic spray prior to the L panel weathering, I was able to go back in with a q-tip soaked with 98% iso-alcohol to clean up slight oversprays and make the lines more defined.

After that, another coat of acrylic to prep for the decals.
 
Thanks!

After some careful sanding and putty work, I re-painted the seam, and added 5 min expoxy to the inside seam, it won't move now.

added bonus, it will add a bit of weight to balance it out on the springs.

IMG_4949.JPGIMG_4950.JPG


Started putting the finishing touches on - starting with the racing stripes:

IMG_4946.JPG

I picked up the trim stripes from my local NAPA store - about $5 for each color. It comes with a thick/thin stripe - so I have different options to use.

IMG_4947.JPG
 
Finally - finished -

IMG_4986.JPGIMG_4987.JPGIMG_4989.JPG

IMG_4990.JPG
(need to add more weight to the front to balance out the metal bits in the engine section)

I used my Tamiya weathering master kits B, C, and F for the various weathering details, for example, the thruster exhaust on the side pods:

IMG_5051.JPG


IMG_4992.JPGIMG_4991.JPG


IMG_4994.JPGIMG_4999.JPGIMG_5001.JPG

I used an orange LED to illuminate the cabin when I pushed the hidden magnetic micro switch:

IMG_5003.JPGIMG_5004.JPG


IMG_5017.JPG


My Eagle collection so far:

IMG_5018.JPGIMG_5019.JPG


I need to clean up the windows on the beak a bit - but it's finished.

Some things to keep in mind for future builds.

Leave the windows off as much as you can - helps with painting and masking.

The Pod section can be left open on the top - and you can place the windows in late in the build.

The decals react well with Micro Set - they went down smooth and conformed well. But they will rip easily after getting the solvent on them.

Plenty of decals - you can go crazy with them - I did :)
 

Attachments

  • IMG_5016.JPG
    IMG_5016.JPG
    64.9 KB · Views: 231
This thread is more than 7 years old.

Your message may be considered spam for the following reasons:

  1. This thread hasn't been active in some time. A new post in this thread might not contribute constructively to this discussion after so long.
If you wish to reply despite these issues, check the box below before replying.
Be aware that malicious compliance may result in more severe penalties.
Back
Top