You are using an out of date browser. It may not display this or other websites correctly.
You should upgrade or use an alternative browser.
You should upgrade or use an alternative browser.
Rey - Star Wars: The Force Awakens Build (open for everyone!)
- Thread starter TheLadyNerd
- Start date
Thank you for the advice, I never even thought about using velcro!
I gathered the wrap dress at each shoulder, and then attached velcro to the undersides of the gathers. I also put velcro on the shoulders of my tunic to match this. i didn't sew at the waist. Instead, i affixed the hook velcro to the backside of my belt...that holds everything in place quite well. I used brown acrylic poster paint and dry brushed it onto the pouch VERY SPARINGLY. I did also use the distance spray paint method to weather the clothes.
Contec
Master Member
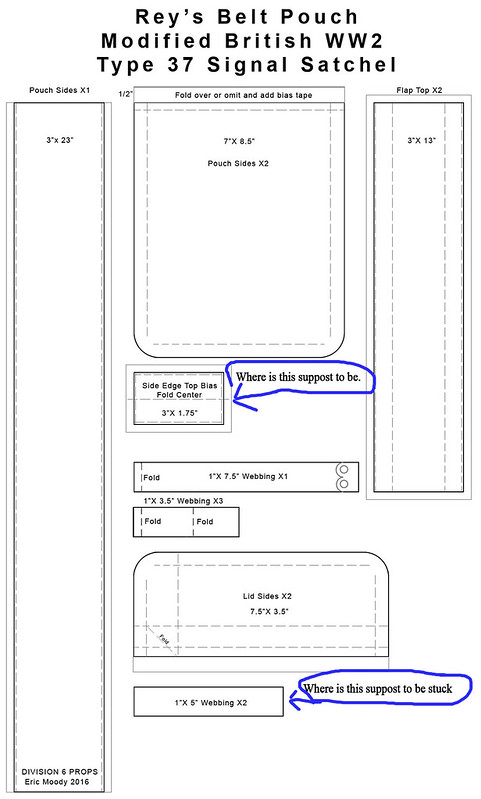
My next project is sewing the belt pouch.
using the blueprint that was posted a while back i seem to have run into a snag, Where is these parts go on the bag?
And where does the top flap get connected to the bag. so it can hinge open, Is it on the inside against the belt or is it on the side of the bag?
using the blueprint that was posted a while back i seem to have run into a snag, Where is these parts go on the bag?
And where does the top flap get connected to the bag. so it can hinge open, Is it on the inside against the belt or is it on the side of the bag?
jackwabbit
Well-Known Member
spray paint dusting will work, but I usually prefer to use watered down acrylic paint applied with a sponge so I can control the color and application better.
Seconded on spray paint dusting will work. I've used that on most things I've made, just because I don't know how to weather any other way, really (though I did recently do a leather jacket with the Digital Snail vid method. Works great. He has some info on regular weathering, too. Check YouTube under that name.
I weathered my Rey shirt with spray paint dusting (be sure to be really far away and just lightly mist it) and for the first time, went too far and had to redo it. Too much paint!
It happens.
Good luck!
- - - Updated - - -
Thank you for the advice, I never even thought about using velcro!
I was thinking of using velcro and was undecided on it. Thanks for the info. May use it or may sew it...we shall see when I get there.
I didn't make it, but i think 1x5 pieces are for the belt loops on the back.Where is these parts go
Fett 4 Real
Sr Member
For anyone who made their pants. What material did you go with?
Sent from my iPhone using Tapatalk
Sent from my iPhone using Tapatalk
PrimalStorm
New Member
I went with silkessence from JoAnn.For anyone who made their pants. What material did you go with?
Sent from my iPhone using Tapatalk
Fett 4 Real
Sr Member
I went with silkessence from JoAnn.
I was going to grab that today...but was unsure if it would take dye being polyester...did you buy the white and dye it? Thanks for the help...I'm fabric impaired...unless it's tackle twill I have no idea what is what and how it reacts to dyes and such....Google says it's hard to dye polyester so I wanted to ask y'all first....
Sent from my iPhone using Tapatalk
PrimalStorm
New Member
I bought the gray since I see the pants as grayish tan. I haven't dyed the pants yet since I am waiting to get all of my fabric in and just have a giant sewing and dyeing day/weekend. Since I have never dyed before, I bought extra fabric so I can experiment with the dye.I was going to grab that today...but was unsure if it would take dye being polyester...did you buy the white and dye it? Thanks for the help...I'm fabric impaired...unless it's tackle twill I have no idea what is what and how it reacts to dyes and such....Google says it's hard to dye polyester so I wanted to ask y'all first....
Sent from my iPhone using Tapatalk
Here are instructions on how to dye polyester. http://www.wikihow.com/Dye-Polyester Somebody else though might have better instructions.
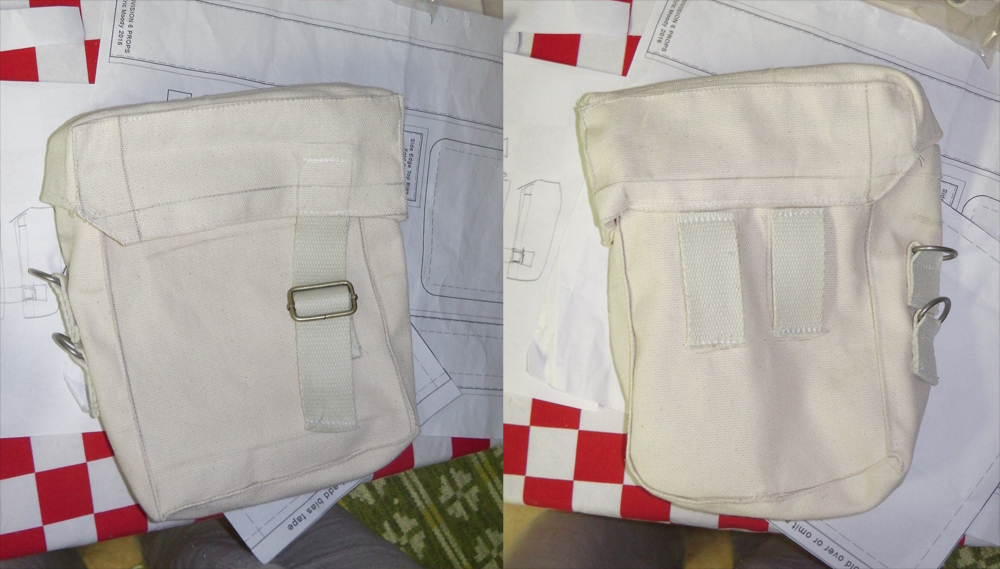
Took a couple of hours but my belt bag is finished.
Where did you put the side edge top bias fold center?
kristen jones
Master Member
I have extra leather for your belt. i don't have anything thin enough for your wrist bracer, but the belt is no problem. Just let me know how long you want, and what overall width and I'll cut you a strip. I went with 3" overall width for mine, and about 52" in length. I did end up cutting it down a bit shorter from there, but the 3" width was perfect as that let me have 1-3/4" wide "bottom" belt and 1-1/4" wide "top" belt. That ended up looking much better than my original wider belt which was cut from a 4" wide strip.Looks great Contec! If you were closer, I'd be commissioning one from you. Hey everyone, still looking for some leather for the belt and wristlet. Strikingout everywhere around here. Anyone with extra or a supply, I'm interested. Robert
kristen jones
Master Member
Any Reys on here that will be attending C2E2 this weekend in Chicago?
I wouldn't mind having a meet-up and photo op with my fellow RPFers.")
I wouldn't mind having a meet-up and photo op with my fellow RPFers.
Contec
Master Member
Where did you put the side edge top bias fold center?
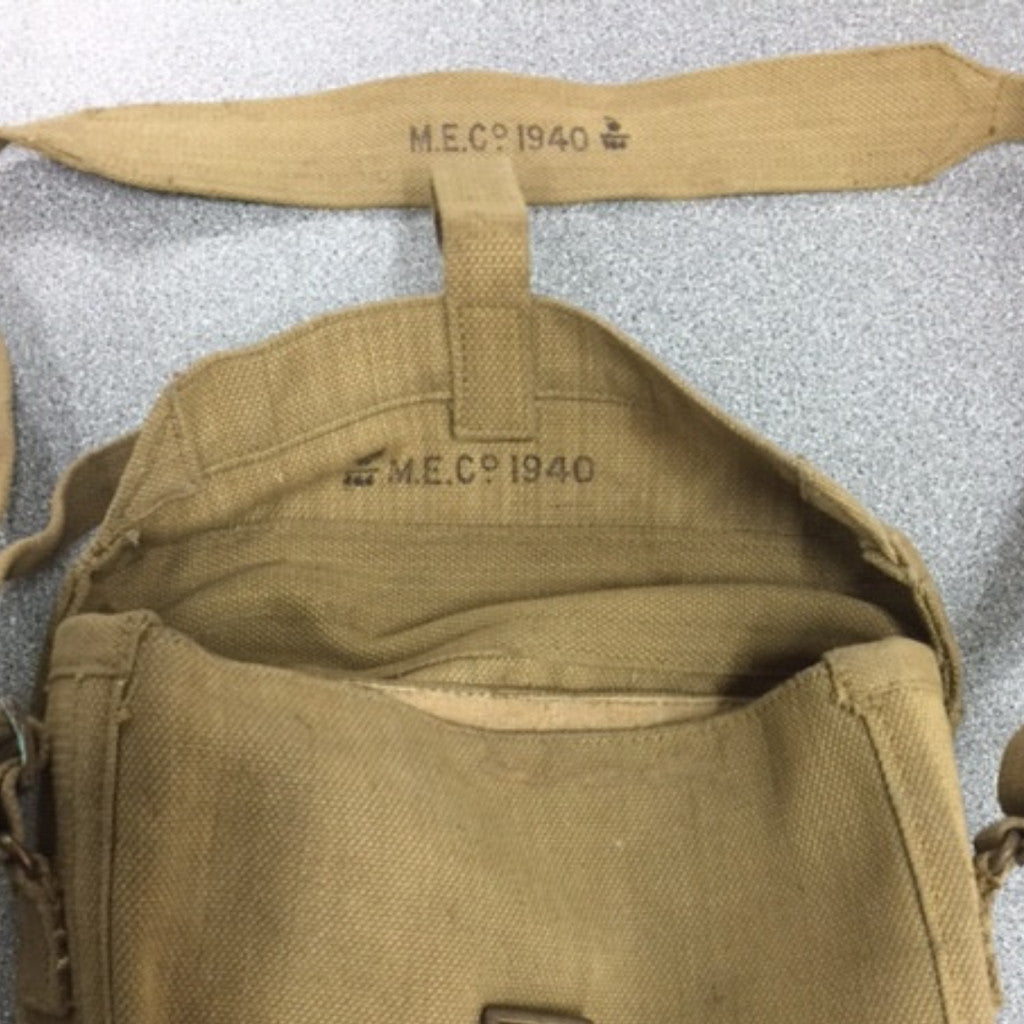
I checked images of the real signal satchel and saw that it had those pieces around the edge of the opening on each side.
So i just folded them and sewed it onto the edge.
You can see them in these pictures.
Mithril Designs
Well-Known Member
I have extra leather for your belt. i don't have anything thin enough for your wrist bracer, but the belt is no problem. Just let me know how long you want, and what overall width and I'll cut you a strip. I went with 3" overall width for mine, and about 52" in length. I did end up cutting it down a bit shorter from there, but the 3" width was perfect as that let me have 1-3/4" wide "bottom" belt and 1-1/4" wide "top" belt. That ended up looking much better than my original wider belt which was cut from a 4" wide strip.
Kristen, what was the final length your belt ended up at? And where did you extend it? I just printed out the template and taped it together, and at 2-3/4" wide, it's about 37" long. I know I will need to make it longer for my waist, but I'm not sure where to add the length. Did you add it at A, B or C as marked on this image?
I won't be at C2E2 this weekend. I'm west coast. Tomorrow there is a Rebel Legion and 501st Star Wars day at FIDM where they have the costumes on display.
kristen jones
Master Member
I cut a 3" wide by 52" strip, and cut the belt from it and bent the bottom down. then I measured my waist and trimmed equal amounts from each end to get it down to the right length ( though I allowed extra for the doubling back of the loose end). once I had that locked down I did the same for the bottom belt. when I was happy with the lengths, then I drew on the end details and cut them out, and laid out the slots and cut them.
Mithril Designs
Well-Known Member
So you made it as two separate pieces? I'm kind of confused, because someone said the Rebel Legion said the belt had to be two pieces, but from every picture I've seen, it's one piece.
Kendra
Active Member
So you made it as two separate pieces? I'm kind of confused, because someone said the Rebel Legion said the belt had to be two pieces, but from every picture I've seen, it's one piece.
For my part, I've made my belt in one piece.
I bought a 46" X 15" piece of semi-rigid brown calf leather (1.8mm thickness) but it was too thin, so I glued on the back some piece of leather (the same) to double it. It's 3.6mm now and it's perfect.


For the lengh I ajust it to my body. 46" wasn't enough to make the "C" (on the pattern) of the bottom part, so I had to improvised a lot. :lol The fact is that the reverse side of the belt has to be a lighter brown leather. I used the same leather I glued on the back, except I changed the side, so when the belt cross the buckles, it show this piece of leather. For my belt I used only 1 piece of leather, not 2 glued together, it's too thick.


I dyed then the belt with Brown Havane leather paint (the same I used for the Peltz gloves and wristband). It's ot a spay, but a brush (very great for making all detail and contast !) First I applied a very small drop of liquid and dispatched it with in small circle (with a cotton pad or towel, or my hand lol) on the totality of the belt. Then I applied more layer on the edge and continously do that until I draw the detail and match the perfect color I've want.
And here the result :


 (the light of my room is yellow, so don't pay attention to the color. The right one is on the pictures above )
Last edited:
Mithril Designs
Well-Known Member
Similar threads
- Replies
- 7
- Views
- 5,113
- Replies
- 35
- Views
- 9,317
- Replies
- 2
- Views
- 3,437
- Replies
- 11
- Views
- 6,333