I've been working on the Revell AT-AT kit for about a year now. I got it for about $20 thinking that it would be quick build in between more intense projects, but you know how that goes. ") It's so darn big and close to being accurate I couldn't just build it as is, and every upgrade leads me to another I'd like to do. I'm about 95% done now, and thought I'd post a WIP thread to show off my work, not necessarily in chronological order. Definitely inspired by danikin72, Baloo's amazing head blueprints,and Jun Austria's great build, all seen here on RPF. And this in turn inspired me to finish my AT-AT driver costume for Halloween this year!
It's so darn big and close to being accurate I couldn't just build it as is, and every upgrade leads me to another I'd like to do. I'm about 95% done now, and thought I'd post a WIP thread to show off my work, not necessarily in chronological order. Definitely inspired by danikin72, Baloo's amazing head blueprints,and Jun Austria's great build, all seen here on RPF. And this in turn inspired me to finish my AT-AT driver costume for Halloween this year!
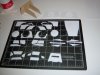
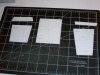
Work planned include re-scribing all the panel lines, replacing as much inaccurate detail as possible, re-greebling the belly, and major head rebuilds. I'm not worrying about keeping articulation, this will be static in a diorama. Some greebles come from random donor kits, a lot of scratchbuilds, and a 1/48 Tamiya Flakvierling which has a lot of the required greeblies (you either need several of these or a good way to reproduce parts, I resin cast some)
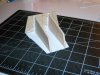
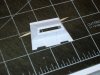
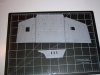
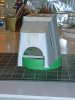
So, here the head so far. This is clearly the worst part of the kit, I don't know how they screwed it up so badly. Using Baloo's blueprints and measurements from studio model pics I rebuilt the back section with sheet styrene. The disks on the side are epoxy putty using a simple push mold pulled off of an appropriately sized refrigerator magnet. The fins on the bottom are new as well, and all greeblies have been replaced from scratch. I still need to build a new window/face, having built two unsatisfactory ones so far.


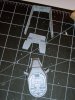
The guns were the fun part, and a lot of work! Side guns from bits of plastic sheet and tube, 1/48 aftermarket brass Flak barrels from RB, and the 1/48 Tamiya Flak guns.


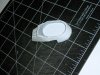
The chin guns were a lot of work! I built one and made a mold for the second. Mostly epoxy putty with plastic detailing and the round/wheel part salvaged and modified from the parts that came with the kit. The barrels are 1/48 aftermarket King Tiger barrels from RB with the ends filed to the appropriate shape.


Like I said, the rest of the kit is mostly complete, though I keep finding little things to fix up. I'll try to post some more pics as time permits. Thanks for looking!
It's so darn big and close to being accurate I couldn't just build it as is, and every upgrade leads me to another I'd like to do. I'm about 95% done now, and thought I'd post a WIP thread to show off my work, not necessarily in chronological order. Definitely inspired by danikin72, Baloo's amazing head blueprints,and Jun Austria's great build, all seen here on RPF. And this in turn inspired me to finish my AT-AT driver costume for Halloween this year! Work planned include re-scribing all the panel lines, replacing as much inaccurate detail as possible, re-greebling the belly, and major head rebuilds. I'm not worrying about keeping articulation, this will be static in a diorama. Some greebles come from random donor kits, a lot of scratchbuilds, and a 1/48 Tamiya Flakvierling which has a lot of the required greeblies (you either need several of these or a good way to reproduce parts, I resin cast some)
So, here the head so far. This is clearly the worst part of the kit, I don't know how they screwed it up so badly. Using Baloo's blueprints and measurements from studio model pics I rebuilt the back section with sheet styrene. The disks on the side are epoxy putty using a simple push mold pulled off of an appropriately sized refrigerator magnet. The fins on the bottom are new as well, and all greeblies have been replaced from scratch. I still need to build a new window/face, having built two unsatisfactory ones so far.
The guns were the fun part, and a lot of work! Side guns from bits of plastic sheet and tube, 1/48 aftermarket brass Flak barrels from RB, and the 1/48 Tamiya Flak guns.
The chin guns were a lot of work! I built one and made a mold for the second. Mostly epoxy putty with plastic detailing and the round/wheel part salvaged and modified from the parts that came with the kit. The barrels are 1/48 aftermarket King Tiger barrels from RB with the ends filed to the appropriate shape.
Like I said, the rest of the kit is mostly complete, though I keep finding little things to fix up. I'll try to post some more pics as time permits. Thanks for looking!