Revell 1:50 Poe’s X-Wing Fighter

JMD

New Member
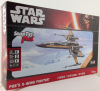
Kit: Poe’s x-Wing Fighter from Revell (85-1825)
Scale: 1:50 (I hear)
Skill Level: 2
Pieces: 54

This is my first build thread, so bear with me.
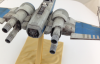
A little while back, I built Bandai’s 1/72 scale Resistance X-wing. Like many, I too love the quality of engineering and detail that goes into the Bandai kits. The only draw back for me is the scale. I just wish the kit came in a 1:48 version. Fingers X’ed for that. So, after walking past the larger Revell kit a few dozen times, I decided to give it a shot.

What I have heard about the Revell kit:
-Details are a bit soft or just plain missing
-The engine wells on the inside of the wings are flat, not wells at all
-Does not come with a pilot
-The overall shape is pretty darn good. This particular feedback intrigued me the most because I do like the sleek, lighter, yet aggressive look of the T-70s.

The plan is to work on the detailing of this kit using the Bandai kit and photos as a reference. I also plan to use sheet and tube styrene to add any detail. This will be more of an homage to the Bandai kit detail, not a prop-based accuracy build.

So, with that…

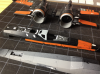
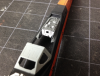
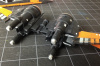
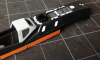
First, I added some cut flat styrene pieces to the wings and fuselage. I have also included some photos of my Bandai 1:72 kit used for reference.
 

Attachments

  • 001.png
    001.png
    445.7 KB · Views: 292
  • 005.png
    005.png
    755.4 KB · Views: 343
  • 004.png
    004.png
    568.8 KB · Views: 345
  • 003b.png
    003b.png
    1.2 MB · Views: 371
  • 003.png
    003.png
    388.5 KB · Views: 387
  • 002b.png
    002b.png
    1.1 MB · Views: 368
  • 002.png
    002.png
    333 KB · Views: 377
I slapped on some primer to wings and fuselage and moved on to the cockpit tub. All white parts are added. I added a back rest with a targeting computer, hoses and some greebles. Tubing is .020” styrene rod inserted on each end into holes made via a pin vise.


I also decided to tackle the missing engine wells on the inside of the wings. Started by cutting out the openings.
006.png007.png008.png009.png010.png


006.png


007.png


008.png


009.png


010.png
 
Last edited by a moderator:
Along with the inside engine well surgery, I worked a bit on making the torpedo divot on the fuselage a bit deeper. Like the engine wells, they are way too shallow.


I did a quick test assembly of primed parts to get a peek at the kit’s overall shape and proportions. That rubber band is not canon. I am digging the way this kit looks so far. Compare the shot with landing gear to the view of the Force Awakens set x-wing in the JJ Abrams - Force For Change video. Not too bad, right? Sorry, for the missing landing gear doors and not fully closed wing in that photo.

012.png011.png013.png

011.png


012.png


013.png
 
Last edited by a moderator:
You´ve already improved this rather dull kit very much. I´m following your build with great interest because I just finished the build part of mine (it´s currently waiting for me to find time to paint it). You can view it here in case you might to want see a similar build as reference. Keep up the great work! :)
 
You´ve already improved this rather dull kit very much. I´m following your build with great interest because I just finished the build part of mine (it´s currently waiting for me to find time to paint it). You can view it here in case you might to want see a similar build as reference. Keep up the great work! :)

Daniel. That's one heck of a build! What a great mix of scratch built and 3d printed parts. Yours is the best treatment of this kit that I have seen and would encourage others to check it out via your link. I cannot wait to see your build fully assembled. You are making me want to do a second build, using your build as my main inspiration/aspiration. Thanks for sharing!
 
With the inside wing engine wells now cut out and sanded, I worked on some scratch-built engine detail. Again this detail is loosely based on the Bandai kit. I used some styrene tubing (1/2” and 7/16”). I just cut the tube sections in half and layered up the diff. sizes. I also added a few small pipes with .020” styrene rod. That larger exhaust/thrust pipe deal to the rear is a repurposed waste corner from the kit sprue. I left one of the female snap-fittings toward the rear of the well. I would recommend just cutting that sucker off too, otherwise you will need to hide it.


I used some Rub’n Buff metallic for the smaller tubing, including the larger copper looking thrust pipe thing. I also added orange paint to an engine housing band based on the x-wing section in the Incredible Cross Sections book.

014.png015.png016.png017.png

014.png


015.png


016.png


017.png
 
Last edited by a moderator:
The engine detail looks awesome! :)

And thanks for the praise! In case you´re interested and I figure out how to do it, I could make the exhaust and gun 3D printed parts available for sale on shapeways. Just let me know if you want them.
 
The engine detail looks awesome! :)

And thanks for the praise! In case you´re interested and I figure out how to do it, I could make the exhaust and gun 3D printed parts available for sale on shapeways. Just let me know if you want them.

Oh, heck yes! Those parts really help elevate this kit. Please let me know if you are able to do it. And, thanks for the encouragement.
SaveSave
 
Last edited by a moderator:
Oh, heck yes! Those parts really help elevate this kit. Please let me know if you are able to do it. And, thanks for the encouragement.
SaveSave

Ok, give me a couple of days. I need to open a shapeways shop but also slightly modify the CAD model according to my experiences when installing the parts on my own model. I´ll increase the tolerance for the gun parts so they slide onto the tubing more easily (you´ll need to replace the gun barrels with brass or aluminium tubing of 1 mm and 2 mm diameter if I remember correctly).
 
Last edited by a moderator:
Ok, give me a couple of days. I need to open a shapeways shop but also slightly modify the CAD model according to my experiences when installing the parts on my own model. I´ll increase the tolerance for the gun parts so they slide onto the tubing more easily (you´ll need to replace the gun barrels with brass or aluminium tubing of 1 mm and 2 mm diameter if I remember correctly).

Sounds great! Thanks so much for sharing your work and taking the time to make those changes to the parts.
 
Another test fitting (no glue) with the finished inside wing engine wells. I have been inspired by the Force Awakens full scale set x-wings to try and add more detail to the somewhat plain landing gear that comes with the kit. Maybe some hydraulic hoses made from styrene rod or wire?

018.png019.png020.png021.png023.png024.png

Here are some “before” shots of the stock gear.
025.png

018.png


019.png


020.png


021.png


023.png


024.png


025.png
 
Last edited by a moderator:
And then over a year passed. Finally, I have been able to get back on this project and get the ball rolling again. This is my first thread, so I am determined to take it to completion. In my last post I was contemplating doing some scratch build tweaks to the stock gear. After doing some research of the movie set x-wing and the Bandai version I decided the details I wanted to included would require 3-D printing. I have only done some simple 3-D printed forms in the past, so a stretch for me.

026.png
The models for front and back gear. I really wanted to get some of the hydraulic lines in the parts. The diameter of the hoses were about small as the printing constraints would safely allow.

027.png028.png
Here are the printed back and front landing gear. I decided to experimented with a few materials. The clear back gear was printed with Frosted Extreme Detail, the front with Hi-Def Acrylate. The black Hi-Def Acrylate is smoother IMHO, but a bit softer in detail and stiffness.

In the year gap, I also got the itch to light the kit. This will be my first attempt at this, so I purchased a pre-made rig for this kit.
 
This is looking very cool with all the super detailing. If you are open to sharing I would love to try and print your engine parts on my printer.
 
Another test fitting (no glue) with the finished inside wing engine wells. I have been inspired by the Force Awakens full scale set x-wings to try and add more detail to the somewhat plain landing gear that comes with the kit. Maybe some hydraulic hoses made from styrene rod or wire?

View attachment 693477View attachment 693478View attachment 693479View attachment 693480View attachment 693481View attachment 693482

Here are some “before” shots of the stock gear.
View attachment 693483

Hello, great work you're doing... This kit is a mess out of the box. I just wanted say that on mine, I filed the fuselage openings down quite a bit, testing for function along the way, to get this wings to open as wide as they should. They only open not even half as wide as they should without filing... just trying to help.
 
Last edited by a moderator:
Back
Top