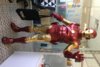
Looks so AWESOME!! Came out beautifully.
You are using an out of date browser. It may not display this or other websites correctly.
You should upgrade or use an alternative browser.
You should upgrade or use an alternative browser.
Retro comic version Iron Man build launch with Q's!
- Thread starter Marthony
- Start date
Marthony
Well-Known Member
Thanks! Looking forward to first day of use events - candy give-out tour at work after lunch (arts facility), fireworks at 8pm, and then the bar adventure with $300 competition (won it last year). Having the next day booked off months ago for hangover/project afterglow/clean-up is a wonderful thing too.
Ready to paint the replacement codpieces this evening! Already have 2-4 coats of Pledge floor wax on the other parts with more to come, though as it is taking as much as 45 minutes to coat the full set I won't get the 10 coats I enjoyed on smaller test pieces. Regardless, even 5 coats will give a nice gloss and protection from anything that would otherwise try to stick to the paint job...relevant for a bar night!
I still need to install the repulsors, but realized a simpler/tidier method yesterday; I was planning on of doing 4x 5000mcd yellow 170 degree 2.2V LED's in a parallel circuit (with 4 resistors) to a 3V button battery with a switch in the circuit on a trimmed piece of breadboard (to reduce # of wires needed). Instead I'll stack 3x 3V button batteries so I can do a series circuit requiring 1 resistor. It is easier/slimmer wiring with fewer wires & resistors, and 3x the running time per battery set. 3x button batteries is still much less clunky than a 9V, and you just need to swap out battery sets between events or bring spare sets to a con.
Planning to tackle repulsors tonight after the quick 2x hip pod painting session, and otherwise to add coats of wax to the end of Wednesday evening. Thursday after work & before bar time I'll look at hot-gluing in some nylon loops for bathroom stall hanging options.
Almost there..!
montysaurus
Well-Known Member
Looks fantastic. The only thing I would add is a balaclava to hide the back of your neck. But otherwise perfect.
Marthony
Well-Known Member
Agreed Montysaurus! As it happens I am wearing a 5" high neck wrap made of leftover red metallic body suit material from G1 cartoon Megatron, but will replace it with a 7~8" high version and pin it to the collar of the body suit to cover it in the back while still cover most of my neck. I don't see a nice way of connecting it to the helmet though. Hoping the Velcro close at the back will keep it vertical in the back for good coverage; the front isn't as noticeable, but will consider a method there as well.
Would prefer a paint match, but as it matches the design of the body suit and is comfortable I'm calling it good. =)
Thanks!
Would prefer a paint match, but as it matches the design of the body suit and is comfortable I'm calling it good. =)
Thanks!
Attachments
Marthony
Well-Known Member
Thanks George! It also had original cartoon cannon sound with button hidden in the pivot control grip. Since you've said so, here are my other Transformers:
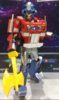
9.1 scale (except head) Optimus Prime, cardboard but with EVA axe. This is the 3rd upgrade of my 1st 'hard' costume and launch into cosplay.
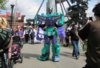
Multi-scale as needed 8.5' Devastator. Aluminium frame, hard insulation foam & EVA. Rigged so that without head & lower legs it passes sideways through a standard bathroom door - That's why the upper arms are lower than the toy's. Idea thanks to a poor ******* in a fiberglass Warhammer suit a year before that was too wide & deep to enter the venue!
Tonight I painted the replacement hip pods and almost all the wiring for the repulsors, to finish installation tomorrow night. Still need to add more wax coats & replace neck wrap. Hot-gluing in hidden rigging can be done evening before bar time - really means of running a shoelace through parts to hang while using bathroom.
9.1 scale (except head) Optimus Prime, cardboard but with EVA axe. This is the 3rd upgrade of my 1st 'hard' costume and launch into cosplay.
Multi-scale as needed 8.5' Devastator. Aluminium frame, hard insulation foam & EVA. Rigged so that without head & lower legs it passes sideways through a standard bathroom door - That's why the upper arms are lower than the toy's. Idea thanks to a poor ******* in a fiberglass Warhammer suit a year before that was too wide & deep to enter the venue!
Tonight I painted the replacement hip pods and almost all the wiring for the repulsors, to finish installation tomorrow night. Still need to add more wax coats & replace neck wrap. Hot-gluing in hidden rigging can be done evening before bar time - really means of running a shoelace through parts to hang while using bathroom.
Attachments
George
Master Member
Rad !  thanks for the photos !
Lifetime G1 fan right here, along with G.I.Joe, Marvel, DC, and Japanese Animation to name a few.
So cool to see all this come to life at comic cons and this forum.I really hope to see more diversity in costumes/characters,since people tend to predominantly craft what is currently in theatres.
thanks for the photos !Lifetime G1 fan right here, along with G.I.Joe, Marvel, DC, and Japanese Animation to name a few.
So cool to see all this come to life at comic cons and this forum.I really hope to see more diversity in costumes/characters,since people tend to predominantly craft what is currently in theatres.
montysaurus
Well-Known Member
Have you thought about an open face hood in the same material?Agreed Montysaurus! As it happens I am wearing a 5" high neck wrap made of leftover red metallic body suit material from G1 cartoon Megatron, but will replace it with a 7~8" high version and pin it to the collar of the body suit to cover it in the back while still cover most of my neck. I don't see a nice way of connecting it to the helmet though. Hoping the Velcro close at the back will keep it vertical in the back for good coverage; the front isn't as noticeable, but will consider a method there as well.
Would prefer a paint match, but as it matches the design of the body suit and is comfortable I'm calling it good. =)
Thanks!
Marthony
Well-Known Member
A pleasure! Clearly also a G1 fan...might be dating myself a bit!
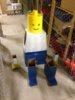
I go with what mode of costume design I want to try, and then a character that I connect with. I'm not as much for current movies as I haven't had so much time to connect with them. Thus far they've been fairly mainstream still, but we'll see with the next one. Since getting into cosplay with a last-minute idea of original Lego Man, I've had a thing for shell costumes as you can lose yourself in the character when you are mostly covered. (Lego Man-Optimus-Megatron-Devastator-I.G.-I.M.)
My next costume idea is original comic book Martinex of Guardians of the Galaxy, 1990 edition, first 5-6 issues before the artists decided he was too much of a pain to draw. This takes me along my path of right angles/straight lines of Transformers, to patterned & geometric shapes of Iron Giant & Iron Man, to low-poly geometric. The torso won't be truly geometric but otherwise it should be close. This will also push painting/finishing techniques to another level in addition to figuring out a surface that reflects different colors based on angle. Guessing most will think its neat, with a small group actually recognizing it.
(Considered doing the Thing of Fantastic Four but have since moved on)
Attachments
Marthony
Well-Known Member
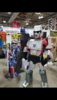
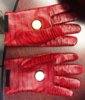
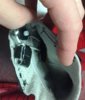
Cost me an hour of sleep to finish repulsors, but for night before first use that's not bad at all right? Didn't have time to replace neck wrap, but might before evening events - event after lunch is campus tour giving out candy.
This is my first time using a breadboard, but it worked out fairly well. Identifying short-circuit is pretty quick with the parallel lines so clear (vs. home-made loose wiring set). A bit tight quarters but very workable as the solder doesn't easily run across the breaks.
Would have taken more photos to detail the process, but was running late..! From the breadboard shots my process was:
- Solder on pair of thin metal leads to breadboard, as my stock wire is too thick
- Solder on pair of wires
- Check layout to glove, with battery set & switch within glove just before the cuff
- Trim wires, solder on button-switches taken from 24 LED puck lights. Button pressable from outside of glove
- Tape 3x 3V button batteries together, then positive & negative wires to that
- Mark & trim down to desired height the pair of plastic (superglue container) tubes, to cover the LED's plus contain 1/8" of magic eraser material as a diffuser
- Sand off the bottom edges & markings, and then go to 120 grit to make the plastic a diffuser as well
- Place & mark off where the covers sit on the breadboards
- Use Carpet scissors (you'd want heavier) to trim down the breadboards, then sand with 60 grit sanding sticks
- Trim magic eraser wafers to fit into covers over LED"s, as test showed the 4 points of light too clearly without
- Superglue covers to breadboards
- Use spare tube to mark location on palm of glove where to place, using black permanent marker - same as used for lines on gloves
- Use snips to trim away circle within black layout marks, leaving black circle
- Place assembly within, and press leather down flat against ridge left outside/around LED cover
- Superglue around cover. Follow up with 2nd application after initial drying for any bits that don't appear well glued
I'll have to be careful when taking the gloves on & off, but the lack of flexibility of the superglue is nullified here as it is on a hard object; the leather around can flex for all movements.
These repulsors are not as bright as I'd like, but for my first run at such a thing and as they don't interfere with my grip at all I'm calling them good. Can easily turn on & off to conserve power. Will look great in the bars and not mess up photos, though my unibeam might. =)
2 hours to first of 3 adventures today wearing it! Will wear layer of thermal underwear under the bodysuit for the fireworks show.
Hope to post pics of the afternoon run! Happy with the proportion of the new side pods.
Attachments
Marthony
Well-Known Member
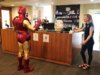
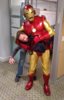
Campus tour a win!
The hip pods tilt out a bit, but not a big issue? Got dressed without a mirror so will be able to snug up the stomach wrap to codpiece better for next event. Also, the repulsors will look better in the dark. Was happy with how easily I was able to switch my repulsors on & off; with the button batteries being so small I don't dare leave them on long. I can't toggle my unibeam once dressed, but will just change AAA batteries between events. I'll get more button batteries, but it is a process to switch them out. Mobility/range of motion was good.
Pretty warm indoors; might bring a small hand fan with me once more as I did at a prior event wearing my less ventilated Megatron helmet. Regardless, will need to drink heavily to maintain hydration. =) This time perhaps I'll try vodka, water and lime and see if that's doable.
Just have to brace for paint job damage at the bar, but at least prototyping tells me that 5x fresh coats of wax mostly covers up wrinkled paint 'damage'. Wax should enable wiping off stains.
Huzzah!
Attachments
montysaurus
Well-Known Member
Great work.Looks like a fun build. Thanks for sharing.
Rocket Rider
Active Member
Amazing job!!! my favorite comic book version.
Similar threads
- Replies
- 0
- Views
- 263
- Replies
- 1
- Views
- 542
- Replies
- 2
- Views
- 648
- Replies
- 43
- Views
- 3,376