Retro comic version Iron Man build launch with Q's!

In most recent news, I've discovered that templating directly from your lower leg makes certain things difficult. I wasn't able to 'level' the top of the prototype after first build from the template I'd made, and it was just a geometric mess to try to correct - even before thinking of duplicating it for the right leg! I've decided to abandon the template approach and instead try a conical frustum, as my lower legs are close to round anyway, and the gradient from ankle to calf is fairly even. Besides, the calf wrap would obscure contours in that area anyway. The attempt has given me the radius at top & bottom and I can measure for height.

I've only once before gone through the frustum process - to transition between tube sizes of my G1 cartoon Megatron's fusion cannon. Fairly straight forward if you find the right online calculator tool to do your math after you've got the available measurements. It does require cardstock and a protractor however.

After the frustum is made, I'll heat-shape some for better appearance. From there I'll template for the 3/8" EVA calf wrap piece vs. go through all the math again, as this is a simple shape to template from and I won't be wearing it. =)

The ultimate solution would be to make a cast/duct tape form of my lower leg, but I don't want to put time into that right now for relatively simple parts of this costume.

Baby steps in problem solving..!
 
Success! (or at least, close enough to get closer to victory)

I measured my failed prototype patterned lower leg's internal diameter at top & bottom, getting 5.5" & 3.5" respectively. I then factored in the thickness of the foam, 1/4", to build for 6" & 4" instead (same theory as using a pepakura file). Height of the prototype was 10 1/4".

I then used the tools via Geometry calculators to get the exterior length, 10.3". With the lower radius of 2 & upper of 3, that meant the shape would be 18.8" wide at the top & 12.6" at the bottom. This translates to a trapezoid as shown on my whiteboard, and from there the shape may be marked out for cutting. It isn't perfect - I'll have to trim off a bit of material at the top-rear, but I'm happy with this.

Next I used my foam ruler to get the top length of the wrap estimated at 20", marked down the shape by 5" and measured around those marks for a bottom length of 17 3/4". The whiteboard shows the shape to be cut out. Again not perfect, but easily enough trimmed to proceed with.

Up next I'll re-use Iron Giant's shoe cover templates for use here, and see if the leg wrap needs editing at the bottom (old shoe pics).

Divide and conquer all problems for the common denominator of pleasantly stubborn effort. =)

*edit*
Ugh. In reviewing this vs. my last post however, I realize I've goofed and understand why the shapes are off - conical/circular shapes cannot be simply made into trapezoids! In my defense I was tired & fighting a cold. Will repeat process using protractor etc.

Hidden lesson here is to always have extra material to work with to make up for what you did while tired..! =)
 

Attachments

  • IMG_7397.JPG
    IMG_7397.JPG
    696.7 KB · Views: 104
  • IMG_7398.JPG
    IMG_7398.JPG
    404.3 KB · Views: 120
  • IMG_7399.JPG
    IMG_7399.JPG
    977.6 KB · Views: 143
  • IMG_7400.JPG
    IMG_7400.JPG
    228.4 KB · Views: 118
  • IMG_7401.JPG
    IMG_7401.JPG
    355.5 KB · Views: 128
  • IMG_6427.JPG
    IMG_6427.JPG
    171.6 KB · Views: 107
  • IMG_6421.JPG
    IMG_6421.JPG
    145.1 KB · Views: 110
  • IMG_6422.JPG
    IMG_6422.JPG
    157.3 KB · Views: 129
Last edited:
I started building this exact suuit in a very similar method but never finished it. Super happy to see someone give it a shot!
 
Was quite a busy weekend, but managed to find time to redo this stage properly. In the below paper image I'd erred with a 60 degree arc; 30 is what was needed, but that's why I keep plenty of cardstock on hand!

For the un-pictured next arc I realized my metal ruler had a hole in it to use. Buy enough EVA mats and you get a bad one - it has become my abused underlay for pinning items to as desired. =) I used a set of pins around the edge of the ruler's hole so it would pivot properly without moving or changing angle. Better than a string that stretches a bit, though that worked for this application (plus a piece of tape at the end to allow pinning down)

Next stage is reproducing the shoe covers. Once they are adhered I'll plot the scoring pattern and decide on the spacing etc. While I can score & heat-flex the 'lines' on the lower-calf sections fairly easily before adhering, that isn't possible with the parts of the shoe covers. Odds are I'll use my foam ruler to get clean curved lines there. Might do minor damage to the EVA by pinning as needed, and seal the holes later.After the lines are opened up I'll have to go over them with a black permanent marker as I used pink EVA there.

After that is closure installation for the backs of the wraps. While I'd pictured installing a pair of 1-1.5" wide lengths of Velcro vertically to cover the seams, I don't think this is ideal as that means a lot of flexing back there which implies the Velcro should be stitched to nylon webbing to be well secured to the EVA with hot glue. They do need to open at the back; a partial opening closer to the ankle isn't enough. I think I should look into a zipper for the bottom 5.3" and possibly also the top? Less flexing and the zippers already have nylon as the material to secure with. Would then carefully paint red later.

Nick Darling, how far did you get and what stopped the project? What methods were you approaching to get what version?
 

Attachments

  • IMG_7403.JPG
    IMG_7403.JPG
    390.5 KB · Views: 96
  • IMG_7405.JPG
    IMG_7405.JPG
    807.4 KB · Views: 93
  • IMG_7406.JPG
    IMG_7406.JPG
    333.4 KB · Views: 126
Another weekend of progress. =)

Shoe covers have been done (you know, before finishing stages)...twice. After using my 'regular' foam I discovered that they just looked out of proportion & too large when directly under 1/4" foam...should have expected that. Re-did with 1/4 and cutting tight on the template for a snug fit. These would look more correctly if I'd installed the under-shoe straps that hold the shoe covers snug to the shoes, but take my word for it. =) Also need the Velcro tab popping up from the tongue to connect to the lower legs.

If you go through enough foam you get a sheet that is defective in some way; I've such a black 2' square that I use for pinning template pieces to transfer to cardstock. In this scenario I used it as the base to attach multiple sheets of cardstock to, then pin a pivot spot for my metal ruler. The prior template attempts on my forearms & lower legs gave me the upper & lower radius and the side length; from there I was able to calculate the rest of the details to plot the conical frustums.

While you can estimate the arcs needed, true fitting over a layer of clothing plus a bit of airspace makes it wiser to mark out what the shape should be, then extend the arcs by a couple inches on one side. Then draw edge lines across in multiple margins so you can trim away properly without losing the angles of your frustum. The over-wrap is tougher to get accurately and needs this approach.

After the shapes are defined regardless of width, I chose the spacing for the grooves - 1/2" for forearms and 1 1/3" for legs. I then mark the edge of my ruler per gaps, place my marker in front of the ruler and push the marker with the ruler. Afterwards I clean the permanent marker off the ruler with paper towel & rubbing alcohol.

Lower legs have been done minus Velcro spot above the shoe covers. Adding the zippers means adding width to the interior of the wraps; I'd expected to trim away an equal width but have left it wider instead; bodysuits are warm and airspace between it and costume parts will help for indoor events! Next I'll check about reinforcing the zippers; hot glue might mess up the zipper edges...perhaps super glue?

Forearms are done other than Velcro near the wrist to loosely connect to same stitched to the leather gloves. Adding the upper wrap was a fight here as the ends had to meet. While I re-cut to improve this it was still a fight. We'll see if heating them tonight will restore them to circular shape, but no matter if not as forearms aren't perfectly circular anyway. =)

Lastly, I didn't want to start something new in the evening so made the first pass with 120 grit sandpaper on the helmet. I still need to heat-shape the chin inwards slightly and trim the holes a bit, and the ears aren't attached yet. Ear caps will be re-cut with angle-cuts where they connect to the helmet, and have to install the mesh into them before adhering to the helmet. Will check it over with 120 again after these bits, then carry on to the next 2 grits before Kwik-sealing the seams etc. Haven't installed the open-cell foam within for spacers yet, but they can be done later.

Procrastinating on codpiece still...

Today I discover how to use an OLFA cutting tool with 90 degree base, purchased to better cut the rings for the torso as I've an organic 5-10 degree error to my cuts no matter how I try to cut at 90. Pity the tool wasn't made with clear plastic - I can't see the line I'm cutting! It has an optional side guide however; I'll do test cuts to see the distance from the blade it has, then make a matching outer line on my templates to hand-cut and then later use as the guide edge for using this tool. Ugh.

I've tested latex (water-based) contact cement on EVA! I applied 2 light coats of this thin glue and fanned it. After about 45 minutes after the 2nd coat I gave it 3 light coats of the paint I'll be using. About 1.5 hours later I gave it the torture test - far more durable than the primer I (shouldn't) have been using - the paint is really hard to scratch off via fingernail. It does wrinkle as all spray paint does, but is very durable, non-toxic, and quick.

Baby steps...!
 

Attachments

  • Lowers.JPG
    Lowers.JPG
    1.3 MB · Views: 132
  • IMG_7414.JPG
    IMG_7414.JPG
    1.4 MB · Views: 145
  • IMG_7415.JPG
    IMG_7415.JPG
    894.1 KB · Views: 134
  • Calf wrap.JPG
    Calf wrap.JPG
    513.9 KB · Views: 134
  • Forearms.JPG
    Forearms.JPG
    774.4 KB · Views: 125
  • Leg wraps.JPG
    Leg wraps.JPG
    518.5 KB · Views: 130
  • Forearms 2.JPG
    Forearms 2.JPG
    584.2 KB · Views: 151
  • Helmet.JPG
    Helmet.JPG
    519 KB · Views: 180
More progress, just not so much for display other than one photo I'll take when the upper torso is further along.

Installed the Velcro connectors for the forearms-to-gloves, leg wraps-to-shoe covers, and also the straps that go under the shoe covers & my shoes to hold them in place. Usual fights with the sewing machine to sew the Velcro to nylon with poor choice of needle & thread with only using the machine 1-2x/year..!

I got excited & painted the forearms, only to realize that the water-based contact cement does nothing to conceal the foam colors for the sake of the paint's color; I'll have to redo them. I have confirmed that contact cement-2x tinted primer-spray paint works very well on my 7 colors of foam. For the bonus round I've also confirmed that covering the paint job with contact cement again makes it more rugged - I then add the thin coats of floor wax for gloss...and so the cc doesn't attract pretty much anything that would stick to it. The finish still cracks as it is spray paint, but it is more rugged in torture testing. Cracks can be cosmetically helped by re-coating with floor wax.

I've finished the torso's shoulder rings to spec. While not perfect, my approach of adding 5 16ths to the ring template, cutting that by hand, then using the 90 degree cutting tool with it's side-guide worked. I've also almost finished the neck ring, though could have done it better. I knew it would never be a perfect circle, but one more edit to improve its appearance. This pic has the original template, after I lifted off the larger template. I pinned them into place while tracing; I don't love taking care of the holes, but it was the easiest way to keep everything exactly in place. Foam turned out to be almost .5", so just used two pieces per side, patterned sides facing each other. (I've packs of 3/8 squares, and roll of 1/4" EVA)

Here are how the pre-finished legs look with black socks showing! Will have black socks over the body suit if latter is visible. More of a gap than expected, but will work well.

Tonight I try to finish the unibeam. I've been keeping certain objects to work with foam, and two sizes of cans were ideal: a Chunky Soup can was sharpened to cut the hole in the torso, and also to make 3 circles from scrap foam of the same size. I then took a smaller can to make rings out of the circles. The unibeam will consist of 3x .5" foam rings with the 'lens' in the middle, trimmed-down battery pack taking up the rear circle, and full assembly hot-glued into position from inside the torso. Figured this was a cleaner technique vs. cutting strips to then make into a short tube, though I need to sand down the 3x ring assembly after gluing it together, before installing into the torso. Switch will be off to the side within the torso,

Unibeam is a 24 LED puck light stripped down, super glued to a plastic disc with 2 layers of bathroom window privacy prism plastic (to diffract), 3 pieces of quality yellow plastic, and a 1/8" disc of Mr. Clean magic eraser. Might leave outside as eraser or add a 4th piece of yellow plastic there, not yet decided. I had been planning on using my yellow spray paint on an outer plastic lens, but light just didn't come through it well enough in testing.

Lots to do, but also have Friday & Tuesday booked off from work so I can focus. =)
 

Attachments

  • IMG_7425.JPG
    IMG_7425.JPG
    262.2 KB · Views: 100
  • IMG_7426.JPG
    IMG_7426.JPG
    183.9 KB · Views: 126
  • IMG_7427.JPG
    IMG_7427.JPG
    285.2 KB · Views: 120
  • IMG_7432.JPG
    IMG_7432.JPG
    679.2 KB · Views: 122
Remember folks, every time you speed up you can expect to slow down! =) Made good progress Friday but on Saturday realized that stomach wrap V2 had to be replaced...

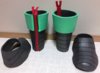
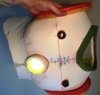
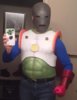
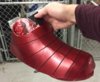
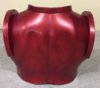
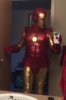
The torso is ready for finishing work other than hidden connector to the stomach wrap. While I'd initially planned for the 'lens' of the unibeam to be within the 3rd/rear ring I moved it to the middle to make for battery pack space at the rear instead. Happy to say the battery pack plastic was easy to trim via blade and I was able to pack it neatly in behind the LED disc, with electrical tape layer between them. The button switch was also removed, rewired and placed in an easy to reach spot at the bottom of the unibeam's rear. While my shirt doesn't touch the battery pack, I hot-glued a piece of nylon to hang down and cover the battery pack just to be sure. I've since also gone through the 3 grits of sanding, and the torso is now ready for Kwik-sealing gaps, followed by 2x latex contact cement, 2x priming, 3 passes spray paint, 2x latex contact cement, 5-10x floor wax... =)

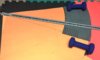
The V2 stomach wrap had problems:
- 4x seams I tried to combine a seam with relief cut. Don't! it puts too much stress on the connection and the glue tends to pull apart.
- Though I tried to only score halfway through the back for the abs, I think I heat-treated the gap too much and put fingers through one section of an ab muscle. I patched it with superglue to get past it, though it made for a steeper angle than the other muscle edges.
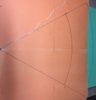
- Order of operations is critical to adding rear-scored heat-shaped muscles. The V2 didn't have the double-sided layout marked on the foam; good luck on getting it even after the foam is shaped! Due to this I mis-drew the shapes and one side's muscles turned out an inch wider than the other, making the wearer look a bit deformed...ok for a monster but not this. =)
- Extra height at front & bottom middles was desired to allow more travel under upper torso, for better range of movement.
- My seams would require a lot of work to tidy up.

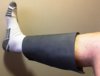
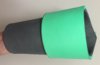
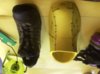
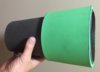
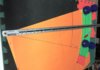
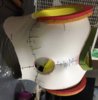
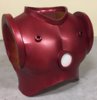
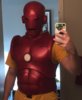
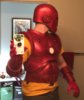
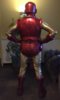
While I was annoyed to have to redo this section, the V3 was worth it (loose at side in this pic). My seams have improved a lot since the V2, and I improved the efficiency of my gluing process with all the relief cuts - 11 per front-half pieces each! Muscle shape I templated looks a lot better than either V1 or V2, and amount of extra material overlap behind the upper torso looks good. Yesterday I also picked up some separating zippers that I'll reduce to 6" to use on this part vs. Velcro, as it was awkward to properly line up the connections. Given time I'll retrofit the left-side close of the upper torso with a zipper as well.

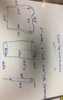
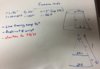
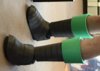
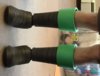
Next largest stage is to redo the codpiece. A week ago I comically closed all the curtains and put boxers over my underwear, then also briefs as briefs are the closest thing to the codpiece design shape. (yeah, no pics of this stage!) My wife helped plastic-wrap me plus add masking tape & make register marks. Edits for front were after movement tests warranted cutting a bit higher for thigh lifts, and extending the front down more to cover my body suit. The EVA is also angle-cut to give a bit more space on the inside bottom. Top is also angle cut opposite the stomach wrap to give an overlap if parts get pulled apart slightly when moving/posing. (wasted a sheet of foam on the V3 stomach wraps cutting the bottom angle wrong-AGH!)

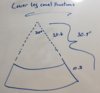
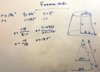
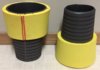
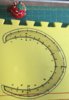
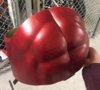
From last week I've got the V2 front piece for use and edited the rear pattern for re-cutting the V2 buttocks. I also templated the hip pods and have the approach set for that V2; I had to test what diameter of circle made for what size of pod once heat-shaped, if angle cutting was to be done, and what to use as the shaping tool - my softball was too tight a curve (could have borrowed a basketball), but I just un-shaped to spec. Side pods' inner side will be sealed from bottom & side but leave the top open with a covering of nylon. This top opening will create a pocket function that should carry an iPhone5 etc. Before hot-gluing the nylon to the back edge I'll sew on a patch of Velcro that will mount to the matching patch on the sides of the codpiece.

The codpiece won't have a side-close - it will be a one-piece wrap that I'll slide on like a hula-hoop with built-in jock strap. The V1 fit snugly so I don't see the need for a side gap that can't be as nice looking as no seam at all. There will be 3-4 Velcro connections between the codpiece & stomach wrap, keeping the pair from separating much at all. Their mutual angle-cutting will cause an overlap in case I pull them apart much with movement/posing. While I'd initially planned to let these parts travel a bit with elastic connections, the gaps would be a minus if they showed the yellow body suit, and there isn't actually movement between these body parts anyway. Connecting to the stomach wrap & the groin strap will keep the codpiece in place.

After the codpiece & stomach wrap are settled I can install the elastic tensioner behind the top-front of the stomach wrap to just below the unibeam inside the upper torso. Will take a bit of tension-testing. Once that is done I can add strips of open-cell foam on the inside of the upper torso in the shoulders, back and upper pectorals as breathable spacers against the tension down.

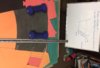
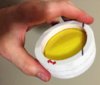
I started working on the glove's repulsors, but realized I need a tighten up my approach; my initial plan of 6 LED's in parallel on a 3V button battery makes for a fair bit of wires..! Will reduce to 3-4 LED's, and look at trimming/editing a piece of breadboard to make for much tighter circuits. Each LED requires its own resistor. The circuit will have the same press-button switch from a 24 LED puck light, located closer to the cuff. the button battery will have the wire leads taped to it, and then be enclosed in tape before being taped in near the end of each glove cuff.

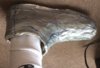
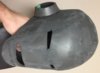
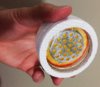
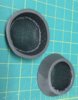
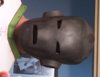
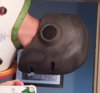
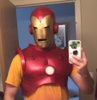
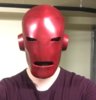
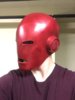
For the helmet, the V1 ear cover with 1 layer of nylon window screen mesh has revealed that more mesh is needed to obscure my ear within. I used the first ear-covers that lacked required angle-cutting to sit on the helmet properly for the V1 test, sealing & painting them for a good comparison. I covered half the mesh with 2x tinted primer before spray painting. I'll try 2 & 3 layers of mesh before final version, and install the mesh on the actual covers before gluing to the helmet.

Yeah...a few things to do yet! =)
 

Attachments

  • IMG_7435.JPG
    IMG_7435.JPG
    583.2 KB · Views: 163
  • IMG_7436.JPG
    IMG_7436.JPG
    775.6 KB · Views: 151
  • IMG_7437.JPG
    IMG_7437.JPG
    734 KB · Views: 138
  • IMG_7439.JPG
    IMG_7439.JPG
    565.3 KB · Views: 178
  • IMG_7442.jpg
    IMG_7442.jpg
    356.9 KB · Views: 187
  • IMG_7443.jpg
    IMG_7443.jpg
    382.6 KB · Views: 180
I just love seeing the suit come together step by step.
Thank you for sharing this adventure !
 
You're welcome George!

Yesterday was my last vacation day for extra time working on this (though I've a clear weekend and little else taking evenings, wife is even away until Tuesday now). I succeeded in making the codpiece, but it was hard to slide on; I cut both sides and added about 3/16" per side so it is now snug. (pictures will come!) Reaching my shoes isn't great, but not that important as I can do stairs. =) Installed groin strap as well to keep things snug front & back. This means the unit has to be put on like underwear, but that's just an order of operations thing.

Stomach wrap's left side close has a zipper installed and works well! Not too difficult to reduce a separating 12" zipper to 6" 'professionally' with the extra pair of ends from your local friendly quilt shop. Considered but will not install on upper torso as just too hard to reach to operate; will leave as Velcro close.

Just as important, I sewed Velcro to nylon pieces and installed by hot glue:
- Codpiece to stomach wrap connectors. 2" wide one in front/center and two 1" wide spots on side-rears. These keep the two sections snugly together.
- Stomach wrap to upper torso tensioner. 2" wide, 1" high Velcro loop on inside of each piece, with a 2x2" heavy elastic having 2"x7/8" hook Velcro on each end. This gives enough stretch for me to twist side to side and up, but does not show my body suit, and auto-centers when I do.

I've also moved 4 pieces into 'finishing': the forearms & calf wraps have had 2 coats of contact cement, 2x tinted primer & 3 light coats of paint. Debating ruggedizing with another 2x coat of contact cement before floor wax. The finish will still crack but is highly durable. Heavy damage is almost obscured with freshening up the floor wax finish. I then sanded the stomach wrap and called it a night. =)

These parts need kwik-seal treatment and then are ready for the above process:
- Helmet
- Upper Torso
- Stomach wrap
- Shoe covers

Codpiece will get side pods made before being advanced but also needs the scoring design done, and 'neck ring' hasn't been prototyped yet. This would be short in the front and taller in the back to cover most of my skin from showing, made from 1/4" foam and scored the same way as the forearms/calf wraps. Paint testing not yet done for approach of spraying oil-based gold over this red, and the taping off for shape.

Nice thing is there are some bar-specific things that can wait until the hours before heading out, such as attaching nylon loops within parts so they can be hung over a hook or hinge in a bathroom. It would be ideal to be carrying a lanyard and running it through the loops of everything I take off so nothing has to touch the floor.
 
Thanks Nemesis9! It will look better soon - ear covers are ready to be added in the next session. These are from the Pepakura file, but angle-cut as needed for the conical frustums to sit flat on the side of the helmet...you'll know what I mean if you'd cut the first pair at 90 degrees like I did. =) I used the first-cut pair for testing - turns out 3 circles of nylon mesh, spray-painted once from the inside before installation (and again from outside after) is what's needed to almost totally obscure visibility of my ears. To install, I placed the rings upsidedown and placed a line of hot glue within near the edge, moved the piece to a clean piece of cardboard to lose excess hot glue, then gently pressed in 1 piece of screen to desired edges and fanned to cool & set. Next added a thin line of glue behind the piece, cooled, then set in the last 2 and glued behind them as well.

Last night I did the helmet ears, and first run at Kwik-sealing seams & gaps on helmet, shoe covers, upper torso & stomach wrap. Will repeat tonight.

Also confirmed last night that the golden oil-based paint looks great over the red Dupli-color paint. I've earlier confirmed that painter's tape doesn't damage the red paint at all. This means I'll fully paint the helmet red, then place the layout template over it a day later to paint gold.

I have realized however that I should have used black foam for the codpiece! This means that I'll have to manually paint the grooves black with the acrylic I have, then spray paint red after. Will test if this is best vs. hand-painting the grooves black after. Arg.
 

Attachments

  • IMG_7445.JPG
    IMG_7445.JPG
    306.7 KB · Views: 133
Ear cups are on! This is also after 1 application of Kwik-seal; will do 3rd tonight to try & eliminate my seams. I erred in the version of Kwik-seal I used for the first 2 applications in using the clear; non-clear is desired so you can make out what ridges remain!

Pleased to confirm that black permanent marker (Sharpie brand) is good for blackening the groove lines on the green codpiece EVA. Far less tedious than hand-painting and doesn't leave any texture to affect painting process afterwards.

Saturday the helmet, torso, shoe covers & stomach wrap get painted red. The codpiece awaits receiving its groove pattern & hip pods.

That leaves making the helmet painting pattern overlay to paint gold Sunday, neck wrap, repulsors, coating pieces with floor wax...and some hidden rigging.
 

Attachments

  • IMG_7446.JPG
    IMG_7446.JPG
    50.2 KB · Views: 132
  • IMG_7447.JPG
    IMG_7447.JPG
    67.1 KB · Views: 126
Last edited:
Here's the first post-paint test! Still have to wax, install repulsors & hidden rigging/pockets. I think I should replace the hip pods with 1/3 bit bigger ones (good too, as they are pockets and might fit my phone). Getting there!

Wax will really make it come alive..! =)
 

Attachments

  • IMG_7450.JPG
    IMG_7450.JPG
    812.2 KB · Views: 166
  • IMG_7452.JPG
    IMG_7452.JPG
    661 KB · Views: 144
  • IMG_7453.JPG
    IMG_7453.JPG
    592.2 KB · Views: 141
  • IMG_7455.JPG
    IMG_7455.JPG
    190.9 KB · Views: 151
  • IMG_7454.JPG
    IMG_7454.JPG
    507.4 KB · Views: 141
  • IMG_7456.JPG
    IMG_7456.JPG
    390.9 KB · Views: 267
  • IMG_7460.JPG
    IMG_7460.JPG
    260.1 KB · Views: 193
  • IMG_7462.JPG
    IMG_7462.JPG
    231.6 KB · Views: 169
  • IMG_7463.JPG
    IMG_7463.JPG
    234.6 KB · Views: 174
  • IMG_7465.JPG
    IMG_7465.JPG
    216 KB · Views: 295
  • IMG_7467.JPG
    IMG_7467.JPG
    369.9 KB · Views: 178
  • IMG_7469.JPG
    IMG_7469.JPG
    544.9 KB · Views: 155
  • IMG_7448.JPG
    IMG_7448.JPG
    159.6 KB · Views: 161
  • IMG_7449.JPG
    IMG_7449.JPG
    142.7 KB · Views: 149
+1 What he said! I just love the paint job.Beautiful Bordeaux red(-ish), like in the latest Avengers movies.
Congratulations on a successful build !
I noticed you skipped the arms though.Is this because most 3D models have a chip off of the shoulder, and will you build them lateron after all ?
 
Thanks!

While 'Bordeaux Red' was an option with Dupli-Color paints, I went with 'Metallic Red'. Of course I won't do so again as this is my last rattle-can painted cosplay before learning/investing in non-cracking methods.

There will be no arms. Well, ok, I have been doing 4-5 sets bicep curls every 2nd day for almost 3 months to make this look better, but minor body modifications is as far as I intend to take it. =) Perhaps in the future with experience in upholstery foam I'd try making muscle arms, but I expect EVA would be cumbersome. I engineered the forearms for range of movement too; it's a personal choice.
 
Back
Top