Quick and Dirty ROTJ Saber Build

micheal1191

Active Member
Always been a fan of Obi Wan's ANH saber and after re-watching ROTJ I started to really look at Luke's saber which pays homage to Obi Wan's so I decided to build one on budget lol.
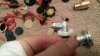
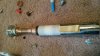
so I went to the hardware store and bought some parts
1/2 x 6 Chrome sink extension
Copper pipe fittings
bilge pump tube
1/2 shark-bite pvc

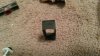
I also scrapped a bad hard drive for the motor taking the parts and stacking them to form the emitter

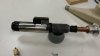
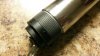
so here are the parts strewn about and starting to be fitted together
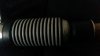
20140817_134933.jpg20140817_134856.jpg20140817_134942.jpg20140817_225820.jpg
 

Attachments

  • 20140817_134955.jpg
    20140817_134955.jpg
    2.1 MB · Views: 322
Looking forward to seeing this!

I got a bunch of hard drives from work (need an emmiter for a project) and after spending A LOT of time pulling one apart, it looked nothing like what I see here on the boards.

Any tips on the hard drive I should be looking for... the current eSATA (sp?) ones are no good.

I need an emmitor like YOU got going!

This one I believe was a SATA and take the whole thing apart to get to all the parts. I popped the actual drive motor out with a press down the center and took all the different rings apart and stacked them up into this configuration and then glued them together.
 
Think I fixed the pic issue in the next post.
 

Attachments

  • 20140817_134927.jpg
    20140817_134927.jpg
    2 MB · Views: 196
  • 20140817_134924.jpg
    20140817_134924.jpg
    2 MB · Views: 183
  • 20140817_134920.jpg
    20140817_134920.jpg
    2 MB · Views: 194
Last edited:
I basically knew where i wanted to go i just needed to get the parts to general sizing and figure out how to run electronics and wires. So I cut down the parts and started dry fitting.
uploadfromtaptalk1408821956422.jpg
uploadfromtaptalk1408821992259.jpg
I also started the activator switch which is one of two parts that weren't off the shelf.
I began by laser cutting the parts and making sure they fit the way I needed them to then started adding details.
uploadfromtaptalk1408822051158.jpg
uploadfromtaptalk1408822076104.jpg
uploadfromtaptalk1408822100274.jpg
uploadfromtaptalk1408822187668.jpg
uploadfromtaptalk1408822024148.jpg
uploadfromtaptalk1408822115775.jpg
 

Attachments

  • uploadfromtaptalk1408822147787.jpg
    uploadfromtaptalk1408822147787.jpg
    45.3 KB · Views: 179
Finally got the last post mostly sorted out.
Needed to do the upper grip so I started by spray painting the pump tube and sanding the high spots. And then printed a part to cover the gap between parts.
uploadfromtaptalk1408826629018.jpg
uploadfromtaptalk1408826585287.jpg

The next thing I had to do was make the pommel which originally I was going to use the flared part of the extension but I ended up finding sone greeblies. A 36 pin connector, re-breather valve and an old fuse.

uploadfromtaptalk1408826972285.jpg

Did some last bits of paint and soldering using a led flashlight that l got from lowes to that I took apart and crammed inside the saber.
uploadfromtaptalk1408827506184.jpg
And fished the assembly
uploadfromtaptalk1408827553293.jpg
uploadfromtaptalk1408827816620.jpg
uploadfromtaptalk1408827637120.jpg
 

Attachments

  • uploadfromtaptalk1408826543463.jpg
    uploadfromtaptalk1408826543463.jpg
    31.2 KB · Views: 174
  • uploadfromtaptalk1408826575030.jpg
    uploadfromtaptalk1408826575030.jpg
    56.7 KB · Views: 195
  • uploadfromtaptalk1408826849347.jpg
    uploadfromtaptalk1408826849347.jpg
    298.4 KB · Views: 180
  • uploadfromtaptalk1408827456545.jpg
    uploadfromtaptalk1408827456545.jpg
    46.2 KB · Views: 191
Thanks everyone. My last saber was built from mostly custom parts using a 3d printer and a laser cutter and with this one I wanted something that felt and looked like it could have been made for the movie uaing whatever was around.
Hopefully in the next week or so I will have a blade for it. Lol still need to post to pics of my other saber that has a blade come to think about it.
 
I had to laugh at just lying around part. Hands up if you have a 3d printer or something to laser cut just lying around lol. Any way loved seeing it whole project and please keep on posting your skills. Cheers.
 
I had to laugh at just lying around part. Hands up if you have a 3d printer or something to laser cut just lying around lol. Any way loved seeing it whole project and please keep on posting your skills. Cheers.
Lol I meant physical parts like sink tubes but I work at a fab lab kinda like a maker space and the equipment there is up for use with a membership. If you can find a fab lab near you or a tech shop go for it. And if you need something printed for cheaper than shape ways lemme know and we can set it up :)
 
Lol again, I live in rural France so the chances of there being a fab lab or even a drab lab are slim to null(which also means rubbish which it is lol) Thank you for your very kind offer though. I don't expect my other half to authorising anything like that say for the rest of this century! That said though and just for interest sake what would you charge for a total remake of this sabre factoring in your materials, time extra? Cheers.
 
Lol again, I live in rural France so the chances of there being a fab lab or even a drab lab are slim to null(which also means rubbish which it is lol) Thank you for your very kind offer though. I don't expect my other half to authorising anything like that say for the rest of this century! That said though and just for interest sake what would you charge for a total remake of this sabre factoring in your materials, time extra? Cheers.
Pm and we can work out something out if you would like one like this or a lil different if you want.
 
Indeed quick and dirty saber build . . . . just out of curiosity how long is the total lenght?

From my point of view I feel that the neckpart onto the 'grenade' section is a bit to long,
and may require some slight adjustments . . . that is if you feel the same way, of course.

Chaim
 
Hi Gang,

I had the pleasure of seeing and holding the saber up close - EXCELLENT job! He knocked this one out of the ballpark!
 
Indeed quick and dirty saber build . . . . just out of curiosity how long is the total lenght?

From my point of view I feel that the neckpart onto the 'grenade' section is a bit to long,
and may require some slight adjustments . . . that is if you feel the same way, of course.

Chaim

if I remember right off hand I want to say right around 13 in(its about one inch longer than the Graflex used in ANH) and i think that some of the stepping features on the real saber also play with the perspective length by breaking it into smaller sections, but the way I fitted the parts it is entirely possible it is a little long lol.

- - - Updated - - -

Hi Gang,

I had the pleasure of seeing and holding the saber up close - EXCELLENT job! He knocked this one out of the ballpark!

Thank you and Falcon building my future I see :)
 
Decided to add another greeblie a simulated clip. I made it by rounding over a piece of an aluminum kick plate over a pipe.
20140825_193024.jpg
uploadfromtaptalk1409020869293.jpg
Tomorrow I will be adding rivets on the edges by the buttons and the center plate to mount it.
 

Attachments

  • uploadfromtaptalk1409020826879.jpg
    uploadfromtaptalk1409020826879.jpg
    25.5 KB · Views: 159
Last edited:
Back
Top