Orca from JAWS

I highlighted the curve in the flybridge roof which is also present in the windows and the wall of the wheelhouse. It looks more extreme in this screenshot than it really was but it is significant especially when building the model. The line almost follows the hull but the hull at its widest point, flares out and way from the windows, forward towards the bow. Fairly typical of Novi boats from the time.
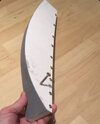
Lucy, You've got a lot of explaining to do.........
I understand what you're saying, but someone that doesn't understand boats, Or A Novi.......Ya lost them.
explaining better how the roof, forward deck, and stern have a curve to them might be better.
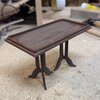
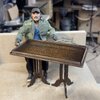
I can't wait to see your cabin, I ordered the wood for mine, says it's been shipped.
 
One of six legs in progress. Chamfering the lead edge, both sides, as per the original.
 

Attachments

  • D62A36F2-B4EB-4951-8E8C-EF402F352308.jpeg
    D62A36F2-B4EB-4951-8E8C-EF402F352308.jpeg
    544.8 KB · Views: 113
Table done. Ebonized the veneer then I’ll lighten it tomorrow and give it a good burnishing and then varnish it. I love picking up on the details easily missed but really sell the scale of it. In this instance, the tabletop was ply with 3 boards laminated on top. So I did the same thing by finishing off the top of the table with 3 pieces of veneer I had lying around. After chatting to the carpenter who built a lot of the Orca 2 and this table, I managed to confirm a couple of bits I wasn’t sure about but I’m tempted to make a replica table full size too for the workshop :D
 

Attachments

  • 1D83F07E-D43A-4421-8F3F-A511E671FB86.jpeg
    1D83F07E-D43A-4421-8F3F-A511E671FB86.jpeg
    2.6 MB · Views: 125
  • 7414A933-C350-4A0A-9BC7-D88A32620775.jpeg
    7414A933-C350-4A0A-9BC7-D88A32620775.jpeg
    738.8 KB · Views: 126
  • 445DF1F1-B3C1-4057-85DC-AA61AB38C8EC.jpeg
    445DF1F1-B3C1-4057-85DC-AA61AB38C8EC.jpeg
    692 KB · Views: 125
3 coats of varnish, wire wool and wax later.
 

Attachments

  • F4EAC8B5-200D-4764-A477-1CAD1CA33916.jpeg
    F4EAC8B5-200D-4764-A477-1CAD1CA33916.jpeg
    3.7 MB · Views: 143
  • E14C31C8-5E23-437C-B28B-8597707EAC25.jpeg
    E14C31C8-5E23-437C-B28B-8597707EAC25.jpeg
    7.3 MB · Views: 121
  • E129C813-18AB-42C1-AF8E-69571C483E6F.jpeg
    E129C813-18AB-42C1-AF8E-69571C483E6F.jpeg
    3.5 MB · Views: 130
Last edited:
I filled them in the end. For the most part, as you reduce scale, imperfections like that disappear so to sell the scale better I have to do my best to minimise any giveaways. I also have to sell the time period so these barrels would be brand new. I will scuff them up though when I’ve cast them up. Came out ok in the end
Yeah there is a balancing act when doing detail in miniature.Its easy to go overboard.Been guilty of that myself. Oh and your table looks fantastic.
 
Yeah there is a balancing act when doing detail in miniature.Its easy to go overboard.Been guilty of that myself. Oh and your table looks fantastic.
Thanks! i always think that anything is salvageable and do-overs always take less time than the first thankfully. Yeah certain things give away scale so I try to make things as clean as possible when it comes to lines, edges and form. The harder the edges, the better. Texture goes out the window at scale. No point in trying to preserve too much of the wood grain texture on this as grain can be a scale killer too so a really tight close grain veneer would’ve been better for this. Sapele or similar.
The finishing of this piece took me longer than normal because the grain of the mahogany veneers was pretty persistent, even after 3 coats of lacquer, sanding in between, it’s still visible. Ideally the grain should only be visible in colour, not texture. So I finished it off by applying wax with super fine wire wool which fills in a lot of the smaller grain lines whilst smoothing out the surfaces and burnishing it.
The tabletop isn’t as flat as I want it and I’ll probably give it another round of wire wool to get rid of the grain completely.
 
Great work all in all. As for the grain; one of my friend used to photocopy wood grain wall paper, reduce it to scale on a piece of paper and color it afterward + varnish. There you go: in scale;)
 
Great work all in all. As for the grain; one of my friend used to photocopy wood grain wall paper, reduce it to scale on a piece of paper and color it afterward + varnish. There you go
Thanks so much! Yeah that’s a great idea for scaling wood grain! I’ll have to remember that for next time
 
Thanks! i always think that anything is salvageable and do-overs always take less time than the first thankfully. Yeah certain things give away scale so I try to make things as clean as possible when it comes to lines, edges and form. The harder the edges, the better. Texture goes out the window at scale. No point in trying to preserve too much of the wood grain texture on this as grain can be a scale killer too so a really tight close grain veneer would’ve been better for this. Sapele or similar.
The finishing of this piece took me longer than normal because the grain of the mahogany veneers was pretty persistent, even after 3 coats of lacquer, sanding in between, it’s still visible. Ideally the grain should only be visible in colour, not texture. So I finished it off by applying wax with super fine wire wool which fills in a lot of the smaller grain lines whilst smoothing out the surfaces and burnishing it.
The tabletop isn’t as flat as I want it and I’ll probably give it another round of wire wool to get rid of the grain completely.
I havnt built an Orca in like 4 years.But all this talk of scale and wood grains is bringing back my anxieties..lol
 
Looks like the media wont lend to creating molds for casting into a kit. Any chance of a kit?? Thinkin' not, but I still need to ask. Finger's crossed.
Oooorrrrr, might someone know of a decent kit available. No need for the 8" Neca Scale. The mantle would look incredible with the Orca gracing it. I have a replica Bruce that is about 3' long and just a touch too large for the Neca scale, but Quint and Hooper (drives the boat. chief) still look great with him.
 
I better get back to this project then eh? Stripped the profile back to chamfer the bow as per the Warlock. Then I shaped some laminated plywood I profiled from my half-hull model of the orca for the first layer of planks. I’ll put the bulkhead profiles back on after I’ve hole-sawed some of the side profile away. Lots to do but I have to make up for lost time on the Orca
 

Attachments

  • IMG_7353.jpeg
    IMG_7353.jpeg
    104.3 KB · Views: 87
  • IMG_7346.jpeg
    IMG_7346.jpeg
    2.1 MB · Views: 92
  • IMG_7349.jpeg
    IMG_7349.jpeg
    1.7 MB · Views: 90
  • IMG_7348.jpeg
    IMG_7348.jpeg
    1.4 MB · Views: 98
To quench my need to be further ahead than I am, I made the life rings for the sides of the flybridge.
 

Attachments

  • IMG_7267.mov
    39.1 MB
here’s something I didn’t share before. This is a 1/24 scale half-hull model I made using photos of the Orca in dry dock. It’s quite typical of a novi. I carved the model in high density foam (they’re usually made in wood) using the the side elevation of my plans and top view plan as guides. After chatting with some boat builders in Nova Scotia via emailing back and forth, exchanging photos of the Warlock and the Orca during its construction, it gave me a pretty good understanding of hull shape. I then used the photos of the Orca in transit to USH to create the forms. Then cut the hull up into sections and scanned the profiles to create a CAD versions that I’d later laser cut to shape. The next step is filing the bulkhead profiles down either towards the bow or towards the stern, depending, to lay up the first layer of planks.
 

Attachments

  • IMG_7355.jpeg
    IMG_7355.jpeg
    727.7 KB · Views: 98
  • IMG_7364.jpeg
    IMG_7364.jpeg
    1.8 MB · Views: 90
  • IMG_7365.jpeg
    IMG_7365.jpeg
    1.6 MB · Views: 94
  • IMG_7363.jpeg
    IMG_7363.jpeg
    2 MB · Views: 98
The original Orcas prop was 24”. This was gifted to Spielberg when the Orca was placed in USH Singapore lake, now JAWS lake. Here it is in situ post production when the Orca was bought and used on the west coast as a pleasure cruiser before being sold back to Universal. Note the rudder chain for details.
 

Attachments

  • IMG_3645.jpeg
    IMG_3645.jpeg
    39 KB · Views: 88
  • IMG_6295.jpeg
    IMG_6295.jpeg
    395.6 KB · Views: 94
Back
Top