Well, I'm finally done with my most recent endeavor. As I stated previously in the thread, this whip is an 8', 16-plait, Aussie-style (12" handle) bullwhip.
However, I modified my plans for the build, so that this piece differs from the tutorial a bit. First of all, instead of just binding the core-strands to the end of the spike (which seems like a potential weak spot to me), I grooved the entire length of the spike, & cut 4 notches into the head of the spike (with the Dremel):


...then where one would normally have bound the core-strands to the spike, I lengthened them, turning the 4 core strands into 2 core-strands that criss-cross over the end of the spike. So, what I have is: 1 strand of 9', with 1 end loaded with 3' of ball-chain, & the other end loaded with 4' of ball-chain. The 2 empty feet in the middle extend up 1 side of the handle & down the other. The other strand is a 12' section with 1 end loaded with 2' of ball-chain, the other end with 8' of the original 7-strand nylon innards (the 2 empty middle feet, up-&-over like the other one). Then I bound the cord to the entire length of the handle:


After this, I followed the tutorial for a time, finishing up the core, the 1st 8-plait belly, & the 2nd 12-plait belly:


Then, for the 16-plait overlay, I deviated from the tutorial again, making the handle into a U1O1 diamond plait, then switching to the U4O4 pattern for the thong:


At this point, I thought I'd try something else new. Ever since bwc put up this tutorial, I've been looking at various whipmaker's websites. One guy I'm now a pretty big fan of, is
Bernie Wojcicki from Tasmania. I've been staring at his
bullwhip gallery for several weeks now (btw, he also has a bunch of VERY informative videos on
youtube), & he sometimes adds a decorative ring at tip of the handles. Since I don't have access to a machine shop right now, I thought I'd try something similar, yet different. I went to Lowes & purchased an irrigation fitting made of ABS plastic:

...& got to work with the Dremel. I wanted to carve out a design that would look like a dragon's tail (since a dragon's tail is long, whip-like, & also capable of wreaking havoc). Afterwards, I dry-brushed on some red acrylic paint, & then sealed it with some Future floor polish:


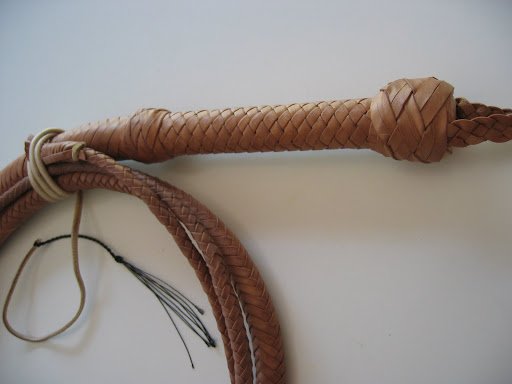
I sandwiched the ring between 2 Turk's Head knots (which also hides the plaiting transition). The heel knot was done using 4 "passes" instead of 3 as in the tutorial (because of the 4th pass, I don't know if it would still called a "5-part, 4-bight" knot though. bwc?)
Anyway, I'm WAY happier with my 2nd attempt. My strand drops are invisible on this whip, where on my 1st one, I can find every single one of them. And sorry if I was long-winded, but I've spent so much time on this, that I wanted to crow about it a little bit (as well as pre-emptively answer any questions, should there be any) So without further delay, Voila:

And some detail pix:


Thanks for looking, & thanks again bullwhipcracker for the learnin'.

")