Nike Mag V2 Mod Discussion (Page 58 Shopping List)

Status
Not open for further replies.
Awesome man, you'e got me all excited about my shoes again. These two parts are definitely going to up the accuracy big time :)

For a time, all bets were placed on cloneprops making these parts. He is not, so I will. Molding and casting is something I am (enjoying) learning as I go. I wish I had learned how to do this years ago. Man, I think about all the cool stuff I could have made myself.

The video is up.
 
Last edited by a moderator:
@cavx the heel part is almost symmetrical but the slope on the inside of the heel rounds out and the outside (near the bubble) is slightly flatter but just barely.

image.jpegimage.jpegimage.jpeg
 
does any one know how to achieve that accurate midsole grey ? Jedifyfe I saw an old post on your instagram showing the replicas you did with the painted mid sole compared with the RD what paint did you use ?
 
Last edited by a moderator:
@cavx the heel part is almost symmetrical but the slope on the inside of the heel rounds out and the outside (near the bubble) is slightly flatter but just barely.

View attachment 615184View attachment 615183View attachment 615182


Excellent pics.
How do you think they made these original shapes back in 1989?
It seems like they made some quite complicated shapes back then, in particular the white ankle piece. They seem to have curves and all sorts of smooth shapes that are quite brilliant in their design.
No wonder it still looks good today.
80s futuristic design still looks futuristic!
 
:eek does mean a new midsole=new clears to go with it ?is it gonna be like jewan's midsole ?

It will be close. At this stage, I am working with the V2 parts for the soles simply due to the cost of making complete new parts. But as I have to make new side wings, in time I will make new sole bases as well and of course, make sure the mid-sole works with these new parts. For right now, the upgrade-able parts are outer soles, heel cups/bubbles and ankle buckles, so that is what I am concentrating on right now. Everything needs to fit the V2 because that is what we all have.

Break down.

Ankle buckle will be the same size (just more details on the back) as the V2 part.

Heel Cup will be a modded V2 part. The bubble technically should be increased slightly as I have molds now for a modded V2 sized bubble. The letters are full sized and over all shape just needs some trimming.

Outer-sole - modded V2 to fit V2. Will be upgraded in the future.

Mid-sole - WIP based on modded V1 soles due to the more screen accurate shape.
 
And first de-mold this morning.

attachment.php


Rigid master part on the left, flexible cast part on the right.

It is very flexible but the mold does need a bit work because some of the rubber leaked out and made the wall really thin in places. Over all, very good though. About 90% there.

I will fix the mold issue today and hopefully by this afternoon, can run test #2.
 

Attachments

  • 20160416_093153.jpg
    20160416_093153.jpg
    67.9 KB · Views: 470
Hi guys quick qustion.
The red light on the wall charger should turn off when the battery is fully charged with this set up and battery correct or do i just guess when it should be done.
8635830001_cfe4d848cb_k.jpg
 
Hi guys quick qustion.
The red light on the wall charger should turn off when the battery is fully charged with this set up and battery correct or do i just guess when it should be done.


Looks like the exact same charger I have. The light will turn green when it's done. Usually takes about 4 hours for those 9 volt batteries.
Be careful with turning on the shoe lights while plugged into the charger. I read somewhere in this thread a long time ago that the 10+ volt output of the charger can fry the EL inverter or something. Not sure if it's true, but thought I'd mention it.
 
After cutting out the strap slots with a scalpel, the rubber just feels too soft to take the strap tension, so I am using a harder plastic to make a tester to see if that will be better.
I am also considering scrapping this mold, pushing the parts I have made out flat and re-molding from there. Will know in a few hours time I guess.
 
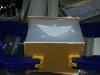
I have had a win! So I cast a buckle in clear so I could see through it and find the problem points. From there I took scalpel to the mold and made from crude mods. I then cast a new buckle in a harder plastic which I also pigmented white. This plastic remains flexible for about 24 hours, so I have been able to open it up a bit as the master part is a bit too small to fit my ankle. I also took advantage of the softer form time to do the rough trims. After this sets up and reaches full hardness, I can trim it with the dremil.

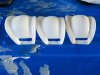
As for the mold, so I don't have to trim each cast part, I will mod the master, cut out more silicone from the mold, re-insert the master and fill in the gaps with more silicone. As silicone only sticks to itself, it will bond to the existing mold. I will have use a release agent between the two halves.

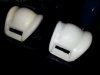
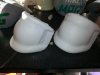
I also modded the molds for the bubbles, so tomorrow can hopefully de-mold my first pair of bubble free parts.
 
And here are the two new parts after all the flashing has been removed. The part on the right is the master part and the other two are the clones.

attachment.php


I am glad I removed most of the flash whilst they were still soft. Now that they have set, they are pretty hard. As I said in my video, I don't think it is important for these to be soft. The strap and buckle are part of the support. The new heel cups will have to be soft to allow flex when you walk.
 

Attachments

  • 13015143_10154137189613841_2313808728588361744_n.jpg
    13015143_10154137189613841_2313808728588361744_n.jpg
    42.3 KB · Views: 375
Status
Not open for further replies.
Back
Top