Nike Mag V2 Mod Discussion (Page 58 Shopping List)

Status
Not open for further replies.
is this gonna be for the v2 ? or v1 ? and is it gonna have the elliptical shape on the inner wings like the RD ?

If I don't have to make new clear sole parts, I won't, but yeah those parts need to be smaller than the current V2 wings.

Not sure about the 8s and 11s at this time, but the 10s are for a custom build for me. I just figured that since I have the parts, might as well do them all.

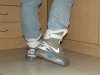
The inner "wave" of the V1 is much closer to the RD MAG and you will notice I have already cut down the backs. After the side hollow is all filled and sanded, these will look much close to the RD than the V2 does.

Initially I was going to build up the toe, but as it turns out (based on what I have done so far) it is easier to build the mid-sole down. So hopefully I get some more done on these tomorrow.
 
Cool. That's way more effort than I'm currently going to for replacing the rubber on one of my pairs of V1's. Darn, my iPod battery is flat so I can't take a photo right now.
 
Cool. That's way more effort than I'm currently going to for replacing the rubber on one of my pairs of V1's. Darn, my iPod battery is flat so I can't take a photo right now.

I actually think the MP MAGs and these (apart from the dip I have just filled) have an overall better shape, so if I am to throw Silicone and Polyurethane at this, I want something worth molding and casting.
 
So as it turns out, those rigid sole parts I made were medium, not small and why they look oversized on those US8 soles.

Here is them on US10.
attachment.php


To make recesses on the base of the sole, I pressed the sole parts into some Plasticine, made a small wall, gave them a good spray with release agent and then poured the resin. When I demolded, I now had interlocking parts for both left and right. Some of the tread got contaminated, but that fine because these sole parts are throw aways once this is done. There is still a heap of build up to do around the edges, but I am now out of resin, so probably no updates for a while.

The trims are glued in place allowing the soles to be removed
attachment.php
 

Attachments

  • 20160406_163308.jpg
    20160406_163308.jpg
    166.6 KB · Views: 520
  • 20160406_163336.jpg
    20160406_163336.jpg
    204.4 KB · Views: 516
Cool. I finally got around to taking a few photos of the new soles I put on the V1's. Not quite finished yet but close. I was able to get a slight outrigger effect too. :)
wow lets try that again i just got pages of random letters instead of the images i tried to upload

IMG_2343.JPG
IMG_2346.JPG
IMG_2347.JPG
 
Last edited:
Did you just glue the pyramid mat to the shoe?

The black with black sole looks way better than black with yellow or red.
 
I like it in all black & White ! You should put some holes to insert some D shape lights or GITD from cavx ;)
I'd like to get some V1 but can't find it anywhere :(
 
Yep, did just cut and glue the pyramid mat to the midsole. Always wanted a monochrome version. The yellow rubber on these had worn down so I replaced them. Just a 'cut with scissors, grind the edges until right' mod (and repaint the MAG letters on the back)
I am trying to save up for another pair of V2 for the new GITD I already got from Cavx
:)
 
The black with the white looks much better than the white shoes with the black soles I had.

Pictures ? :)
DragonGalvy : can you shoot me some closeups of the upper part (in and out and back) without the strap so I can study how this V1 is made :)
 
Last edited by a moderator:
Pictures ? :)
@DragonGalvy : can you shoot me some closeups of the upper part (in and out and back) without the strap so I can study how this V1 is made :)

Sure. Here you go.

1st image is how they came out of the box.
2nd image is after I painted them grey. I could only get this or darker shade at the time. I now have a really nice light grey. I also added reflective tape SWOOSHs.
3rd image my first attempt at adding clears and faking the EL by way of reflective tape.

attachment.php

attachment.php

attachment.php
 

Attachments

  • Stage 1 Original Shoe.jpg
    Stage 1 Original Shoe.jpg
    185.6 KB · Views: 502
  • Stage 2 painted.jpg
    Stage 2 painted.jpg
    228.3 KB · Views: 496
  • Stage 3 adding clear soles.jpg
    Stage 3 adding clear soles.jpg
    136.8 KB · Views: 489
thanks for the pics, I prefer the second version (but it would be better with your clear midsoles)
 
thanks for the pics, I prefer the second version (but it would be better with your clear midsoles)

For just a comfy kick around pair, I would just do the light grey version of the paint and white out the SWOOSH. Those stickers were not cheap at the time. Now I (bought for my wife) have a scan and cut, I'd be able to do my own. Which I should do anyway to make up a SWOOSH kit to go with my NIKE MAG letter decal kits.

The problem with the V1 soles is that they wear out really fast. They were good for the first 3 months and then by month 4 were worn bad.

They are assembled way better than the V2s as well. With a bit of heat, you will get the V2 opened up quite easy. Not so with the V1. And the way the upper is made is completely different as well. Much better construction on these and no stupid pink cardboard. They use a sew cloth piece underneath on the inside.
 
My new parts are clayed up and ready for silicone. I won't pour until Monday now as I have Con over the weekend and want daylight to do the pour so I can make sure I have every last bit of clay off that master before the pour and to make sure I get all the bubbles out.
 
For just a comfy kick around pair, I would just do the light grey version of the paint and white out the SWOOSH. Those stickers were not cheap at the time. Now I (bought for my wife) have a scan and cut, I'd be able to do my own. Which I should do anyway to make up a SWOOSH kit to go with my NIKE MAG letter decal kits.

The problem with the V1 soles is that they wear out really fast. They were good for the first 3 months and then by month 4 were worn bad.

They are assembled way better than the V2s as well. With a bit of heat, you will get the V2 opened up quite easy. Not so with the V1. And the way the upper is made is completely different as well. Much better construction on these and no stupid pink cardboard. They use a sew cloth piece underneath on the inside.

you mean like these? :D
And RVLF, here's some shots of the collar without the strap (but the dots of hook-and-loop are my addition to hold the strap where I want it)
(the triangle on the 'led area' for these is because I got this pair with two right heel cups haha)
IMG_2391.JPG
IMG_2393.JPG
IMG_2394.JPG
IMG_2395.JPG
 
Last edited by a moderator:
yep the silver pair with 'gumsole' colour rubber. There's still a lot of sneakers being made deliberately gumsole, unfortunately.
 
thanks for the pictures, It is a great amount of information to me :)
What is the triangle where the "led bubble" is supposed to be ?
 
I painted them grey - the silver was very bright. Would have preferred to get rid of the texture as well but that was too much effort. :D The triangle is just a cover I put on the shoes, because the left shoe has a heel cup from a right shoe, and the led bubble thing is then on the inside of the shoe. So I just put triangles on both sides where the led bubble thing is to cover that it was wrong.
 
Status
Not open for further replies.
Back
Top