Nike Mag V2 Mod Discussion (Page 58 Shopping List)

Status
Not open for further replies.
The way I understand it is if I don't then I don't get a refund. Plus they wernt even the right size.
 
That sucks. It is not like the shoes (V2 and sport) are even the same price, so no excuse to get the order wrong.
 
They messaged me this morning and said they had the logo version but they were $245. So after telling me they were v2s and then sending me the wrong sized sport version they then say they are more money?!
 

Attachments

  • image.jpg
    image.jpg
    131.3 KB · Views: 100
  • image.jpg
    image.jpg
    136.9 KB · Views: 97
V2s have always been between $235 and $250 (still over priced by about $100, but that is the price they have been since their launch in early 2013) with some shops selling these for $350+. When they first were announced, they were listed at $109 and when you placed your order, you got an email stating "you send more money and we send your shoes". I just got a refund the first time. The price didn't drop, so about July 2013, I sucked it up and paid the $250USD and ended buying 3 pair, each at that price.
 
And possibly the worst tasting coffee I have ever had.

And for just 1 extra Yuan, I could have got a big bowl of noodles. Go figure.


So you sent them back? I am sure at some point a pair of 10s or 11s will reach me soon.

Cavx, do you need just the soles or both the sole and midsole to make the clears?


Sent from my iPhone using Tapatalk
 
Anyone ever have their first pair of mags blocked by customs but had them reshipped by the seller and recieved them?
 
Anyone ever have their first pair of mags blocked by customs but had them reshipped by the seller and recieved them?

No but customs can be random. They have so many parcels to check and quite often shoes and other items just slip right through.
 
No but customs can be random. They have so many parcels to check and quite often shoes and other items just slip right through.


I will ive them 14 day to get to me, if they are not here by then i will open a dispute and request my money back and just order the HC version. Does anyone know where i can find the nike check and air mag letters for the HC version?
 
I will ive them 14 day to get to me, if they are not here by then i will open a dispute and request my money back and just order the HC version. Does anyone know where i can find the nike check and air mag letters for the HC version?

Member markpoon is the member you need to contact for decal kits for the shoes.
 
Last edited by a moderator:
hi Djc8437,

PM me if you're interested in our decal set, thanks.

I will ive them 14 day to get to me, if they are not here by then i will open a dispute and request my money back and just order the HC version. Does anyone know where i can find the nike check and air mag letters for the HC version?
 
Decided to do the toe slim mod before I start fishing all the wires through the shoe....Didnt want to risk burning out some of the new electronics with the heat from the hair dryer.....Is there any particular trick to this. I watched the tutorial videos and everyone seems to have already got the toe portion of the upper already separated from the mid sole. Im working at it with a hair dryer and butter knife. I get like 2 or 3 areas where I got the fabric to separate from the mid sole but no matter how much heat and pryI cant get these areas to expand. At most Im getting about a quater of an inch downward and side to side seperation. I cant get all the way to the bottom of the mid sole and I cant expand the the "hole" from around the length of the toe area. Im not sure if my hair dryer is hot enough. I was having the same trouble with the heal cup getting that to separate from the fabric. I mean If I stick my hand in front of the hair dryer I have to pull my hand away and I've been letting the hair dryer sit facing the shoe on full blast for a few minutes and nothing seems to make a difference. Been working at it for about 3-4 hours and I'm barely have anything to show for it
 
@chuck2003, using your heat gun, start with the wings of the heel cup and once they come away, work your way to the sole. If you can get the whole heel cup off, it is easier to re-wire the shoe as you will have access to the bottom port hole as well as the top one. Where are you putting your battery?

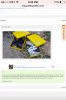
With the last pair I did, I left the upper attached to one side (I choose the lights side) and lifted the upper completely off the rest of the sole. So basically from the front rib right around to the back rib leaving just that section attached.

Once you can access the base of the toe, gently peel the cloth away from the pink card board. DO NOT tear this away. You NEED it to reform the toe. ONLY peel the toe leaving the rest of the under wrap still attached to the pink card.

Unpick the stitching on the toe ONLY and then carefully peel open the layers. You may need a bit of heat to soften the toe box. Once you have that opened up, you can cut the toe box out leaving the top and base layer.

You then tuck the tow layers over the edge of the pink card and glue it back in place. START at the part that is still bonded to the sole so you don't get a wrinkle.

You can pack a nice bead in under the upper, then after that has set, go back and fill in the seam. Do it in stages. Take you time.

My video showing what NOT to do is up on YouTube now.

Since this video was uploaded, I have pulled apart my US8s again to correct them. They are still not perfect, but way better than they look inn this video. I will make another update soon as I get closer to fitting the soles.
 
Last edited by a moderator:
I was researching about gluing and laminating under vacuum and saw a few really interesting videos.

So whilst playing around with some left over urethane that I pigmented light grey, I noticed how tacky (as in adhesive) it can be. I have coated the mid-soles of my US8 pair in the grey like I did to my US9.5s. What I want to do now is see if I can use this stuff to attach the soles. The urethane will bond to urethane and it bonds to the rubber of the mid-sole. The way I want to do this is mix a batch, double degass it to make it thick, apply it to the sole base and then place the entire shoe in a vacuum bag (like those used to store blankets etc).

When you glue and clamp two parts, the strongest point of contact is the point where the clamp is. With a vacuum bag you get 100% contact on the entire part being glued. There is not enough suction here to form bubbles like the degassing process because a vacuum cleaner can only pull about 6"Hg Vs my degassing system that pulls 30"Hg. I am hoping this will provide a better more uniform way to bond these soles. Given just about everyone has a vacuum cleaner, buying a vacuum bag for a project like this should not be that hard. Even with traditional glues, the process should give much better results than open air gluing. And this might also be useful for bonding the upper back down as well.

Thoughts?
 
Has anyone built a replica of the box the official nike mags came in?


Sent from my iPhone using Tapatalk
 
Has anyone built a replica of the box the official nike mags came in?


Sent from my iPhone using Tapatalk

I have a thread on it but no one ever completed one. I personally would want the black box that the friends and family pairs came in. Fits much better to how they came in the movie. Here are the dimensions.
40.3 cm length
45.5 cm width
15.3 cm high with out lid
15.7 cm high with lid
.4 cm thick lid
flap 8 cm overhang

Pm sent with a few questions for ya


Sent from my iPhone using Tapatalk
 
Has anyone built a replica of the box the official nike mags came in?


Sent from my iPhone using Tapatalk
I made a box, but never skinned it in the yellow paper. I even had a magnetic flap. I recently tore it apart to use the illustrator board for another project, but honestly, a box should only take about 2 hours TOPS to make. Once I have time to work on my Mag Mods, I'll likely tackle the box again too.

Add in the instruction booklet file I made (it's in the paper props section) and you can have a damn good replica of the RD box and packaging.

If you go for it, let us know how it goes.

-Nick
 
Status
Not open for further replies.
Back
Top