You are using an out of date browser. It may not display this or other websites correctly.
You should upgrade or use an alternative browser.
You should upgrade or use an alternative browser.
Nike Mag V2 Mod Discussion (Page 58 Shopping List)
- Thread starter Taff83
- Start date
-
- Tags
- back to the future
- Status
- Not open for further replies.
cavx
Master Member
use the correct 9v inverter with a 9v battery.
Ok so im starting to get ready for wiring and I was messing around with my el pannels I bought. The pannel I bought came with this huge 12v inverter. Im planning to do a 9v setup ( i basically bought everything off the shopping list except for the el since the link was old). I connected the el pannel to my 9v inverter and put a 9v battery on it and it did not light up. However when I tried it with the 12v inverter it lit up. So would I have to buy an el pannel specifically for a 9v setup ? Sorry for the noob electronics question
This is the el pannel I bought http://www.adafruit.com/products/414
I probably should use 9V, but I got a steal in small 12V inverters which were slightly smaller than the 9Vs I could get.
So that was my issue. The small 3V inverters appear to have failed. They work, but they just don't output enough power to light the sheet properly.
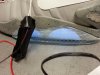
So even though the inverter is rated at 12V, it bench tested fine right down to 2.7V. We connected the shoe to a variable power generator that displays volts, amps and even the resistance. Because it variable, I could wind it up or down and see the effects in real time. At 9V, the EL is very stable, so chuck2003, yoiu should be fine.
3V interter @ 3V input
12V inverter @ 9V input]
I also measured the light through the soles and difference with my colorimeter shows it drop from 5FL with 9V and 12V inverter to below 1FL with 3V and the 3V inverter.
As for the colour of the light, the correct colour is CYAN which would measure at Red:0% Green:100% Blue:100%
This panel measured Red:0% Green:100% Blue:180% so almost twice as much blue as there is green. Some of the blue push can be biased by the colour of the soles the light is passing through.
I will remeasure an open to air full sheet later.
Attachments
Last edited by a moderator:
MrSouthpaw
Sr Member
Hey, Everyone.
Tomorrow Worldcon/Sasquan starts. Huge international sci-fi convention.
I'd just like to thank everyone who has contributed their knowledge and experience in helping me get my HC Mags prepped and ready as well as I could in the time I had. I know it's not V2s, but this seems the logical topic to address everyone all at once.
I hope here in the coming year I can get my hands on more accurate "base" shoes and really make a nice pair of Mags for conventions.
Once again, Thank you everyone. I couldn't get them done without you.
cavx
Master Member
MrSouthpaw I am sure I speak for everyone here, so your welcome. I know I have learned so much just hanging out in this thread.
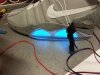
I got both shoes re-wired except the LEDs.

The wiring is much neater too now and the larger 12V inverter now lives inside the buckle. Battery is in the mod-sole.
Even outside, these are bright.

I will run these for a few hours to see how they hold up.
I got both shoes re-wired except the LEDs.
The wiring is much neater too now and the larger 12V inverter now lives inside the buckle. Battery is in the mod-sole.
Even outside, these are bright.
I will run these for a few hours to see how they hold up.
Last edited by a moderator:
")
cavx
Master Member
So we all love this sequence and I am sure some of us watched it frame by frame once decent video like the Blu-ray was released.
A fair while a ago I posted this video.
In the film, the lights don't come on until the laces tighten down and that was my idea to re-locate a pressure switch under the strap.
And here is version 2.
A fair while a ago I posted this video.
In the film, the lights don't come on until the laces tighten down and that was my idea to re-locate a pressure switch under the strap.
And here is version 2.
Last edited by a moderator:
That's really cool. I actually want to do that now lol. Do you have a link to the switch to buy?So we all love this sequence and I am sure some of us watched it frame by frame once decent video like the Blu-ray was released.
https://www.youtube.com/watch?v=liI1E_ZZV5w
A fair while a ago I posted this video.
https://www.youtube.com/watch?v=Gh3dCkicYgE
In the film, the lights don't come on until the laces tighten down and that was my idea to re-locate a pressure switch under the strap.
And here is version 2.
https://www.youtube.com/watch?v=pPL4YD_QvZU
cavx
Master Member
That's really cool. I actually want to do that now lol. Do you have a link to the switch to buy?
Thanks. Yeah I like it too. I will upgrading to EL with this switch on my own pair for certain now.
The switch is a small "momentary" switch. It is basically a pressure switch. When pressure is applied, it closes the contacts completing the circuit and the lights come on. As soon as the pressure is taken off, the contacts release and break the circuit and the lights go out.
I don't have a link on hand, but everyone one of us that bought these shoes have a pair of these switches :cool
If yours broke off and you lost them, they cost $0.99 each at any good electronics store.
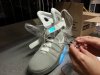
They are the ones that came on the shoes! Once I discovered they were not an open/close push button type (standards on/off type), I immediately looked for a way to mount these. I have used a small rectangle of that mesh (yeah the same stuff I keep making MAG shells out of) that I super-glued to the cloth. I burned a small hole in the mesh with my solder iron so the button on the switch would poke through and keep the switch facing the right direction. I need to bind the wires and finish the lights in the bubble and these are done.
Last edited:
I could also see flexing a problem. Wonder if you could make a magnetic connection? Put one magnet in the part of the strap that's against the shoe and another in the flap that tightens to the shoe. I don't believe magnets are conductive but there must be a way to do it as my surface tablet uses a magnetic power connector.
Sent from my iPhone using Tapatalk
Sent from my iPhone using Tapatalk
cavx
Master Member
That's neat but I would think that when you walk around and the upper flexes, you may find the lights turning off and on all the time.
When I first set them up, the switch would twist. Now the little button is poking through a hole, it does not move. So long as the strap is tight, you should not have an a problem. It doen't need a lot of pressure, but it will require that velcro back in place for those that removed it from their straps.
I could also see flexing a problem. Wonder if you could make a magnetic connection? Put one magnet in the part of the strap that's against the shoe and another in the flap that tightens to the shoe. I don't believe magnets are conductive but there must be a way to do it as my surface tablet uses a magnetic power connector.
Sent from my iPhone using Tapatalk
Magnets are made from metal so they should conduct. The only post thought about this is maybe a small bit of plastic behind the switch to make sure it has a "hard" surface to press against. You would not feel it thanks to the padding in the collar. I have pressed the switch many times and it has not failed and why I decided to capture a video about this.
DragonGalvy
Sr Member
When my factory lights were still working, I was able to get my switches to stay in a position pointing out to the buckle, by using hot melt glue around the base of the switch. It sticks to the cloth, sets relatively hard and prevented the wires breaking off at the switch end.
Then, while I was wearing them, I just had to press on the back of the buckle, and they would turn on.
Worked quite well until the wires failed somewhere under the sole or something. I got a pretty good run out of mine though, so can't complain.
Then, while I was wearing them, I just had to press on the back of the buckle, and they would turn on.
Worked quite well until the wires failed somewhere under the sole or something. I got a pretty good run out of mine though, so can't complain.
KingKolton9
New Member
RepHot has them for US $50. They are OK for every day kicks I guess.
I went to rephot and they did have them, but they don't accept credit or debit cards. Only money wires and orders. :unsure
cavx
Master Member
I went to rephot and they did have them, but they don't accept credit or debit cards. Only money wires and orders. :unsure
A lot of these Chinese suppliers only take Western Union etc for payment.
cavx
Master Member
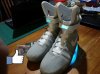
I have made a start on the US8 clear soles.
Here is a quick look at the master parts. They still need a bit of work.


I am doing these a little different to the US13s (which I will pull part and copy this method) to ensure a better fit and capture more detail on the seam at the bottom. The outrigger is slightly reduced, but the heel is actually pushed out a bit more to (hopefully) replicate the sole of the real shoe. I am hoping to capture that hollow on the side as well that I was not able to get on the version 1 or 2 of these clear soles.
Here is a quick look at the master parts. They still need a bit of work.
I am doing these a little different to the US13s (which I will pull part and copy this method) to ensure a better fit and capture more detail on the seam at the bottom. The outrigger is slightly reduced, but the heel is actually pushed out a bit more to (hopefully) replicate the sole of the real shoe. I am hoping to capture that hollow on the side as well that I was not able to get on the version 1 or 2 of these clear soles.
chuck2003
Well-Known Member
@cavx I noticed the soles you sent me are a bit thicker then the original soles.....When you attached them to the mags how did you go about making them fit thickness wise ? Did you sand them down till they fit ? I just put the front pad in the recess just to check if i needed to trim and it seems like it might fit. Might have to do a slight triming around the edge but i noticed they are quite thick and would stick out of the shoe a bit
This is how proud it sits right now....I did a little test with the dremel it creates a frosted look on the under side of the sole. But from I read the original had a frosted look correct ?
This is how proud it sits right now....I did a little test with the dremel it creates a frosted look on the under side of the sole. But from I read the original had a frosted look correct ?
Last edited:
cavx
Master Member
Mine are the same thickness and stick out a touch like yours. Once they are on, you find they are quite stable under foot. They grip like nothing else and are generally a pleasure to wear.
One of the guys mixed a bit of acrylic paint into the Shoe Goo to make it light grey. Apparently it set and works fine as well as giving you the colour change. When I did those US13s I used Tarzan Grip and it frosted the rubber anyway. They even stick out on the US13 because I have laminated the original parts with the pyramid mat.
In the recent pics of the US8 set I am working on, the parts are thinner because I have use cor-flute for the base.
I am working on correcting this for both the front oval and rear part for future batches, but all this takes time.
DragonGalvy
Sr Member
I've replaced my soles with Cavx's clear versions as well, and find the grip to be good. Like how they make the shoes feel. I found the superglue I used to hold it in place while the shoe goo dried frosted mine a bit, but don't mind. The fact that the clear sole sticks out more than the midsole seems like a good idea to me, as it prevents either the colour or the texture of the midsole from wearing away. I was concerned about the sharp edges of the clear sole getting caught on something and ripping it off while I was out, (because the new ones stick out further) so I grinded down a small amount around the edges to give a 'slope' from the midsole. Haven't lost anything yet!
BTW, what's cor-flute?
BTW, what's cor-flute?
Last edited:
- Status
- Not open for further replies.
Similar threads
- Replies
- 12
- Views
- 808
- Replies
- 0
- Views
- 1,070
- Replies
- 60
- Views
- 7,918