Nike Mag V2 Mod Discussion (Page 58 Shopping List)

Status
Not open for further replies.
Here is how it will look with the strap,Something like this.
This is just a temporary one i made out of paper to see how it looks before i buy leather and sew up the real one Tomorrow.
I like how it looks what do you guys think.
View attachment 618608

Hi man, good to see you here :)

As I told you on insta, these are great ! Really ! After seeing your customs I wanted to get a pair ^^
For the strap, It looks good but the logo feels too big for me...
 
yes i think you right i was thinking the same thing the logo is a little big, the strap i very big but i feel the logo can be slightly smaller,.
Im going to make a few different size logos to see what looks best before i decide.
i love the black Mags you just did i need to get a pair from you one day.
Yeah I think it is a matter of 3/5 mm too much...
Anyway here is a quick photoshop for fun ^^ (i didn't change the size of the logo on this ;) )

attachment.php


EDIT : I resized the logo and added a light grey line to the low part of the upper :

attachment.php


for the black mag, t is just a V2 with some little ajustments, nothing bg... just the tongue, the upper part and the strap + slim toe...
Or you're talking about the ones I made by myself ?
 

Attachments

  • SwooshMagHunter.jpg
    SwooshMagHunter.jpg
    91.2 KB · Views: 381
  • SwooshMagHunter2.jpg
    SwooshMagHunter2.jpg
    92.1 KB · Views: 376
Last edited:
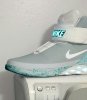
I have completed the first stage of the new wings for the clear soles. I am starting with the large first, then medium and lastly will do small.

As my giant vacuum chamber is not finished yet, I decided to cut the mold in half so it could be placed on a shelf inside the existing chamber. I had thick (1/2" glass louver on hand, and with the chamber laid on its side, the shelf sits just below the half way point. It is wide enough to slide (the now) half the mold in at a time.

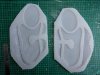
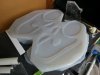
I am using epoxy to make these new master parts, and to ensure I don't any bubbles, I painted the inside of the molds with epoxy first, then degassed the mold. Then mixed the required about, degassed that and then poured it making sure I over filled the molds. I'd rather have a slightly thicker part and have to trim flashing off than miss details or have a jagged top edge.

These will be ready for demolding just after 3PM my time. The reason I am using epoxy is because it remains semi flexible for about 6 - 24 hours (ambient temp pending) and this will allow me to set them up in a jig with the ends curved so that when they set rigid, they will be the correct shape to go onto the shoes.

From there, I will make two new molds that allow me to pour these inverted vertically to ensure I get perfectly formed wings each time. To keep the waffle pattern on the base, I will probably have to make one side of the mold (the outer side) higher and with a lip that keeps all the details intact. Not easy and there could be many fails before I get this sorted.

The molds for the bubbles are being a right PITA. One forms perfectly and the other traps a small bubble. Yet both have their pour and vents spouts in the same place relative to each part (left and right). Go figure.

At least the ankle buckles seem to be coming out OK. There is a bit to trim, but (like the soles) I'd rather have excess flashing across the top of the part than a hollow.

attachment.php

attachment.php
 

Attachments

  • 20160427_110815.jpg
    20160427_110815.jpg
    218.5 KB · Views: 368
  • 20160427_114916.jpg
    20160427_114916.jpg
    168.3 KB · Views: 363
Wow RVLF that looks so nice. Thanks for that now i have a clear image of what im trying to do greatly appreciated for these awesome images. yes i was talking about the black one you just posted and you make it sound so easy the mods you did lol great work!
I love all your work and both black Mags you did.

Quick qustion am i to comment or quote when replying to someone.
I haven't used this platform much to talk
 
Last edited by a moderator:
Quick qustion am i to comment or quote when replying to someone.
I haven't used this platform much to talk

If you quote, then the thread contributors know you are responding to a specific person. If you just respond, someone else may type and post seconds before you do, and your response may not seem relative to the direct previous post.
 
Wow RVLF that looks so nice. Thanks for that now i have a clear image of what im trying to do greatly appreciated for these awesome images. yes i was talking about the black one you just posted and you make it sound so easy the mods you did lol great work!
I love all your work and both black Mags you did.
No problem, it took me just 5 minutes ;)
Seriously, the mods I did are not so complicated, Your work on the Swoosh Hunters is way much harder !
And about that, where did you find the EL sheet and the other materials ?
I See that you're from Toronto, and I haven't found any store that would have these in Canada :/

Quick qustion am i to comment or quote when replying to someone.
I haven't used this platform much to talk
Yeah, Quote is better. And people quoted get an alert so they know when someone is responding or speaking to them ;)
 
Last edited by a moderator:
UPDATE: The demold of the two sides wings seems to have worked perfectly. Sometimes during a pour of the clear rubber, small bubbles would form or get trapped. Because of the thickness of the rubber being more of a gel than a liquid, these bubbles could raise to the surface. Not sure if this is because the epoxy is so water thin or if painting and degassing the surface really made that much of a difference, but I got 100% perfect detail capture today. Due to the humidity and temperature, the parts could not be demolded until well hast 5 hours and are still flexible. I have quickly trimmed them and placed them in the jigs that will hold them with a "curved tail" until the parts set up and cure hard.

I also am doing a tester on a inner wing where I have curved it over a 100mm pipe to provide a slight curve.

Will be interesting to see how these are tomorrow.

I'm also making more buckles and will add these to my "for sale thread" (in the JY) soon.


So what what the new wings in the clear looks like ? Are they an improved
version? Or these new much like the RD ? Wings ?
 
If you quote, then the thread contributors know you are responding to a specific person. If you just respond, someone else may type and post seconds before you do, and your response may not seem relative to the direct previous post.

Thanks Cavx I overstand now.
 
No problem, it took me just 5 minutes ;)
Seriously, the mods I did are not so complicated, Your work on the Swoosh Hunters is way much harder !
And about that, where did you find the EL sheet and the other materials ?
I See that you're from Toronto, and I haven't found any store that would have these in Canada :/

i got the El panels from ebay
http://www.ebay.ca/itm/272221125901...04&_trkparms=gh1g=I272221125901.N41.S1.R1.TR1

yeah i cant find any stores in Toronto that sell them but there is this store where i got the lipo battery Micro usb charger with boost from 3.7V to 5V but i feel i still need to boost the volts higher some how to 9V but it works fine now at 5V but could be brighter.
Got it here with other stuff.
https://www.creatroninc.com/
 
Were the old wings splitting ? The inner ones too ?

Because I make these, I will change parts on my owns shoes as I see fit. I never had one wing split until this most recent pair (4th sole replacement). I did have the pyramid mat tread crack on the left shoe (why does only the left shoe fail?). This time, the tail of the right does have a split. I super-glued it back together with no issue.

I want to change out the side wings from the medium to the large to get more flare. Given how well the vacuum method worked, I might run a test today with some clear rubber.
sounds cool can't wait to see results!
 
Do you drive a car with a manual transmission?

Working the clutch pedal would be my first guess.

Yeah probably. My car is manual. What I did notice is that I don't sit in the seat and swing my legs. I tend to step in, and I am guessing this places huge stresses on the left shoe (right hand drive car).
 
Status
Not open for further replies.
Back
Top