Nike Mag V2 Mod Discussion (Page 58 Shopping List)

Status
Not open for further replies.
Shapeways handles the actual manufacture. Each buckle is 3D printed by them when you order.

-Nick

I should probably post this in the other threads, but this is the internals of the infamous Halloween mag. The battery is better and the LEDs are slightly better, but other than that, for all intents and purposes, they are identical to the V2.

magbattery_zps3f53a809.jpg
 
Thanks for those shots! There aren't too many inside shots that I have found of the v2 as it seems most of the links expired.

im fore sure not great with wiring and electronics but a few questions if you or someone could answer:

there is basically no "clean" way to get access to all the wiring without ripping up the shoe?

if I took the clear sole off would I be able to use the existing wire that's going to the soles led and change it to EL?

would that battery be able to power that EL and another strip in the strap?

Thanks!
 
@airair, is the Heel Cup attached to the Mid-Sole?
Cobrakai22 when I re-wired mine, I had already removed the soles. There is a thin skin of rubber under the battery that I removed (you could probably just slice it and bend it out of the way rather than removing it as I did) and that allowed me a little more access. In the end, you still need to peel up the pink card in the shoe under the inner sole. I found that I could wiggle my finger up inside and behind the Heel Cup and grab and pull the wires down into the sole area. You probably don't even have to remove the outer soles. I removed mine because I was about to replace them with a set of my clears.
 
Last edited by a moderator:
@airair, is the Heel Cup attached to the Mid-Sole?
@Cobrakai22 when I re-wired mine, I had already removed the soles. There is a thin skin of rubber under the battery that I removed (you could probably just slice it and bend it out of the way rather than removing it as I did) and that allowed me a little more access. In the end, you still need to peel up the pink card in the shoe under the inner sole. I found that I could wiggle my finger up inside and behind the Heel Cup and grab and pull the wires down into the sole area. You probably don't even have to remove the outer soles. I removed mine because I was about to replace them with a set of my clears.

The heel is glued at the bottom to the grey soles. It sits in and was moulded that way to make it easy when they glue the uppers on.

The problem with reusing any of this wiring is that some wiring ends up glued between the heel and fabric, and is likely to break at any point.
 
Last edited by a moderator:
Thanks for those shots! There aren't too many inside shots that I have found of the v2 as it seems most of the links expired.

im fore sure not great with wiring and electronics but a few questions if you or someone could answer:

there is basically no "clean" way to get access to all the wiring without ripping up the shoe?

if I took the clear sole off would I be able to use the existing wire that's going to the soles led and change it to EL?

would that battery be able to power that EL and another strip in the strap?

Thanks!

These are the HC internals, but the v2 is identical almost.

You would have to break the plastic that houses the battery and figure out their circuit board. You can't reuse this circuit

If you want el panels, a full rewire is required really.
 
well im free :D
back to moding
how about my shoes still had juice for almost a year siting in a box wore them to dave and busters last night
i misst them so much
 
airair can you confirm if the HC Heel Cup is the same shape as a V2 or a new and slightly different part? It does look different in all the photos that keep popping up. DJ1gocue welcome back :)
 
Last edited by a moderator:
Does anyone know if Cloneprops is still selling the buckles?

I know the store is still active online, but I was just wondering if anyone had ordered from it recently?

Don't want to place an order and find he isn't actually making them anymore.

I just saw his pair and all I can say is WOW. As a sneaker customizer I thought I was already doing complicated stuff. Turns out I still have a lot to learn. :facepalm
 
Totally, his heel cup and LED bubble are amazing. If he was still going to do the whole things as a kit I would be all over it.


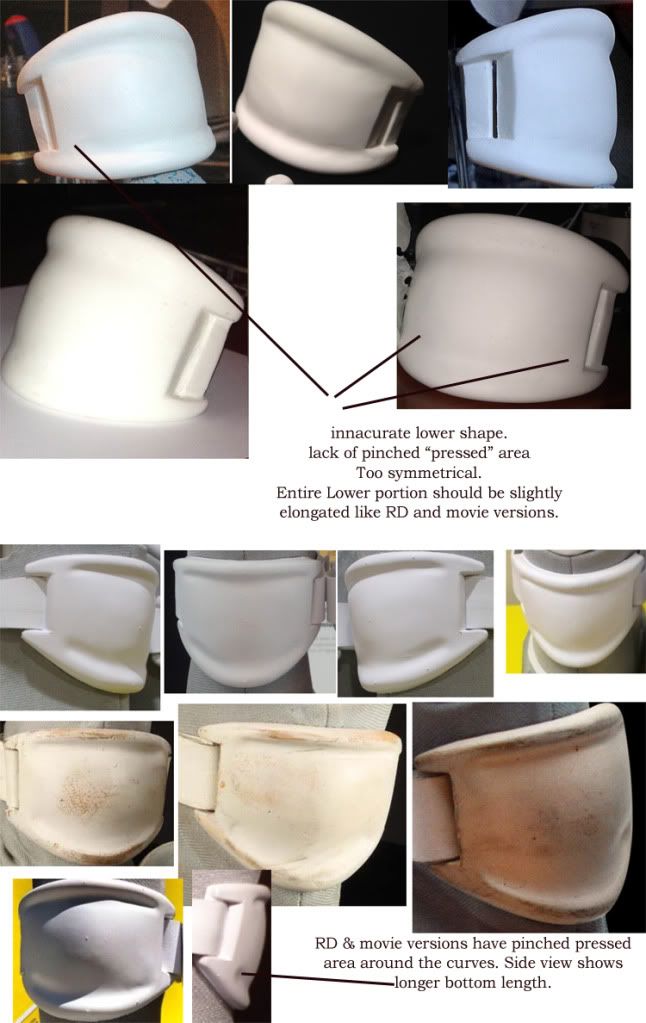
His LED bubble was fine, but the actual grey heel piece was still innacurate, its actually far too big, fat and shaped way too round. Especially for the small size shoe he was making.

I actually think the V2 heel is better despite that itself being slightly smaller than the real nike version. Overall, its a much closer version than the Cloneprop heel. The Clone prop LED bubble is far superior though.


I also noticed that his grey soles were still not accurate with the back of the grey soles still too high, and the front not angled upwards enough like the originals.

Also, his grey uppers template was incorrect too, the laces sitting too forward, and the back of the template shape where the seam meets is also incorrect. I can point out a few other flaws but there's no point, as its still a good reference point to use when building your own parts and to ensure that you make things accurate. If he had fixed those few things, it would have been perfect.


His first white ankle piece was also incorrectly shaped, which i pointed out way back through a picture comparison on this very thread. His second version, the shapeways version was much more accurate.
bucklecomparison1.jpg


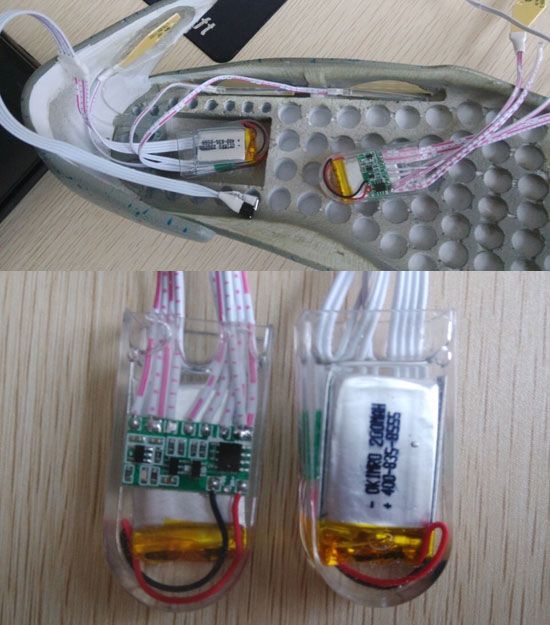
The best bit of his build was the clear soles which are magnificent, tinted blue and practically identical to the 2011 shoes.

His work was great quality work overall , but he seemed to dissappear, and getting any bit of information from him about materials used, what processes to use was like asking a nun for a massage (ie impossible).


My fully scratch made pair (when i eventually get round to it) will try to be as screen accurate as possible hopefully.

- - - Updated - - -

I just saw his pair and all I can say is WOW. As a sneaker customizer I thought I was already doing complicated stuff. Turns out I still have a lot to learn. :facepalm


It was very good, but considering he used 3D modelling, and its still not totally accurate, it shows that you need far more attention to detail to get things perfect, as i've pointed out above.


I'd rate it above the V2, but some of the bits are far from accurate, but maybe thats just me being a picky bugger who requires screen accuracy!
 
Last edited:
It was very good, but considering he used 3D modelling, and its still not totally accurate, it shows that you need far more attention to detail to get things perfect, as i've pointed out above.

If I remember correctly, he didn't do the original 3D scan, so worked with what he had been given. And that could explain why the part is slightly over-sized (which actually matches in with so many other over sized parts of the V2 shoe). His part is good because it clips over the V2 buckle but I think the small size (which he pulled down from the site) would be the best choice if it still available. You'd then replace the whole buckle with his.
 
Messing around with different adhessives for a more permanent bond for strap re-gluing. So far the stuff I've tried at the fabric stores don't really hold up to the stress. Anyone have any other suggestions besides straight super glue? I haven't tested the loctite fabric glue yet I suppose that's next on the list.
 
I'd rate it above the V2, but some of the bits are far from accurate, but maybe thats just me being a picky bugger who requires screen accuracy!


You're right, it's definitely not screen accurate but I like that he added his own style to it. Considering the equipment he has access to and the fact he clearly is pretty talented when it comes to prop design, he could have made a 1:1 super accurate version but instead I feel like he gave it a bit of his own design, which is pretty cool.

If I was in his position I probably would have just churned out many screen accurate versions :D
 
His first white ankle piece was also incorrectly shaped, which i pointed out way back through a picture comparison on this very thread. His second version, the shapeways version was much more accurate.
bucklecomparison1.jpg

His first piece always looked like it was upside down especially the image on the right.

- - - Updated - - -

If I was in his position I probably would have just churned out many screen accurate versions :D
.

Everyone was keen for a kit until he mentioned the price. But that is what many don't understand. Good materials cost money.
 
http://i1256.photobucket.com/albums/ii495/airair1989/bucklecomparison1.jpg
His first piece always looked like it was upside down especially the image on the right.

- - - Updated - - -

.

Everyone was keen for a kit until he mentioned the price. But that is what many don't understand. Good materials cost money.

Absolutely. The cost of casting rubber and mould materials can quickly build up. On top of that, you have to look at things such as degassing to avoid bubbles and other issues.
Its not as simple as first thought!

He did a tremendous job though with the castings. Really professional finish. Its definitely something to aspire to, to take that sort of ingenuity and make your own version.
 
Status
Not open for further replies.
Back
Top