You are using an out of date browser. It may not display this or other websites correctly.
You should upgrade or use an alternative browser.
You should upgrade or use an alternative browser.
New BMF coming
- Thread starter Jimmer
- Start date
spacebob
Sr Member
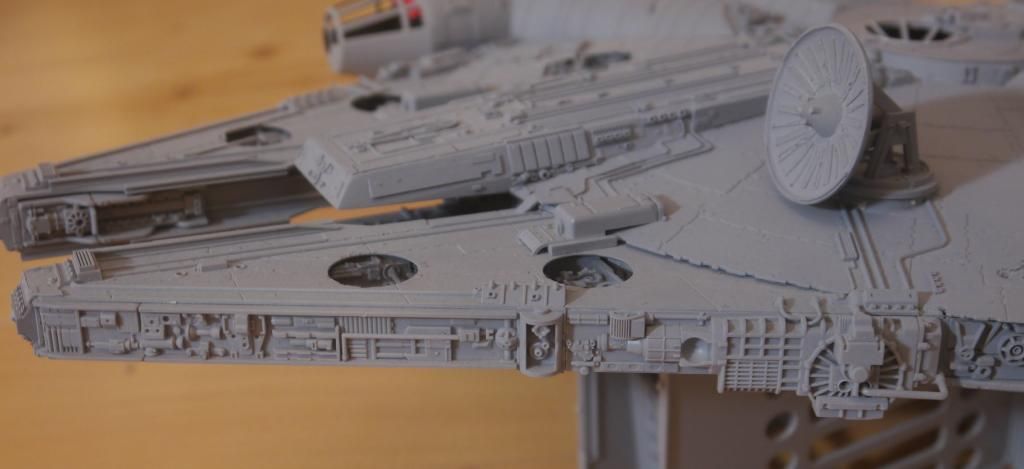
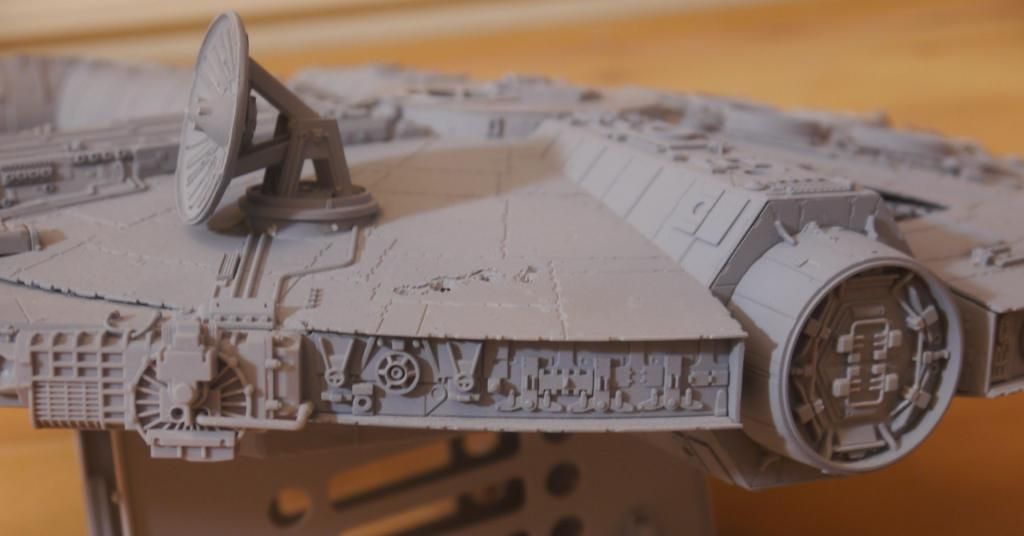
Ok I’m usually into making 1:1 scale normal props but occasionally I still like to do models.
web.jpg") (click pic)
(click pic)
Here’s my falcon I made in 1995. I knew it wasn't accurate but the thing still looks good.
Now with this new toy I can see a fun project that will only cost £30 or so if I scratch build the rest of it.
That’s a near studio scale falcon for £30. Believe.
I need to cram in the falcon facts so could anyone confirm or deny what I think, I know.
1. There were two main ILM models, One about 4’ wide and then for empire one more about 2’ wide.
This toy features mostly detail from the smaller.
2. The finemolds falcon is very accurate and features detail from the smaller falcon also.
3. The BMF was mostly copied from the finemolds one apart from the obvious changes.
If this is all right then I can scratch build details using the BMF I have, as a good guide?
Questions over.
(click pic)Here’s my falcon I made in 1995. I knew it wasn't accurate but the thing still looks good.
Now with this new toy I can see a fun project that will only cost £30 or so if I scratch build the rest of it.
That’s a near studio scale falcon for £30. Believe.
I need to cram in the falcon facts so could anyone confirm or deny what I think, I know.
1. There were two main ILM models, One about 4’ wide and then for empire one more about 2’ wide.
This toy features mostly detail from the smaller.
2. The finemolds falcon is very accurate and features detail from the smaller falcon also.
3. The BMF was mostly copied from the finemolds one apart from the obvious changes.
If this is all right then I can scratch build details using the BMF I have, as a good guide?
Questions over.
Archive&Future
Sr Member
Ok I’m usually into making 1:1 scale normal props but occasionally I still like to do models.
View attachment 399056 (click pic)
Here’s my falcon I made in 1995. I knew it wasn't accurate but the thing still looks good.
Now with this new toy I can see a fun project that will only cost £30 or so if I scratch build the rest of it.
That’s a near studio scale falcon for £30. Believe.
I need to cram in the falcon facts so could anyone confirm or deny what I think, I know.
1. There were two main ILM models, One about 4’ wide and then for empire one more about 2’ wide.
This toy features mostly detail from the smaller.
2. The finemolds falcon is very accurate and features detail from the smaller falcon also.
3. The BMF was mostly copied from the finemolds one apart from the obvious changes.
If this is all right then I can scratch build details using the BMF I have, as a good guide?
Questions over.
You're mostly there!
1) There were 2 main models built, a 5' long Falcon for ANH, and a 32" Falcon for ESB. The details on each are different and some of the basic proportions differ as well
2) The Finemolds kit is dead on as far as details are concerned but the proportions are not quite right
3) I'm not sure about this, from looking at the BMF I would have said that the details have been referenced straight from the 32" model. There are too many differences (read: corrections) that Hasbro have made....
I've made Pinterest boards of each version if you want to have a look. I think you'll need an account to see the full board though
http://www.pinterest.com/haystackhair/millennium-falcon-reference-32/
http://www.pinterest.com/haystackhair/millennium-falcon-reference-5/

PHArchivist
Master Member
Here is summary of posts discussing painting and glueing this product. Sorry - didn't apply post #s or names to all of these.
Seems Krylon Fusion and Locktite are the winnters so far...
Summary:
"plastic isn't like the familiar polystyrene that's so easy to cut and sand. The BMF had that rubbery kind of plastic that's tough on the Dremel. Go too high and it just melts.
-----
it is the same type of plastic. It's very rubbery. I already cut out the cockpit windows on mine and finding it very difficult to sand. It kind of turns into this shredded pulp when you sand.
-----
It is bad plastic but im thinking sheet styrene glued with super glue all plastics glue to the sidewalls then it will be easy to use normal polystyrene glue to add the detail parts.
-----
made from the same type of plastic (PE) as the new X-Wing and it is being reported that this is the type of plastic that NOTHING adheres to.
-----
I used a combination of a dremel, box cutter and exacto knife. the hard part is sanding. The plastic is soft and kind of shreds and balls up instead of sanding smooth, but it seems as though to me that the plastic on the side walls is a different type.
-----
Robert: what about the Duplicolor line of paints and primers designed for flexible plastic bumpers? If you could get a primer coat to stay on as a barrier, you should be good to go on the rest.
-----
Troy: I've had luck using Dupli-Color adhesion promoter and primer on my X-wing tear-down and mod:
-----
this plastic appears to be polypropylene. If it is, it will require special bonding agents to get things to stick to it. Polypropylene resists most solvents and cements. That's why most objects that are composed of this material are snapped or screwed together rather than glued. There are products that I have used before for bonding polypropylene to itself and to other materials.
Loctite makes bonding agents that work with polypropylene - one is known as "Plastix", the other, "Loctite Plastics Bonding System". Both systems use two components - a surface prep and a bonding agent. When using these, it allows polypropylene to be bonded to itself or other materials. I've used both of these before with great success.
As far as painting, there are at least two options: There is a product made by AMI called PolyPro Primer that is specifically made for adhering paint to polypropylene. I have not tried this, but some of you may have. The other option is to use an adhesion promoter (which comes in spray cans and is commonly found in auto paint stores) on the surface prior to priming with an automotive primer like Duplicolor Primer. Doing this will give the paint enough "bite" so as not to pull up when removing masks. As with any plastic surface, it should be thoroughly cleaned first of mold release and skin oils prior to applying anything to the surface. I would recommend testing gluing and painting on a portion of the interior surface first before starting on the outside.
-----
Primer might depending on the primer... CA does not seem to "stick" very well. I'm going to try 2 part epoxy on mine.
-----
Have you considered E6000? that stuff pretty much works on anything. It can be messy though.
-----
Not sure what E6000 is. But 5 minute epoxy is pretty cheap and good - and if that does not work JB weld is good on almost anything
-----
Mike: tested another method for painting on the inside of the disassembled hull. Rub down with 91% iso alcohol, scuff with fine steel wool, and a dusting, and i mean a very fine dusting of Krylon fusion satin white. After 24hrs, quite hard to scratch off, not perfect but passed a blue painters tape test.
I have found over the years that a dusting of paint or primer always seems to stick much better than a heavy coat. I would try this on the inside if you want to give it a go to see if your results are similar.
I will post more as i go but my hope is that the krylon fusion dusting will give me a very fine base to work off of. I hope to add a layer of fine primer then switch to Tamiya acrylics.
-----
How about giving it a coat of Future before gluing or painting. Would that work?
-----
Mojo: did a paint test yesterday. Cleaned it like I would a resin kit, with a mild abrasive, then some alcohol, then used standard Tamyia rattle can gray primer, then Krylon flat white and then Tamiyia beige. They all worked perfectly. The white spot is where I tried a tape test to see if the paint would stick. As you can see it did.
-----
File this in the no coincidences department. For those on a budget, you now have a use for the ERTL sidewalls. They fit great and make a perfect launch point for scratch building.
-----
there's a glue you can buy in oz called all plastics & toy glue made by selleys. it even specifies on the package that it glues polyethylene and polypropylene.
2 stage process but very simple. you apply a primer (which is included) to area you want to glue and then apply the glue itself.
i picked up this glue and the new falcon toy yesterday but haven't tried it.
-----
Robert Post #324: test sprayed a small area with the Satin White Fusion. Will do a durability/tape test when dry.
-----
Kokkari: I tried the Krylon on a test area with a light sanding. I let it cure 1 day, not the 7 days indicated, and it scratched off with a fingernail and it peeled off with a tape test. I would like to see if someone lets it cure 7 days and see if it makes a difference.
-----
aren't car bumpers made of a very similar plastic? Couldn't automotive bumper primers work on polyethylene? I'm going to give it a shot, I'll do the isopropyl rubbing and sanding as mslz22 suggested and then try dusting automotive primer in fine layers. Hopefully it stands up to the masking tape test
-----
Mr. E Man: For best paint results, clean the entire surface and then apply a coat of adhesion promoter, followed by primer. Let it cure for a day, then try scratching it or peeling up tape. The paint should stay on without a problem. Polypropylene and polyethylene plastics don't have good surfaces for adhering paint to. By applying adhesion promoter, it give the surface more "bite" and allows the primer and paint a tough surface to stick to.
And here's the stuff at Halfords:
http://www.halfords.com/motoring/pai...er-spray-300ml
-----
Anyone try or use this glue from locktite -
http://www.loctiteproducts.com/p/sg_...ing-System.htm
It is a stocked item at Home Depot, so it is readily available, but have read that it does not have a long shelf life.
-----
Post #333 This is THE stuff!
I've been using it for gluing polypropylene to itself and other materials for years. It's a two-part system - a surface prep and a glue. Makes stuff stick to "unstickable" plastic
-----
Mojo Post #337: my paint test which is posted earlier in this thread, the one I thought was a success with standard model paints, after a week of curing I tried the masking tape test and the entire thing peeled off.
-----
Robert Post #341: update: It hasn't been 24 hours yet, but here's where she stands. I sprayed this spot with two coats of Satin White Krylon Fusion with no prep....no cleaning, just sprayed it on as it came out of the box. At 3 hours I was able to produce the chip in the picture with my fingernail with some effort. Ten minutes ago, I tried to do it again, but the paint would just scuff, not chip. I then did the tape test using both 3M Scotch-Blue painter's tape and Tamiya masking tape, including applying it directly over the chip and it passed with flying colors.
Now, I know that others haven't had success with this paint....I'm just reporting the results that I have had: Use at your own risk. The next step will be to spray a coat of Tamiya Gray Surface Primer over the fusion, let it dry, and repeat the above tests.
-----
Kokkari Post #344: I'm wondering if it makes a difference that you used satin finish. I used matte and wonder if that sticks to the tape more. I tested strait from the can and also with a cleaning and light sanding. While the second adhered better, it still did not work as well as the automobile products talked about before.
-----
Haystack #349: I've had a lot of success with the Montana Gold line of spray paints....I think they're acrylic based? But I haven't yet found a material they won't stick to. I've been looking through the colour chart and I think the following colours might be a suitable base colour:
-G7000 Pebble
-G8000 Elm
-S 9110 Shock White Cream
They all dry with a satin finish and are easy to wetsand. Tamiya paints through an airbrush onto Montana Gold paints work beautifully, could be a winning combo....
-----
MKTodd Post #351: Montana White - Ancient White 9100 might be a good base too
-----
Dmaul Post #355: I used a heat gun to warm up the area before I used a hobby knife and it worked fine.
-----
Robert Post #356: I used a drill bit in my Dremel to remove the center of each window almost to the edge, then finished with an Exacto knife.
-----
Mojo Post #361: Give it a couple of days and then try another tape test. In my case the paint seemed to work just as yours was. I was chatting with one of my modeling gurus and he suggested I try to scratch of or tape test again in a few days. He was right... the paint came right off.
I'm trying some the adhesion accelerators now. Found out that says it is specifically for ployproplain.
-----
Tek Post #363: Have you seen this?
http://youtu.be/GTiCWp0unjs
I don't know if i would do this though
-----
PHA Post #376: Saw this suggested on-line:
http://www.amazon.com/dp/B002GUGH04/...inishingcominc
Many more products and suggestions cited here:
http://www.finishing.com/61/59.shtml
-----
Robert Post #409: I'm going to test mine. So far it has a couple light coats of Krylon Fusion Satin White with Tamiya Gray Surface Primer over that.
-----
Robert Post #412: I know you guys have been waiting for results, so here's an update: it's been 4 days and the paint is performing well. I did manage to get 4 or 5 TINY chips with my fingernail, but I had to scrape really hard to do it (you can see the scuff marks in the second picture) I repeated the tape tests again with special attention paid to the area of the chips, which we is the area most likely to fail. It passed again
I'm not calling this test a success yet, as I haven't waited the recommended 7 day curing time. Also remember, I didn't prep the surface as recommended, so PLEASE use this stuff at your own risk.....many different things factor...humidity, temp, and so on, you guys know the drill. I do know : if this paint continues to perform like this I'll use it in the following manner: Two coats of the whiter satin fusion, two coats of the Tamiya gray surface primer with the final colors(whatever those may be) using Tamiya acrylics.
-----
Mike Post #413 :My results with the Krylon Fusion, after 1 or 2 days i could not scratch it off (or the fine primer i applied over the Fusion). The only difference from Roberts above is that i did a wipe down with 91% ISO to clean any possible mold release, as a light scuffing with fine steel wool. The other thing to keep in mind is that i only did a dusting, i mean a dusting of the fusion, from like 12-14 inches away with the Fusion nice and warm so the particles were fine.
I think the dusting works well because a heavy coat of Fusion or any other paint seems to want to "float" on the plastic more than adhere. The fine dusting seems to grab better, there may be some scientific reason but my experience comes only from building resin kits that sometimes have the same adhesion issues.
-----
PHA Post #414: Fusion sounds promising...
If an adhesion accelerator is used first, then the Fusion on top of that, would you be negating the effect of the Fusion since it is now being applied to the accelerator coat instead of directly to the plastic?
-----
Robert Post #416: Krylon Customer Service was pretty quick to respond to my first question by email, maybe we should give a try on yours
What about all the screw holes on the bottom? Instead of filling and sanding, I thought of covering each one with a thin panel of styrene. I know this plastic doesn't take well to sanding and trying to find putty that would stick to it might open up another can of worms
-----
Robert Post# 417: I used Loctite liquid super glue to attach the styrene panels where the landing gear were. Seems to work fine"
Last edited by a moderator:


Jaitea
Master Member
Thanks Jaitea,
I can see the last bit on the sticker at the front does not need to be included, apart from that its good basic reference")
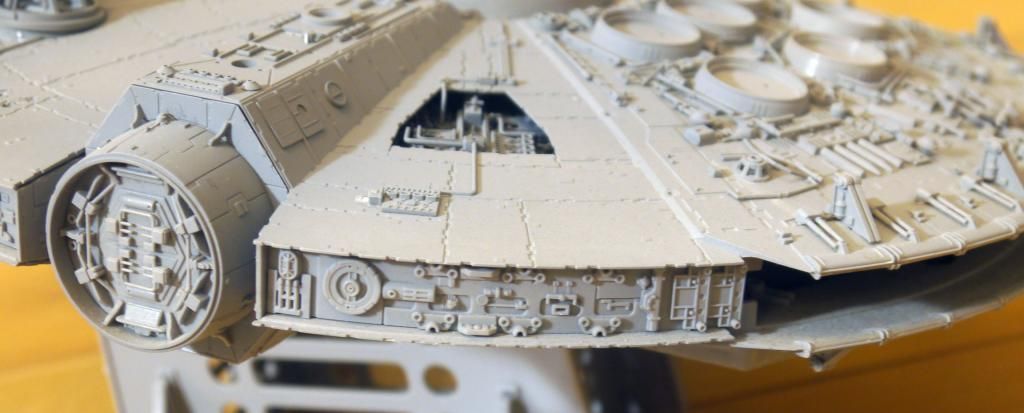
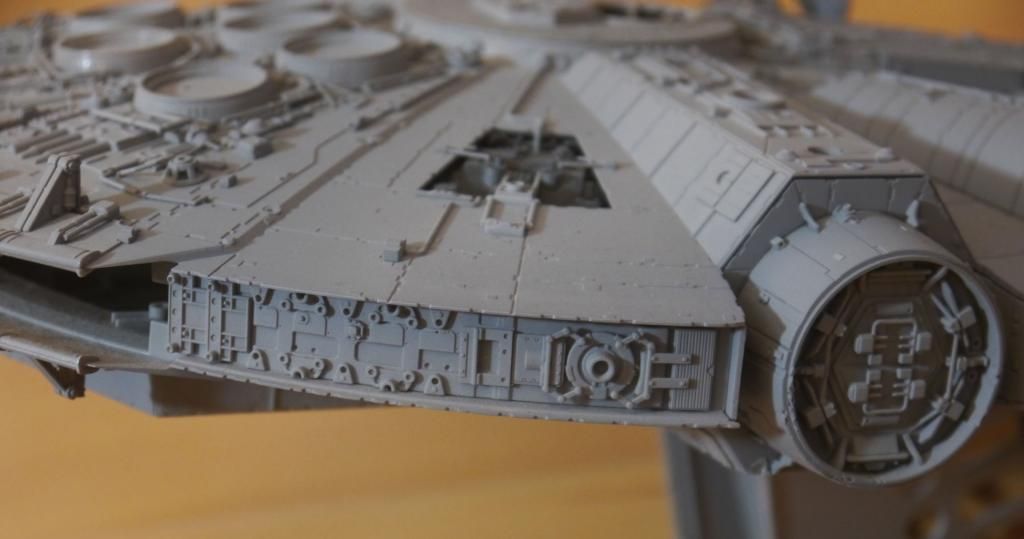
Do you have the finemolds still unpainted?
Here are images of my FM 1-72
Hope they can help spacebob
J
newmagrathea
Sr Member
I just picked one up. It's extremely light, the first box I picked up I thought was empty. But after I picked up a couple more and inspected it to make sure it was still sealed it I figure it must not weigh much at all. Every guy (I mean adult man) was eying this thing as I was carrying it through Walmart.
PHArchivist
Master Member
I just picked one up. It's extremely light, the first box I picked up I thought was empty. But after I picked up a couple more and inspected it to make sure it was still sealed it I figure it must not weigh much at all. Every guy (I mean adult man) was eying this thing as I was carrying it through Walmart.
I was asked if I wanted a gift receipt... I said "Uh... Yeah - sure..."
tek2graphics
Sr Member
That's funny, yesterday I stopped by walmart and took a look at the the "last BMF" on the shelf. I noticed that the package was opened... So i took the toy out and WOW.. it's an amazing model! Can wait to finish paying mine off from lay away!
I just picked one up. It's extremely light, the first box I picked up I thought was empty. But after I picked up a couple more and inspected it to make sure it was still sealed it I figure it must not weigh much at all. Every guy (I mean adult man) was eying this thing as I was carrying it through Walmart.
Good job on rounding up the facts Rob.....one stop info.
Mine came in some time Friday after we went out 'Haloweening'. I found a soggy box in the courtyard today ahaha.
So yea, its light and can flex a little bit. I think Im going to do a two point mount, one female mount underneath on the belly quad laser and the other on the escape dock on the port side. Ill probably fill it with expanding foam after some electronics to give it some rigidity. This will be the one that gets mounted on the wall wile the Hasbro will be on the coffee table.
tek2graphics
Sr Member
Good idea... please share pics when you do! :thumbsup
Good job on rounding up the facts Rob.....one stop info.
Mine came in some time Friday after we went out 'Haloweening'. I found a soggy box in the courtyard today ahaha.
So yea, its light and can flex a little bit. I think Im going to do a two point mount, one female mount underneath on the belly quad laser and the other on the escape dock on the port side. Ill probably fill it with expanding foam after some electronics to give it some rigidity. This will be the one that gets mounted on the wall wile the Hasbro will be on the coffee table.
Archive&Future
Sr Member
Has anyone looked into donor kits for this? By the looks of it, it isn't THAT much smaller than the 32" Falcon. So I suppose we should be looking into 1:500 scale ships, and 1:48, 1:72 and 1:35 tanks...
I've checked some 1:72 tank parts against the thing and they look good so far, obviously you won't be able to get 100% accuracy unless you go with 3D printed parts but for those of us who just want a (relatively accurate) good looking model, I suppose donors are the way to go
Matilda is a kit used a lot on the Falcon....would 1:48 be more suited than 1:35? I'm going to do some research and I'll make another Pinterest board for those who are interested!
I have some kit parts.....they match up size wise on the Hasbro falcon but are over sized on the BMF. When I say oversized I mean slightly. Im sure you could work out something. Im really surprised how clean the details are on this thing. Besides the obvious things, what are you not happy with?
Mara Jade's Father
Master Member
Thanks for the pics Jaitea, they are very helpful
Also we have to stop calling this the BMF, it's confusing, I propose we simply call it the PPF (polypropylene) because that seems to be its most unique feature setting it apart (or BPPF).
Just call it what it is - HSMF: Hero Series Millennium Falcon.
Similar threads
- Replies
- 2
- Views
- 202
- Replies
- 311
- Views
- 49,033
- Replies
- 71
- Views
- 10,877
- Replies
- 17
- Views
- 5,818
- Replies
- 47
- Views
- 7,747