NASA S1035 (ACES) Helmet

machzeropoint2

New Member
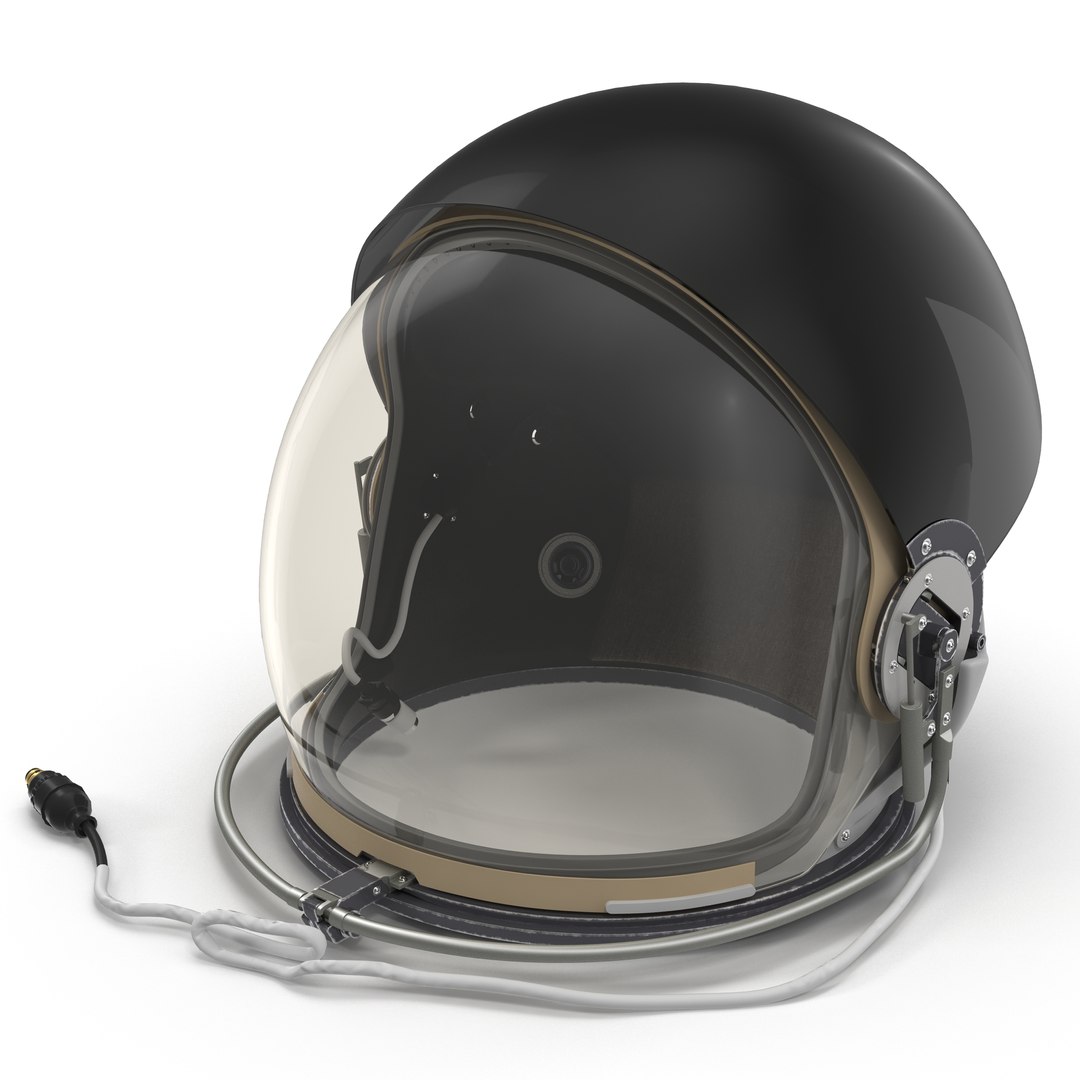
It started as a really cool gift idea, and begged the question how hard could it be to find a space helmet that doesn't look like a fishbowl turned upside down. Oh how quickly and deeply the rabbit hole went.

In the process of fleshing out this idea it seems the only way to make this come to life was to create it myself. I started out by scouring the internet for pieces of information so that I could make the most accurate replica possible. It was there that the job became noticeably more difficult. While there are lots of pictures of astronauts grinning ear to ear while wearing the helmet there are almost no technical drawings/ diagrams/ in depth photos/ exploded views that would be helpful in a faithful recreation. I scoured NASAs technical report server and found a crew training workbook and an anthology of spacesuits "dressing for altitude". I reached out to David Clark and was sent a few generic photos. It seems the lack of information is on purpose. ITAR or International Traffic in Arms Regulations means that the U.S. wants to restrict certain technologies from easily leaving the country (all things spaceflight being a big one). I assume this mostly applies to life support systems that would make it an actual space helmet. While I have no desire to have men in blue suits show up at my door for attempting to skirt rules that are there for a reason. I'm hoping that in creating a display piece that is a shell of the functional helmet I might have better luck. I am aware of the one Adam Savage did (it's absolutely beautiful) which will be helpful come assembly time but is of little help in terms of creating/sourcing parts

My question to the group is has anyone had any better luck finding information or creating a piece with such limited info. My goal here is to create a display piece for a mentor and friend (who has seen the actual helmet). It certainly does not need to be ready for space travel.

G8LZ9425.jpg
 
Last edited:
This one's a pain in the ass. I spent months on it. Bought a very nice digital version of the ACES shell on turbosquid. Converted it to printable files. We included links in the tested videos.
It was a lot of work. I love this helmet.
The hardest part of the helmet is figuring out all the bits and bobs in the ears. I spent ages staring at photos until I understood it. Here's my drawing of how the ears all go together. Brace yourself.
It's a lot of parts. This is an interim drawing I plan to do better than this and release as a poster someday.

I don't have dimensions on these parts as I hand build nearly all of them. NASA engineers work in whole fractions though:
IMG_8631.JPG
 
Here is the mesh Adam's team started with:


It will require some work to create the shells for printing, and separating out all the bits that you don't need for the main helmet shape.

For me, the visor is always the most intimidating part of the build!

Best,
John
 
I can't tell you, though I suspect you already know, how helpful that drawing is. I am convinced that the above picture is the only one of its kind that exists on the internet at this point.

I know Darrell Maloney did the conversion of the digital file for you, but unless I'm going blind I cant seem to find a link to the particular file on tested or youtube. I'm not sure based on licensing who owns the printable file but I am happy to compensate whoever for their craftsmanship, if they are willing to release it.

Thanks again, that drawing is worth its weight in gold for this particular project (DM sent). Ill be sure to post pictures after construction begins.
 
Here is the mesh Adam's team started with:


It will require some work to create the shells for printing, and separating out all the bits that you don't need for the main helmet shape.

For me, the visor is always the most intimidating part of the build!

Best,
John


Thank you!

I already purchased that model and started to take a crack at it, but the truth is 3d modeling, or rather converting it to a printable file, is a little too far outside of my wheelhouse, so I will probably need to commission that out. Once I have the printable files in hand I think I should be able to make something relatively clean
 
Last edited:
For any of those following or still interested I decided to go for it. I took the same model from turbosquid that Adam used for his build and had a 3D artist (Wesley Tarr) start converting the files for me. It has been quite the process taking a model made for VFX and converting it but I think I am over the hump in terms of complexity. The main helmet shell was probably the easiest part. As was suggested, all the parts for the ears were a nightmare. It has taken myself and the artist the better part of 2 months trying to figure out exactly how to model the smaller pieces. I honestly don't think I would have been able to figure it our without Adams diagram, even with close to 300mb of reference pictures. I think we managed to come up with a better understanding of how the visors move.

AssemblyChart (1) (1).jpg


While I wait on a few other parts to be modeled I went ahead and had the shell printed. I For something this size I had to go with PLA, which required a fair amount of work after the print. I like to think I am a pretty handy guy but applying bondo to a compound curve while trying to make it look good was a very humbling experience.

977742-585d39df7255b330618f0668ee634b82.jpg
977743-b474466aca07acc20da2ab47a26ee9c7.jpg
977749-08589e09012e5f76e664a61c7aa0634e.jpg
977750-8a24642de8242e65f9c6d60a8c6e92f5.jpg
977751-73e327545b48f9cb5d3f2ac873887141.jpg

IMG_2927.JPEG


While I wait to get the shell coated I wondered if anyone has had any luck with small runs of CNCd parts and specifically if anyone has had issue converting between OBJ to STP files, the latter which is needed for CNCs. There are a few converters out there but i'm cautious given the price tag of some of the parts to just convert it and cross my fingers.
 

Attachments

  • IMG_2795.JPEG
    IMG_2795.JPEG
    469.8 KB · Views: 370
  • IMG_2796.JPEG
    IMG_2796.JPEG
    521.3 KB · Views: 375
  • IMG_2924.JPEG
    IMG_2924.JPEG
    667.2 KB · Views: 352
  • IMG_2851.JPEG
    IMG_2851.JPEG
    861.9 KB · Views: 278
  • IMG_2849.JPEG
    IMG_2849.JPEG
    885 KB · Views: 359
Looking great, I worked with Wesley on a helmet project similar to yours and he did a fantastic job.
He is a pretty smart guy and definitely talented, I actually have another project lined up for him after this one for the precursor of the ACES (the HGU-20/P) Just out of curiosity was your project the ACES prototype where the visors slid behind a protective shield much like a helicopter or jet helmet?
 
Yeah, that prototype is mine. He messaged me about the ACES if I recall correctly. Wouldn't mind seeing what you have done with the 20/P.
 
Yeah, that prototype is mine. He messaged me about the ACES if I recall correctly. Wouldn't mind seeing what you have done with the 20/P.
Ill be honest not much yet. This has very quickly become an expensive and time consuming project ( to be fair I was warned). I commissioned the same artist that crafted the VFX ACES model to do one for the LEH or launch and entry helmet. The HGU-20/P at least looks far simpler given that its two shells that connect with a hinge, and the visors are considerably smaller and have less curvature to them.
117_v1.jpg
113_v1.jpg
91_v1.jpg
83_v1.jpg
 
Like a lot of projects this one stalled out for a few weeks while work got in the way. That being said I am scheduled to move soon and I am determined to get this done less all the tiny little parts get lost along the way. My initial plan was to mix 3d printing with CNC'd aluminum parts. Turns out the file formats are not compatible or convertible and I was left either printing all the parts or having the parts remodeled in CAD. As much as I fought it, I decided to go with printing. Maybe ill revisit CNC for Version 2.0.

I took the helmet to a local body shop who agreed to paint it for surprisingly cheap, albeit I got a lot of looks walking in to a car repair shop with a space helmet. As pointed out by the original creator extraordinaire, a white glossy coat really does "hide the crimes" and I was super pleased with the results. I was less pleased with my own painting so there will be some more touch ups along the way.

All the parts are starting to come together. Its a doozy for sure. The ones below are only about 80% of the total number. One of the things I think I did rather poorly was allow for tolerances in the models and printing, leading to some fairly expensive reprints

IMG-3124 (1).jpg

IMG-3127.jpg
IMG-3132.jpg
 
Oh man. It's such a satisfying build. I've built three of those now, really love seeing this build come together.
 
Oh man. It's such a satisfying build. I've built three of those now, really love seeing this build come together.

It is a great feeling watching it slowly start to come together!

I know you did quite a bit of in house machining for the aluminum parts. Did you have any of the parts CNCd at all or was it all you? I really went kicking and screaming about printing vs milling, but roughly 6 parts in aluminum were going to cost as much as the entire build, based on the estimates I received, and that was assuming they were able to convert the files.

And thank you for the support, It has definitely been a labor of love but I have banged my head against the wall a few times. I can imagine some of the frustration you must have encountered starting from scratch!
 
Wow! The aluminum parts really add to the authenticity factor for sure. That is some great looking metal work. I think I finally have all the parts, and the plan is to bend the bailer bar today. I have 7 extras, hopefully that is enough.
 
Also, the warm metallic of stainless hardware also makes a huge difference. I slowly replaced every normal screw and bolt with a stainless equivalent. Good luck on the Bailer Bar! It's a pain in the ass. Advice: file down the thin spot in the middle (for the bailer bar release) AFTER bending.
 

Your message may be considered spam for the following reasons:

If you wish to reply despite these issues, check the box below before replying.
Be aware that malicious compliance may result in more severe penalties.
Back
Top