You are using an out of date browser. It may not display this or other websites correctly.
You should upgrade or use an alternative browser.
You should upgrade or use an alternative browser.
Narcissus Builders Club N Stuff.
- Thread starter jedimaster
- Start date
Jason, ha ha, yes and no. I still differ on a couple few things - Martin's nozzles are basically square in elevation whereas mine taper more; the overall height of my engine is slightly greater, as is the cross-sectional area - rivet-counter stuff like that. But I was definitely wrong to think his engines were substantially (10mm or more) shorter than they should be.
Craig, damn right - if God had meant man to work with poly meshes he would have given us computers for brains or something. :lol
:lol
I have three small styrene prototypes in my shed and one abandoned SS armature, so it's not as fast as all that if the original research counts, ha ha. Just kidding, I never got anywhere with it and all credit to Paul and Simon as this really is moving pretty quick. Speaking of, we just wrapped up a morning meeting here at my place, we think we have ways forward on a few questions that had arisen.
We'll be making some changes to the engine seat areas in particular and have a few more plans on how to tackle this or that. Man, that proto looks good in person!
Craig, damn right - if God had meant man to work with poly meshes he would have given us computers for brains or something.
:lolI have three small styrene prototypes in my shed and one abandoned SS armature, so it's not as fast as all that if the original research counts, ha ha. Just kidding, I never got anywhere with it and all credit to Paul and Simon as this really is moving pretty quick. Speaking of, we just wrapped up a morning meeting here at my place, we think we have ways forward on a few questions that had arisen.
We'll be making some changes to the engine seat areas in particular and have a few more plans on how to tackle this or that. Man, that proto looks good in person!
jedimaster
Sr Member
A2B3F790C.jpg[/IMG]
Last edited:
Nice Simon!! It looks great with kit parts in place...
Thanks for the meeting this morning Fellas. It's nice to know we are on track.
Martyn and I will sort out the minor adjustments needed to the engine mounts, and have planned what we need to do for the remaining outstanding items. Everything else is looking good *phew!* :thumbsup
Thanks for the meeting this morning Fellas. It's nice to know we are on track.
Martyn and I will sort out the minor adjustments needed to the engine mounts, and have planned what we need to do for the remaining outstanding items. Everything else is looking good *phew!* :thumbsup
jedimaster
Sr Member
I hate jigsaw puzzles!
D1B1087802.jpg[/IMG]
D1B1087802.jpg[/IMG]
Last edited:
Watertight, hollowed out for print, has the top scoop detail and it's in the print queue, finally! I decided to scribe the panel lines after printing, so I can obsess some more about exact locations before biting the bullet. Also the Evergreen strip detail can be actual Evergreen strip - **** it, as they say.
jedimaster
Sr Member
Solid ones for Jase Martyn. You can foam fill em if ya want but run ya wires first. We ain't doing everything for ya but we didn't want folks to get their hands dirty. You won't be needing a dremmel to build this , just an exacto blade and some glue and ya done.
jedimaster
Sr Member
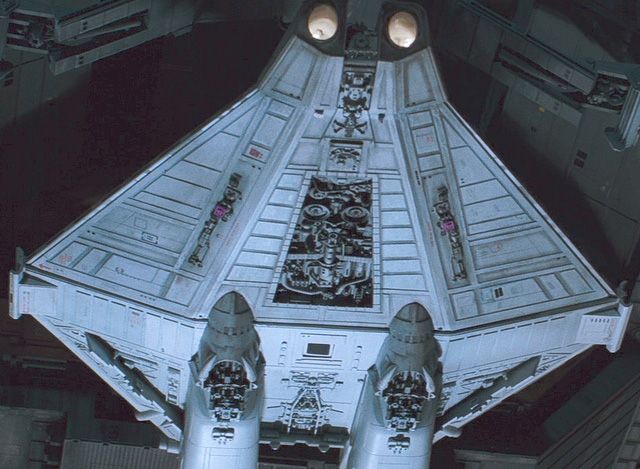
I'm officially signing off on the styrene panels. Everything fits...yeah!!!
http://i754.pho
[IMG]http://i754.ph
Even the "Ole Gal" herself.
[IMG]http://i754.photobucket.com/D3AE-4984-ACC2-E9753D740987-113-0000005307714
http://i754.pho
[IMG]http://i754.ph
Even the "Ole Gal" herself.
[IMG]http://i754.photobucket.com/D3AE-4984-ACC2-E9753D740987-113-0000005307714
Last edited:
jedimaster
Sr Member
Some parts in the pix are just dumped on there for the pix and need some trimming. Gonna post some more I'd pix in a while.
jedimaster
Sr Member
need some help on these. The green in the first pic parts are used 3 times on this model.

The Pink bits in this pic are also used 3 times.
Cheers.
The Pink bits in this pic are also used 3 times.
Cheers.
Looks awesome Martyn.
Watertight, hollowed out for print, has the top scoop detail and it's in the print queue, finally! I decided to scribe the panel lines after printing, so I can obsess some more about exact locations before biting the bullet. Also the Evergreen strip detail can be actual Evergreen strip - **** it, as they say.
Any chance you could send me a dxf of the engine elevations so I can modify the mounts to suit?
I'm officially signing off on the styrene panels. Everything fits...yeah!!!
WoHoo! :cool
Apart from those already discussed, did you find anything that needs tweaking?
I'm going to make a further couple of minor adjustments after studying the reference pics some more. Not really anything to effect the ship itself, but more on how it is constructed. Will work on that this week and look at buying some styrene too now that the layout has been signed off...
:facepalm having some mesh errors appearing on the uploads. Bit of rework.......okay, done. I didn't actually get it in the print queue last night - PC crashed just as the final upload was at 97%, which I took as a sign to go the **** to sleep.
I tried a single-part upload with the nozzle included but it is likely going to be easier to mould as a separate part and slightly cheaper to print that way anyway for some reason. Anyway, HAVE now hit 'print' and should have these in hand in a couple of weeks (now I'll find the rest of the errors, lol.)
Jason, heh! The final part will be hollow though probably not as thin as this (2.5mm wall thickness); might need to clay it a little for casting. It's mainly about saving moolah TBH, since Shapeways charges by the cubic centimetre.
Clamp part also in print queue now. Paul - thanks for that file - I added in the whole structure. I just looked at it and thought 'this might as well be one piece'. It's a deviation from fidelity admittedly, soif we don't like it when we take a look, we can always just cut the extra bits off.
Oh also I redid the strake detail on the nozzle, I'd thinned them down too much. Gone back to thicker strakes, looks better IMO. Old version and new version shown here. Nozzle-less body too, to show that that looks like on its own.
Looks awesome Martyn.
Any chance you could send me a dxf of the engine elevations so I can modify the mounts to suit?
Yep yep, that's up next. I wanted to knock the engine off because of the lead time getting the prints back, now that's done I'll work up a half decent elevation for you.
Also mustn't forget to get the nozzle support details under way, oh yeah and the top engine, hehe.
Revised nozzle looks good Martyn.Yep yep, that's up next. I wanted to knock the engine off because of the lead time getting the prints back, now that's done I'll work up a half decent elevation for you.
No worries on the dxf's - whenever you can - I still have plenty to do!
Look forward to seeing what the clamps look like printed.
Similar threads
- Replies
- 23
- Views
- 995
- Replies
- 10
- Views
- 605
- Replies
- 10
- Views
- 1,131