My Mandalorian Build

Darko

Active Member
Hi all,

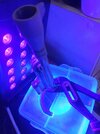
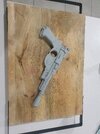
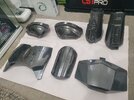
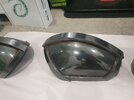
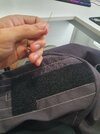
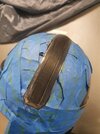
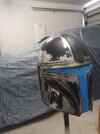
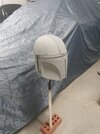
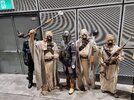
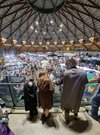
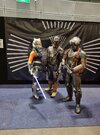
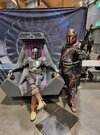
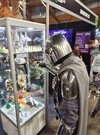
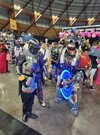
Been a while since ive posted here but I thought I would use this opportunity to talk about and document my Mandalorian costume build. I started the build about a year ago 3d printing and putting together all of the components for my costume and my kids costumes as well, the idea of which was to go as characters to 2022 Sydney Comic Con.

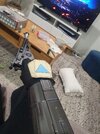
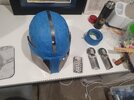
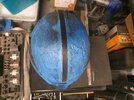
Well we pulled it off, and its a completely different experience going in character which is something we have never done before, but needless to say, we are hooked. As such I am going to document here what I did to make the costume and what I am going to do to improve it before next year, as there was a lot of things I want to improve and things I didn't get to due to time, experience and severely jamming my 3d printer.

Hopefully you all will get something from this for your builds and that I can improve and share that with you all.

This isn't the end but just the beginning.
 

Attachments

  • received_419697683642364.jpeg
    received_419697683642364.jpeg
    252.7 KB · Views: 202
  • received_419749746968466 - Copy.jpeg
    received_419749746968466 - Copy.jpeg
    431.9 KB · Views: 188
  • received_581846740356486 - Copy.jpeg
    received_581846740356486 - Copy.jpeg
    299.9 KB · Views: 189
  • received_658982535424312 - Copy.jpeg
    received_658982535424312 - Copy.jpeg
    278.6 KB · Views: 190
  • received_698117778397050 - Copy.jpeg
    received_698117778397050 - Copy.jpeg
    288.7 KB · Views: 197
  • received_982237346507837 - Copy.jpeg
    received_982237346507837 - Copy.jpeg
    283.6 KB · Views: 203
  • received_6040445995982724 - Copy.jpeg
    received_6040445995982724 - Copy.jpeg
    331.1 KB · Views: 189
Firstly how I got to the point the costume is currently at.

I started initially when I decided I was going to put the kids in costumes for comic con, and after I bought the Black Series Mandalorian helmet, I thought, well I already have the helmet how hard could the rest be. I went looking for good 3d files and from my research the great ape files seemed to be the ones to go with so I bought them from Etsy and started printing.

Now as you know FDM printers produce prints that require alot of work to get to a serviceable state, especially if you want a reflective finish. SO the method I used was.

1. Sand print with 200 grit sand paper just to roughen the surface.
2. Coat the print with UV curing resin the same kind used in resin 3d printers with a brush.
3. Set the resin with a UV light (my UV light is sourced from a DJ light set and it instantly cures the resin).
4. Sand the cured resin.
5. repeat at least 3 times, this results in a perfectly smooth surface, just move up grits of sandpaper each layer about 600 grit is sufficient for the final sand.

The resin sands much easier than the PLA+ print and produces a fantastic finish, you then want to coat with a plastic primer then a primer filler (from an automotive store) and sand that smooth with an above 800 grit.

To do the beskar finish I coated the primed print in a automotive clear coat, (I used 1k but in the future will be using 2k with a catalyst). I then used an artists graphite powder, buffed that into the clear, then did another coat of clear (the clear will eat into the graphite finish so the trick is mist coat first then wet coat, the wet coat you want to follow the wet edge I suggest looking up automotive painting process to see this in action) depending on the part do this 2 to 3 times in layers, for the last clear I would then rub a final buff of graphite on top.

I ended up having to do this to the black series helmet also in order for it to match the finish of the rest of the armor. For the soft parts, I will link the sources but essentially I bought the leather parts from etsy and the gloves were an old set of black leather gloves with the fingers cut off and put over some hardware store yellow leather gardening gloves. The flight suit was sourced from Sky Costume and the cape I bought material from a local fabric store, everything else from the bullets to the right leg armor to the blaster I 3d printed.

The weathering was done with oil paints, mostly raw umber and a set of acrylics used for modelling.
 

Attachments

  • 20220514_082229.jpg
    20220514_082229.jpg
    1.3 MB · Views: 111
  • 20220514_174735.jpg
    20220514_174735.jpg
    1.8 MB · Views: 118
  • 20220802_080211.jpg
    20220802_080211.jpg
    3.1 MB · Views: 133
  • 20220802_080224.jpg
    20220802_080224.jpg
    3 MB · Views: 126
  • 20220910_091838.jpg
    20220910_091838.jpg
    1.6 MB · Views: 133
  • 20220911_200806.jpg
    20220911_200806.jpg
    1.9 MB · Views: 139
So that's where the costume is up to, and now I have a solid base to improve on. My goal is to go head to toe correcting things as I see fit the main things I need to change:

- The cape and boots, I have purchased much nicer recreations of these as my cape wasn't great and the boots didn't match the show at all.
- Beskar finish, I am going to chrome the armor using alclad chrome and a 2k clear as the graphite is just a bit too dark and it is too easy to damage.
- Knee pad, back plate and kidney armor S2 thigh to be added, possibly a jet pack also.
- leather parts fitment, they didn't sit perfectly and require adjustments.
- all missing components such as all bullets, mag chargers, vibroblade to be added high detail parts to be printed with resin 3d printer instead of fdm.
- overall rework of the armor for positioning and improving the surface, repaint using the same paints used in the show (except alumaluster as its too hard to get in Aus for a reasonable price).
- Black series helmet rework.
- Overall weathering passes consistent with what was done on the show.

I have purchased a new airbrush, alclad chrome and a resin 3d printer to start the refresh, I am starting with the Black Series helmet, the helmet is a good base but there are several things that need to change. First the raised inner section of the mow-hawk.
I carefully sanded down the mow-hawk flush then using various files I engraved the center section as seen in the pictures, I then sanded it all completely smooth up to 2000 grit before applying primer.

The ears on the black series are too wide and taper down incorrectly so I am going to remodel them and print them on the resin 3d printer in order to get the correct taper, then black gloss, chrome and weathering this should produce a much more accurate version of the helmet. I have also removed the strapping inside the helmet and I am going to use padding instead to get the position on my head right.
 

Attachments

  • 20221011_171958.jpg
    20221011_171958.jpg
    2.9 MB · Views: 117
  • 20221012_164709.jpg
    20221012_164709.jpg
    3.2 MB · Views: 113
  • 20221012_174753.jpg
    20221012_174753.jpg
    3.8 MB · Views: 111
  • 20221012_184454.jpg
    20221012_184454.jpg
    1.5 MB · Views: 115
  • 20221015_111333.jpg
    20221015_111333.jpg
    1.6 MB · Views: 105
  • 20221015_113357.jpg
    20221015_113357.jpg
    1.3 MB · Views: 118

Your message may be considered spam for the following reasons:

If you wish to reply despite these issues, check the box below before replying.
Be aware that malicious compliance may result in more severe penalties.
Back
Top