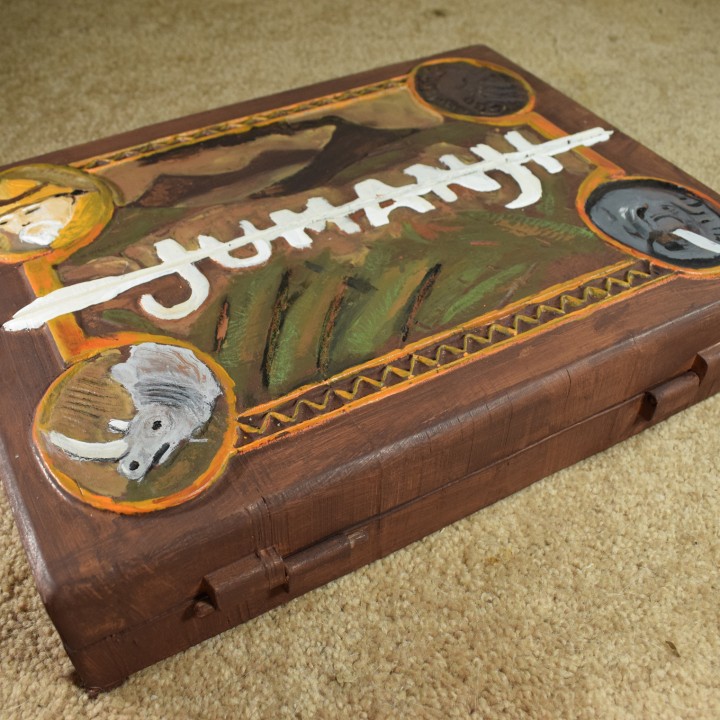
My Jumanji Board

However you used a common house oven at a temperature of around 200°C, right?
Beacuse i like your choice to make the game board camp, it's very nice!
Only a thing...i have read that the clay never become hard..so the clay that you used is a particular clay that after time become hard or however it remain a little soft?

It was supposed to harden, I just didn’t bake it right I think. I do not recall the temperature, but yes it was in a conventional household oven. It was also quite thin and thus a tad brittle.
 
It's been way too long since I've updated this thing... I've been away on various large work projects so my builds have all had to pause. I'm back at it for now I think, so I'll try to post here to keep myself accountable. I started sculpting the playing board the other day, forgot to take pictures, I'll snap some next session. I also opened up my old animated riddles project to give it a makeover. Here is a new version:
There's some odd blips in the render which I will have to investigate. Mostly the big changes involve some slightly more vibrant color treatment, more texture to the green swirly bg as well as a better blur, a little distortion and aberration to look more interesting, update to the focus to look nicer. It's a tad brighter than the original but I think it should pop more and will help with readability once I get it set into the screen.
I've also been thinking up some ways to make it more playable, I'll post once I have my thoughts collected better. I'll be back soon.
 
Last edited by a moderator:
Started working on the playing pieces. My lovely wife is doing the sculpting. The first one came out pretty cool, just a tad too big. hah oops, that's why we measure first hah. I'll still paint it up and we can use it for decoration or something.
2018-03-05 14.31.55.jpg
She gave it another go. Here's the two side by side for comparison. Sculpted in sculpey. After the second one baked I did some minor modifications and cleanup with an xacto.
2018-03-11 20.49.48.jpg
after a bit of cleanup. sanding and a razor blade
2018-03-11 20.49.39.jpg
I hot glued it to a pencil to make it easier to paint...
2018-03-11 20.50.33.jpg
After a couple coats of primer + drying I decided to add some strategic Bondo to do some more touchups.
2018-03-11 22.17.48.jpg
after it dries I will sand off the bondo and re-prime.
 
I'm FINALY finishing this build! I started this 6 years ago, I built the box, sculpted the outside artwork and logo, and attached the rules. I had started sculpting the playing board but due to a clay mishap, and a VERY busy work project, and a couple of moves, it sat unfinished for a couple years.

A while later, I picked it up again and started sculpting the playing board again, but when it was nearly completed it took a tumble off the counter, and I had to start over. Again. My wife sculpted three of the tokens which came out beautifully, and I had fun painting them. Weirdly, the clear coat I sprayed on the elephant reacted weird to the paint and is still tacky all these years later. It was strange that the other two were fine with the same clear coat. I began sculpting the board for the third time, and it died with the same fate as its predecessor. I suppose I should have learned my lesson... Sadly I lost steam and momentum, it was a real bummer. And there the project sat for a while longer.

A year or so later I began again on the board, this time with a different approach. I just couldn't stomach sculpting it for a 4th time. I got about halfway through it and had to stop to make room for two huge long work projects. (As a freelancer I gotta take work when it comes...) And so it sat...

A while later, I Had some time to pick it up again. My half finished approach using layered thin cardboard had warped with time. Bah. And it became apparent that it wasn't going to have the look I wanted. So this time, I came up with a third, more high tech approach. I now have a couple 3D printers to make with. Why not give those a try?

This brings me to now and my most recent adventures!

I took to Photoshop to make a depth map. I had to modify the design a tiny tiny bit as my board dimensions aren't as accurate as they should be. For those unfamiliar, a depth map is a 2D image used to displace 3D geometry. A nice alternative to modeling in some cases, and I'm more comfortable working this way.
2022-12-02 21.03.10.jpg


The model came out pretty good, all things considered.

2022-12-02 21.07.05-1.jpg


I decided to print it on my resin printer, but had to slice it up a ton to fit on the build plate. I forgot to get pictured of the print.

2022-12-02 21.17.47.jpg


Here it is with all the pieces, no cleanup. About an 8 hr print I think.

2022-11-17 23.41.39.jpg


After I glued them together, sanded, and cleaned up the seams, I took it to the garage to prime it. Aaaand the cursed board had a humpty dumpty moment...

2022-11-20 12.56.00.jpg


I glued it back together and fixed the seams. More Sanding, and more primer.

2022-11-21 11.06.11.jpg


And a coat of white paint ready for some color.

2022-11-21 14.57.23.jpg


All Yellow base.

2022-11-21 22.02.34.jpg


Multiple shades of green leaves.

2022-11-22 00.08.16.jpg


Off white trails.

2022-11-22 23.39.26.jpg


Starting a dark brown wash to tie it all together.

2022-11-23 08.59.59.jpg


It's amazing what a bit of weathering does. Always my favorite part.

2022-11-23 10.00.10.jpg


More to follow!
 
Last edited:
Looks great. Are you aware (and you may be...) that by copying the board so closely that there is a different amount of spaces based on where you start your token? Count from beginning to end on each of the four starting places. ;)
 
Jintosh I learned that just recently hah! Pretty on brand for a game that tries to kill you, makes sense that things would be inherently unfair!

When I was a kid I made a board out of cardboard and crayons as best I could from my worn out VHS tape. And I remember thinking that the long sides might have more spaces than the short sides, and that gave me trouble trying to draw it by hand back then. It's funny to have my young suspicions confirmed!
So, now the real brain twister. In the future when 2 adults were playing, and the 2 kids were playing....

....did the adults end up with the longer tracks, and the kids the shorter tracks, or was it somehow random.

If it wasn't random, did the board KNOW THE FUTURE and that kids would be playing and set up the Adults (as kids) with the longer tracks in the first place.
 
That’s a good question. Definitely a brain teaser! Makes me wonder even more about the backstory behind it haha!
 
C6E244F4-ECE9-4346-B3EA-A0BD1CA7E0BA.jpeg

I finally added a magnet to the compartments. They always popped open and the dice would spill everywhere haha. The magnets are some old hard drive magnets, fairly strong for the size and I have a bunch of them. For the opposite side I placed a short screw, which I found I can tighten or loosen to change the distance from the magnet, thus giving me control of how strong I want the lid to stay shut. I was proud of myself for that solution, felt clever haha.

I know the “bump” that holds the screw is the wrong shape. But since the board is already the wrong size and not all that accurate, I decided to take some liberties. This gives me more space to store stuff. It’s just a small scrap of wood I had lying around that I sanded to shape.
 
2022-12-02 22.54.24.jpg


Here's the three tokens my wife sculpted, they look pretty good, but are just a tad too big to fit in the compartments of my board :/ So when we get around to sculpting the monkey we will just keep the 4 of them as display pieces. I may have to repaint the elephant as it's started to chip over time, plus it's still sticky feeling from the strange clear coat mishap...

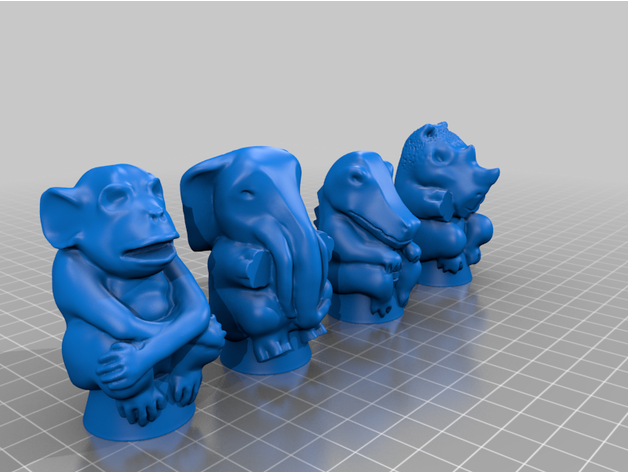
In the meantime, I decided to 3D print the game tokens now that I have a resin printer. I found two sets of models that seemed like possible candidates. (if anyone has better models I'd love to talk!) The monkey I'm going to print in a translucent green resin. Just haven't gotten around to it yet. These ones are ready for primer, then maybe a tiny bit of sanding...

2022-12-02 14.46.38.jpg


For those interested, these are the models I used:

A while ago I stumbled on these fun alternate game pieces. A Lion, Hippo, Worthog, and Zebra. I think it was Jintosh that originally made these? So while I was at it, I decided to throw em on the printer as well. I'll post pictures when I paint them.

2022-12-04 13.53.27.jpg
 
A while ago I stumbled on these fun alternate game pieces. A Lion, Hippo, Worthog, and Zebra. I think it was Jintosh that originally made these? So while I was at it, I decided to throw em on the printer as well. I'll post pictures when I paint them.

Awesome ! Yes, those are my alternate tokens in my FREE STL thread. I'd love to see them printed and painted.
 
View attachment 1644656

Here's the three tokens my wife sculpted, they look pretty good, but are just a tad too big to fit in the compartments of my board :/ So when we get around to sculpting the monkey we will just keep the 4 of them as display pieces. I may have to repaint the elephant as it's started to chip over time, plus it's still sticky feeling from the strange clear coat mishap...

In the meantime, I decided to 3D print the game tokens now that I have a resin printer. I found two sets of models that seemed like possible candidates. (if anyone has better models I'd love to talk!) The monkey I'm going to print in a translucent green resin. Just haven't gotten around to it yet. These ones are ready for primer, then maybe a tiny bit of sanding...

View attachment 1644659

For those interested, these are the models I used:

A while ago I stumbled on these fun alternate game pieces. A Lion, Hippo, Worthog, and Zebra. I think it was Jintosh that originally made these? So while I was at it, I decided to throw em on the printer as well. I'll post pictures when I paint them.

View attachment 1644661
Pm incoming
 
Sorry there haven’t been any updates this week, we had a baby! A bit earlier than we expected hah.

But I finally got some green resin for the printer. And the monkey came out really cool! I will get around to painting the other tokens at some point ha!
4B33427D-0025-4F2D-90D5-2FDB334EA4CE.jpeg
 
I finally got some time to paint the game pieces!

I painted up both of the prints for each piece because I liked them all. Not sure if I'll keep them with the board or put one set on display. There's plenty of space in the compartments to store them all. Haven't decided yet.

I did install some small magnets to the bottom which is fun and satisfying.
2023-01-03 17.19.25.jpg

2023-01-03 17.18.28.jpg

2023-01-03 17.18.31.jpg

2023-01-03 17.18.36.jpg

2023-01-03 17.18.39.jpg


I'm really happy with how these turned out. (sorry for the messy desk and sub par photos)
 
Jintosh I also painted these while I was at it. I'm also happy with these. I'll keep these with the board as well, it's a fun addition.

2023-01-03 17.20.06.jpg

2023-01-03 17.20.17.jpg


After seeing these photos, I may go back and add some more contrast to the warthog, it does look a tad flat compared to the others.
 
Jintosh I also painted these while I was at it. I'm also happy with these. I'll keep these with the board as well, it's a fun addition.

View attachment 1655004
View attachment 1655005

After seeing these photos, I may go back and add some more contrast to the warthog, it does look a tad flat compared to the others.

Beautiful !!! Love the copper LION. Goes with the original iron Elephant. I could not figure out how to paint the Zebra....but that one is perfect as well. I don't even know what you did to the Hippo, but it looks awesome. Old looking.
 
Beautiful !!! Love the copper LION. Goes with the original iron Elephant. I could not figure out how to paint the Zebra....but that one is perfect as well. I don't even know what you did to the Hippo, but it looks awesome. Old looking.
That makes me so happy! I'm so glad you like it!
 

Your message may be considered spam for the following reasons:

If you wish to reply despite these issues, check the box below before replying.
Be aware that malicious compliance may result in more severe penalties.
Back
Top